This article was co-authored by wikiHow Staff. Our trained team of editors and researchers validate articles for accuracy and comprehensiveness. wikiHow's Content Management Team carefully monitors the work from our editorial staff to ensure that each article is backed by trusted research and meets our high quality standards.
There are 9 references cited in this article, which can be found at the bottom of the page.
This article has been viewed 48,808 times.
Learn more...
Puzzle rings were traditionally used to check for loyalty in a marriage. Taking off a puzzle ring could cause it to fall apart, and since they are tricky to put back together, one spouse would be able to tell if the other had taken off the ring. Once you get the hang of putting puzzle rings together, however, there's no risk in letting it fall apart, which is the main reason puzzle rings are worn for fun nowadays. Learn the trick and you'll be able to reassemble the ring in just a couple of minutes!
Steps
Figuring out a 4-, 6-, 7-, or 8-Band Puzzle Ring
-
1Bring together the outside bands. These bands are curved on 1 side. Bring them together so that the rounded edges are facing out. This will form a rounded diamond shape where the knot will go.[1]
- For a 4-band ring, there will be 2 outside bands. For a 7- or 8-band ring, there will be 4 outside bands. Bring them together so that the 2 bands that curve in the same direction fit together. All 4 bands will make a diamond shape when they are lined up.
- The process is very similar for a 6-band ring. A 6-band ring will have either 2 or 4 bands that form a diamond.
-
2Rotate the inside bands so that they hang by the knot. Hold the outside bands together with one hand. Using the other hand, rotate the inside bands so that they are hanging from the outside bands by the bent knot part of the ring.[2]
- For a 4-band ring, 2 bands will hang down by the knot. For an 8-band ring, all 4 inside bands will hang. For a 7-band ring, 3 will hang down.
- For a 6-band ring, either 2 or 4 bands will hang by the knot, depending on the number of outside bands.
Advertisement -
3Locate the band or bands with a groove and hold it firmly in place. Depending on how many inside bands there are, 1 or 2 will have a groove in the knot. This groove will keep all of the other bands together. Hold them firmly with 2 fingers.[3]
- For a 4-band ring, there will be 1 grooved band. For a 7- or 8-band ring, there will be 2 grooved bands.
- For a 6-band ring, there can be either 1 or 2 grooved bands, depending on how many inside bands there are.
-
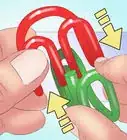
4Cross the 2 inside bands over each other by the knot. With the grooved ring firmly in place, cross the other inside band over the top of it. The band will fit perfectly into the groove. You will be able to see the X through the diamond created by the outside rings.[4]
- The inside rings will fit perfectly one over the other. If they don't align perfectly, try crossing them the opposite way.
- For an 8-band ring, one pair of bands will cross over the other pair. Treat each pair like it is a single band.
- For a 7-band ring, treat the smaller pair of bands as a single band, and cross the single, bigger band over the 2 smaller bands.[5]
- For a 6-band ring, treat any pair as a single band.
-
5Let go of the outside bands. While you hold the inner bands firmly in place, let the outside bands fall to the sides. One of the outside bands will be on top of the other.[6]
- For an 8-band ring and some 6-band rings, let the 4 outside bands fall. For 4- and 7- and some 6-band rings, only 2 outer bands will fall.
-
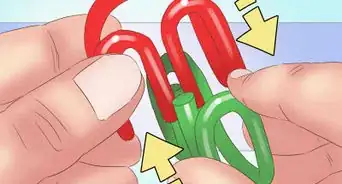
6Thread the outside bands into place. Take the outside ring at the bottom and turn it towards you until the knot passes through the X. Then fit the rings together so that the bands line up. Repeat this process with the other remaining bands.[7]
- You may have to loosen the X for the bands to pass through.
- For 4- and some 6-band rings, you will need to turn 2 bands into place.
- For a 7-, 8-, and 6-band rings with 4 inside bands, turn one band at a time starting with the outermost band.


Putting Together a 3-Band Puzzle Ring
-
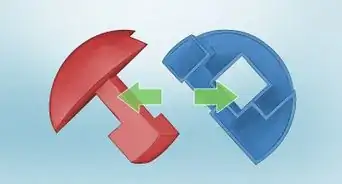
1Interlock 1 of the end bands with the center band. It doesn't matter which end you start from. Slide the center band into place so that the grooves interlock. The bands will align.[8]
- There may be a mark on the inside of the ring indicating where to hold it so that it will most easily slide into place.
-
2Rotate the third band so that the knot is facing upwards. Hold the 2 interlocked bands in place with 1 hand. Rotate the third band with your other hand so that the knot is facing upwards, towards the other knots.[9]
- Hold the 2 interlocked bands loosely to be able to rotate the third band.
-
3Slide the third band into place. The third band will be between the other 2. Gently fit the 3 rings together.[10]
- All of the interlocking parts should fit perfectly together. If they don't, the first 2 bands probably weren't aligned correctly.


References
- ↑ https://johnrausch.com/PuzzleWorld/msc/puzzle_ring_solution.htm
- ↑ https://johnrausch.com/PuzzleWorld/msc/puzzle_ring_solution.htm
- ↑ https://youtu.be/huoFQSu7Cvo?t=142
- ↑ https://youtu.be/huoFQSu7Cvo?t=167
- ↑ https://youtu.be/luGwNrQUl98?t=100
- ↑ https://youtu.be/huoFQSu7Cvo?t=306
- ↑ https://youtu.be/huoFQSu7Cvo?t=343
- ↑ https://youtu.be/0qUFCCtaR68?t=32
- ↑ https://youtu.be/0qUFCCtaR68?t=84
About This Article