This article was co-authored by wikiHow staff writer, Finn Kobler. Finn Kobler graduated from USC in 2022 with a BFA in Writing for Screen/Television. He is a two-time California State Champion and record holder in Original Prose/Poetry, a 2018 finalist for the Los Angeles Youth Poet Laureate, and he's written micro-budget films that have been screened in over 150 theaters nationwide. Growing up, Finn spent every summer helping his family's nonprofit arts program, Showdown Stage Company, empower people through accessible media. He hopes to continue that mission with his writing at wikiHow.
There are 13 references cited in this article, which can be found at the bottom of the page.
This article has been viewed 2,419,464 times.
Learn more...
So you’re looking for a tutorial on how to solve your Rubik’s cube. But every site you come across moves way too fast and uses terms so complicated they might as well be words in a foreign language. If you’re tired of these frustrations and want an easy-to-follow solution to Erno Rubik’s colorful conundrum, you’ve come to the right place.The layer-by-layer method has been used across the globe to help beginners and experts alike conquer the infamous Rubik’s puzzle without breaking a sweat. In this article, we’ll give you a simple outline of the layer-by-layer method and plenty of expert tips that’ll have you cracking the code in no time!
Steps
Learning the Terms
-
1Remember the three types of pieces. Before you begin solving your cube, memorize the types of pieces you’ll be rotating. There are 3 main types of piece on the Rubik's Cube, named after their positions:[1]
- Center pieces are located in the center of each face, surrounded by 8 other pieces. They have only 1 visible face, and do not move.
- Corner pieces are located at the corners of the cube. Each one has 3 visible faces.
- Edge pieces are located between the corner pieces. Each one has 2 visible faces.
- Pieces can never switch types. A corner piece will always be at a corner and a center piece will always be in the center.
-
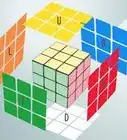
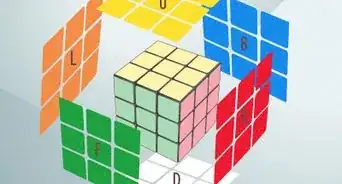
2Learn how to talk about the 6 faces. The Rubik's Cube has 6 faces (sides), each with a different color center. When referring to each color face, always go by the color of the center piece, regardless of where the other colored pieces are. You can also refer to faces by their position on the cube when you hold it at eye-level. These positions are:[2]
- F (Front) — the face you’re looking at when you hold the cube directly in front of you
- B (Back) — the face directly opposite you (not visible)
- U (Upper) — facing up, toward the ceiling
- D (Down) — facing down, toward the floor
- R (Right) — facing to your right
- L (Left) — facing to your left
Advertisement -
3Differentiate clockwise and counterclockwise rotation. Understand that the terms "clockwise" and "counterclockwise" always assume you are looking directly at the face you are working on. A 1-letter instruction (such as L) means to rotate that face clockwise 90º (one quarter turn). 1 letter plus an apostrophe (such as L') means to rotate that face counterclockwise 90º. Here are a few other examples of rotations:[3]
- F' — rotate the Front face counterclockwise
- R — rotate the Right face clockwise
- L — rotate the Left face clockwise
- U' — rotate the Upper face counterclockwise (towards you)
- B — rotate the back face clockwise
-
4Rotate twice if the number 2 is after the letter. The number "2" after an instruction means you have to turn the face 180º instead of 90º. For example, D2 means rotate the down face 180º (two quarter turns).[4]
- There's no need to specify clockwise or counterclockwise for 180° turns. Either way, the face will end up in the same position.
-
5Memorize the shorthand for specific pieces. To help yourself better understand various cube-solving instructions, learn the terms for specific pieces on a Rubik’s Cube. Shorthand generally refers to the specific face each piece is a part of. For example:[5]
- BD (Back Down) refers to the edge piece that belongs to the Back and Down faces.
- UFR (Upper Front Right) refers to the corner piece with 1 square each on the upper, front, and right faces.
- If the instructions refer to a square (a single colored sticker), the 1st letter tells you which face the square is found on. For example: if you need to find an LFD square (Left Front Down), check the left face. If you need to find a BRE square (Back Right Edge), check the back face.
Solving the Upper Face
-
1Turn your cube so the white center is on the U face. Rotate your Rubik’s Cube so the white face is toward the ceiling. 1 piece at a time, you will be rotating and positioning the white edge pieces around the white center, so it forms a '+ sign' or cross on the top of your cube.[6]
- Do not move the white center off of the Upper face until specifically told to do so.
-
2Move white edges to the upper face to form a cross. Locate the position of each of the white edge pieces on your Rubik’s Cube. Depending on where each edge piece is placed, use one of the following configurations to bring the white edges to the U face.[7]
- If there's a white edge piece in the bottom row of the R or L face, rotate that face once in either direction to bring the white square to the middle row.
- If there's a white edge square in the middle row of the R or L face, rotate either the F or B side (whichever is next to the white square) in either direction until that white square is on the Down face.
- If there's a white edge square on the Down face, rotate the Down face in either direction until the white square is directly opposite an empty (non-white) edge space in the Upper face. Turn the entire cube so that non-white face is located at UF (Upper face, next to Front face). Then, rotate F2 (forward 180º) to bring the white square into that UF position.
- Repeat for each white edge square, until they are all on the upper face.
-
3Extend the cross down to the corners. Take a look at the upper edge pieces on the F, R, B, and L faces. Ensure each upper edge piece extends down to a center of the same color. For example, if the edge square FU (front face, next to upper face) is orange, then the F center square should also be orange.[8] If the FUE (Front Upper Edge), RUE (Right Upper Edge), BUE (Back Upper Edge), and LUE (Left Upper Edge) pieces do not match their color faces, use the following methods to match these squares:
- Rotate the U face until at least 2 of F, R, B, or L faces have matching center and upper edge. (If all 4 match, skip the rest of this step.)
- Re-position the whole cube so one of the incorrect edges is on the F face (and the white cross is still on the U face).
- Rotate F2 and confirm that one white edge is now on the D face. Check the other color on the same piece (position FD). For this example, this square is red.
- Rotate the D face until the red square is directly beneath the red center.
- Rotate the red face 180º degrees. The white edge should return to the U face.
- Check the D face for a new white edge square. Again, look for the other color attached to the same piece. For this example, the square’s color is green.
- Rotate the D face until the green square is directly beneath the green center.
- Rotate the green face 180º. The white cross should now be back on the U face. The F, R, B, and L faces should all have a matching center piece and upper edge.
-
4Bring the white corners to the white U face. Find a corner piece on the D face that includes white. (The white square does not necessarily have to be on the D face, as long as it’s attached to a corner piece that is.) The corner piece should have squares of 3 different colors. For this example, we’ll use blue and orange. Complete the following permutations:[9]
- Rotate the D face until the white/blue/orange corner piece is between the blue and orange faces. (Remember, the "blue face" is the face with a blue square as its center piece.)
- Turn the entire cube so the white/blue/orange corner piece is in the DFR position, but don't worry about the exact position of each color on this piece. The F and R center squares should match the colors blue and orange. Note that the Upper face is still white
- From here there are three possibilities for the corner piece:
- If the white square is on the Front face (FRD position), apply F D F'.
- If the white square is on the Right face (RFD position), apply R' D' R.
- If the white square is on the Down face (DFR position), apply F D2 F' D' F D F'.
-
5Repeat with the remaining corners. Use the same process to bring the 3 other white corners to the white face. At the end of this step, you should have a completely white Upper face. The F, R, B, and L faces should all have an upper row of 3 squares (resembling a T shape) that match the center color.[10]
- Sometimes, a white corner happens to already be in the U (white) face, but in the wrong position, so the other 2 squares do not match the center on the same face. If this happens, turn the cube so that white corner is in the UFR position, then apply F D F'. Now the white square is in the D face, and you can move it to the correct position as described above.


Creating the Middle Layers
-
1Find an edge piece in the D face that does not have yellow in it. With the white face still in the U position (and the incomplete yellow face in the D position), check the D face and find an edge piece that does not have any yellow on it. Make a note of the 2 colors on this edge piece:[11]
- Label the color on the D face color X.
- Label the other color on the same piece color Y.
- You must have an edge piece to perform this step. Do not attempt this step with a corner piece.
-
2Turn the whole cube until the X center is the Front face. Rotate the entire cube on its vertical axis (like a globe would spin). Stop when the face with a center square of color X is the new Front face.[12]
- The U and D faces should stay the same during this movement.
-
3Rotate the Down face. Rotate the Down face in either direction, until the X/Y edge piece is in the DB position. The colored X square should be on the Down face, and the colored Y square should be on the Back face.[13]
-
4Rotate the cube depending on the position of color Y. Use an algorithm to get the top 2 layers of the F, L, R, and B faces to match their colored centers. The exact algorithm you’ll be using depends on where the center with color Y is located:[14]
- If color Y matches the center of the R face, apply F D F' D' R' D' R.
- If color Y matches the center of the L face, apply F' D' F D L D L'.
-
5Repeat this step until the top 2 layers are finished. Find a new edge piece on the D face with no yellow squares. (If you can't find one, go to the next step.) Repeat the above steps in this section to move it to the correct position. Once you're finished, the F, R, B, and L faces should each have matching top and middle rows.[15]
-
6Make adjustments if all of the D edge pieces include yellow. Check all 4 edge pieces on the D face. Each one has 2 colored squares, and both squares must not be yellow for the steps in this section to work. If none of the edge pieces match this description (and the top 2 layers aren't finished yet), make the following adjustments:[16]
- Pick an edge piece that does contain yellow.
- Rotate the whole cube so this edge piece is in the FR position. The white face should still be on top. (Do not change any faces; just turn the entire cube.)
- Apply F D F' D' R' D' R.
- Now you should have a non-yellow edge piece on the D face. Go back to the start of this section and repeat the instructions for that edge piece.


Completing the Yellow Face
-
1Turn the cube so the U face has a yellow center. Turn the cube upside down so the fully-solved white face is in the D position and the unsolved yellow face is in the U position. The cube will remain with yellow as the U face until it is completely solved.[17]
-
2Make a cross on the yellow face. Note the number of yellow edges on the U face. (Remember, corners are not edge pieces). Then, much like you did with the white face, configure your cube to create a ‘+’ shape with the yellow edge pieces. Use 1 of the following algorithms, depending on the position of the yellow edges:[18]
- If there are exactly 2 opposite yellow edges on the U face, rotate the U face until the two edges are in the UL and UR positions. Then, apply B L U L' U' B'.[19]
- If there are exactly 2 adjacent yellow pieces, UF and UR (like an arrow pointing to back left), apply B U L U' L' B'.
- If there are no yellow edges, apply either of the above move sequences. This should bring 2 yellow edges to the top. Use one of the sequences above again, depending on where the edges are located.
- If there are 4 edges, you're done creating the yellow cross. Go to the next step.
-
3Bring a yellow corner to the U face. Turn the whole cube until the blue face is in Front, and the yellow face is still the Upper face. Use the following configurations to move the yellow corner in place as follows:[20]
- Rotate the U face until the UFR corner piece does not have yellow on the Upper face.
- If this corner piece has yellow on the F face, apply F D F' D' F D F' D'.
- If this piece has yellow on the R face, apply D F D' F' D F D' F'.
-
4Repeat with the remaining yellow corners. Keeping blue as your Front face, rotate the U face to bring another corner to the UFR position. Repeat the step above to move the yellow to the Upper face. Repeat until the entire Upper face is yellow.[21]
- At this point, the cube is going to look scrambled. Don't worry! It will fix itself in the final steps.


Finishing the Puzzle
-
1Match an edge piece with its colored center. Rotate the U face of your cube until exactly 1 edge piece is on its appropriate color face. For example, if the F face has a blue center, rotate the U face until the square above the blue center is also blue.[22]
- You must have exactly 1 edge piece that matches the center, not 2 or 3.
- If all 4 edge pieces line up with the matching center, line them up and skip down to complete the cube. If this is not possible, apply R2 D' R' L F2 L' R U2 D R2 and try again.
-
2Position the remaining edge pieces. Once you've lined up exactly 1 of the 4 edge pieces, turn the cube so the matching edge piece is on the L face. Then, check if the FU square matches the R center and configure accordingly:
- If the FU square matches the R center, apply R2 D' R' L F2 L' R U2 D R2 and move on to the next step. The cube should now be finished except for the corners.
- If the FU square does not match the R center, apply U2 and rotate the whole cube as if it were a globe.The F face will now become the R face. Apply R2 D' R' L F2 L' R U2 D R2.[23]
-
3Complete the cube using an algorithm. To get the remaining corners in place, rotate your cube so the corner you’re trying to match is in the FUR position.[24] The FUR square should also match the F center color.
- If none of your corners are in the correct position, apply L2 B2 L' F' L B2 L' F L'. Repeat until you have a corner in the correct position.
- Apply L2 B2 L' F' L B2 L' F L' to get each corner to its desired face. You have now solved the Rubik's cube!

Community Q&A
-
QuestionIs there an easier way to do it?
 wikiHow Staff EditorThis answer was written by one of our trained team of researchers who validated it for accuracy and comprehensiveness.
Staff AnswerwikiHow Staff EditorStaff AnswerThe layer-by-layer method is the easiest method for beginners. There are alternative Rubik's Cube solving methods that are faster, but they're more difficult. -
QuestionWhat are easy methods for solving a Rubik's cube?
 Community AnswerThis is one of the simplest methods. Check out YouTube video tutorials by Badmephisto and Dan Brown.
 -
QuestionIs there a shorter way to do it?
 Community AnswerYes, there are shorter ways. These include many speed methods, such as the Fridrich method, which combines the white corners step with the second layer step, the yellow edges step and the yellow corners step, and the positioning of edges step and the positioning of corners step.
-Step-9.webp)
References
- ↑ https://mzrg.com/rubik/mech.shtml
- ↑ http://www.rubiksplace.com/move-notations/
- ↑ https://www.randelshofer.ch/rubik/patterns/doc/supersetENG_3x3.html
- ↑ https://www.randelshofer.ch/rubik/patterns/doc/supersetENG_3x3.html
- ↑ https://mzrg.com/rubik/mech.shtml
- ↑ https://youtu.be/vlp0-_OPRwA?t=89
- ↑ https://cube.stanford.edu/class/files/rubiks_cube_solution.pdf
- ↑ https://cube.stanford.edu/class/files/rubiks_cube_solution.pdf
- ↑ https://assets.ctfassets.net/r3qu44etwf9a/6kAQCoLmbXXu29TTuArrk1/404118e1f9bfb6f9997157a284bbc572/Rubiks_Solution-Guide_3x3.pdf
- ↑ https://assets.ctfassets.net/r3qu44etwf9a/6kAQCoLmbXXu29TTuArrk1/404118e1f9bfb6f9997157a284bbc572/Rubiks_Solution-Guide_3x3.pdf
- ↑ https://youtu.be/vlp0-_OPRwA?t=695
- ↑ https://youtu.be/vlp0-_OPRwA?t=725
- ↑ https://www.cs.brandeis.edu/~storer/JimPuzzles/RUBIK/Rubik3x3x3/SOLUTIONS/Rubik3x3x3SolutionJeays.pdf
- ↑ https://www.cs.brandeis.edu/~storer/JimPuzzles/RUBIK/Rubik3x3x3/SOLUTIONS/Rubik3x3x3SolutionJeays.pdf
- ↑ https://www.cs.brandeis.edu/~storer/JimPuzzles/RUBIK/Rubik3x3x3/SOLUTIONS/Rubik3x3x3SolutionJeays.pdf
- ↑ https://youtu.be/JLrxTW8poOg?t=283
- ↑ https://cube.stanford.edu/class/files/rubiks_cube_solution.pdf
- ↑ https://www.cs.brandeis.edu/~storer/JimPuzzles/RUBIK/Rubik3x3x3/SOLUTIONS/Rubik3x3x3SolutionJeays.pdf
- ↑ https://youtu.be/637mYMLUf8s?t=140
- ↑ https://www.cs.brandeis.edu/~storer/JimPuzzles/RUBIK/Rubik3x3x3/SOLUTIONS/Rubik3x3x3SolutionJeays.pdf
- ↑ https://www.cs.brandeis.edu/~storer/JimPuzzles/RUBIK/Rubik3x3x3/SOLUTIONS/Rubik3x3x3SolutionJeays.pdf
- ↑ https://www.cs.brandeis.edu/~storer/JimPuzzles/RUBIK/Rubik3x3x3/SOLUTIONS/Rubik3x3x3SolutionJeays.pdf
- ↑ https://www.speedcubereview.com/oll.html
- ↑ https://youtu.be/3NYzeX8eE_4?t=927
About This Article

To solve a Rubik’s cube with the Layer method, start by shifting the cube until you have five cubes of the same color in a cross shape on one side of the cube. Then, find a corner piece with the same color as the side you’re working on, but on the opposite side of the cube. Move it to the correct location using 1 of 3 formulas, based on where the square is. Once you’ve solved the top of the cube, the top layer of the four sides should also be solved and you can start working your way down. Keep reading to learn how to use the formulas to move the squares!