This article was co-authored by Ayad Mirjan. Ayad Mirjan is a Dry Cleaner and Laundry Specialist and the Founder of OrangeBag®, a toxin-free, sustainable, Los Angeles-based laundry and dry cleaning delivery service. Ayad has over four years of experience in the industry and he specializes in providing easy laundry and dry-cleaning solutions to professionals, families, and businesses. Ayad received his Bachelor's degree from The University of California, San Diego, and an MBA from Henley Business School. He is also a board member of the Entrepreneur's Organization Accelerator (EOA).
There are 7 references cited in this article, which can be found at the bottom of the page.
This article has been viewed 362,298 times.
Starching a shirt is one of the best ways to provide the garment with a look that is crisp and fresh. Apart from minimizing wrinkling and providing a more polished appearance, starch also can help protect the fiber of the shirt and make it possible to enjoy more years of wear. The secret to getting the most out of starching a shirt is knowing how to prepare the garment, managing the proper mixture of the starch, and applying just the right amount to the surface of the fibers. You can use store-bought starch, or create a mixture out of corn starch or vodka.
Steps
Starching with Store-bought Products
-
1Buy starch. You can buy starch from the store rather than making your own mixture. Most grocery stores will have starch in the laundry aisle. You can purchase it in liquid or powder form. A few good brands of starches are Niagra Spray Starch, Sta-flo, Dr. Beckmann, and Easy on Double Starch.
-
2Mix starch. If using powdered starch, you will need to mix it with water before use. Take four tablespoons of starch and add it to one pint of hot water in a bowl or jug. Stir until the mixture resembles milk. Then, pour the mixture into a spray bottle for use.
- You can use the amount of water and starch recommended above, but you should check with the directions on the starch label before creating the mixture.
Advertisement -
3Start with a clean shirt. Prepare the shirt by unbuttoning any buttons on the shirt, including the sleeve and collar buttons. Remove stains before washing by working a little detergent into them with a cloth, or by using a stain remover pen. Then, wash it on the delicate or normal cycle, depending on the instructions, amount of stains, and durability of the fabric. Next, put the shirt on a hanger to air dry.[1]
- Avoid putting the shirt into the dryer unless necessary. If you do put it in the dryer, use a low heat setting.
-
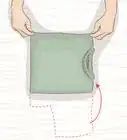
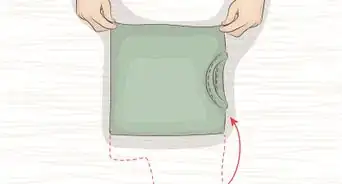
4Position the clean shirt on an ironing board. Lay the garment on the board so that the two halves of the front are hanging over the sides, while the back of the shirt is flat on the surface of the board. You will start by starching the front of the shirt.[2]
-
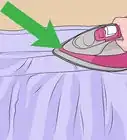
5Spray the starch on the front of the shirt. Apply the starch in a light and even coat across the expanse of the shirt. Wait a couple of seconds to allow the product to seep into the material of the garment. Then, press lightly using an iron set to the recommended heat level for the material.
- If a heat level is not recommended, use a high heat setting so that you will cook the starch.
-
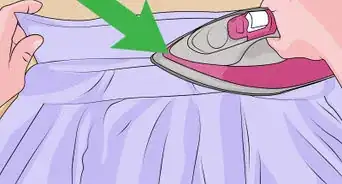
6Repeat on the back of the shirt. Turn the garment so that the back of the shirt is facing up on the ironing board, and then apply an even coating of starch. Iron carefully the back of the shirt. Continue the process by starching and ironing each arm, finishing the job with an application of the starch to the collar.
-
7Hang the shirt immediately. Place the garment on a shirt hanger, and allow the garment to be exposed to fresh air for a couple of moments before placing it in a closet. This will provide time for the starch to finishing adhering to the fibers of the garment and provide a superior hold, creating the crisp texture and look that you want.


Using Corn Starch
-
1Create the mixture. You can make your own starch mixture out of cornstarch and water. Mix 1 ½ tablespoons of cornstarch with 2 cups of water. Stir it until it looks milky. Pour the mixture into a bowl or into the sink. Add warm water until the sink or bowl is nearly filled.[3]
- You should have enough water in the bowl or sink so that the shirt can move freely. Not enough water can result in a board stiff shirt.
- Use distilled water if you have hard tap water. If not, tap water should be fine to use.
-
2Immerse the shirt into the bowl. If the shirt is colored, turn it inside out. Then, immerse the shirt into the water. Work it through and then squeeze out the excess water. You should only immerse one shirt into the water at a time.
-
3Put the shirt into the washing machine. You can also choose to starch the shirt in the washing machine rather than soaking it with your own hands. Allow the shirt to run through one regular wash cycle and then pause it as it reaches the final rinse through the drum. Then, pour the mixture into the fabric softener dispenser, or directly into the flow of water.
- Do not pour the mixture in and allow it to sit in the dispenser throughout the entire washing cycle, or it may cause clogging.
-
4Hang the shirt to dry. Put the shirt on a hanger and allow it to dry until it is damp. Once it is damp, remove it from the hanger. Iron it while it is still slightly damp. This will make the shirt crisp and wrinkle free.
- Make sure not to use too high of a heat setting if your shirt is made of a delicate fabric.
- Alternatively, you can mix ½ cup of cornstarch with 1 pint of cold water in the bucket.
- Boil water, 2 quarts for heavy starch, 4 quarts water for medium starch, and 6 quarts for light starch.
- Add the boiling water to the first mixture. Dip the clothing in the water and let it dry. Iron it as you usually do.


Making Vodka Starch
-
1Prepare the shirt in advance. In order to get the best results, wash and thoroughly dry the shirt before attempting to apply any type of starch to the garment. Washing removes any dirt or grime that could interfere with the stiffening properties of the starch, as well as inhibit the ability of the product to protect the fibers in the weave of the shirt.
-
2Make a mixture. Vodka is great for cleaning, disinfecting, and freshening rooms. It can also be used to make fabric crisper. Use 1/3 cup of vodka and mix it with 2/3 cups of water. Shake to combine and pour the mixture into a spray bottle.[4]
- Any type of non-flavored vodka will work.
-
3Lay the shirt on an ironing board. Lay it with the front side up on the ironing board. Turn on the iron onto the highest heat setting possible for the type of fabric. Spray the mixture evenly throughout the shirt. Iron the inside of the shirt first. Then, iron the collar, cuffs, sleeves, and the rest of the shirt. Repeat the process on the back side of the shirt.[5]
- The back of the shirt creases easier than the front of the shirt. Make sure the back is flattened out completely on the ironing board.
-
4Hang it up. Carefully put the shirt onto a hanger. Hang it in a place where it will not be touched by anything or too close to other clothes. Let it hang overnight and then hang it in its usual place in the closet.


Community Q&A
-
QuestionShould you starch a shirt that is 3% spandex?
 Community AnswerNo, you shouldn't, because spandex is a very delicate material.
 -
QuestionCan I buy a starch product to go in the washing machine instead of a spray?
 Community AnswerLiquid starch can be added to the rinse cycle. There are many brands available. Follow the directions on the label.
 -
QuestionCan I use rubbing alcohol instead of vodka?Community AnswerNo. Vodka is made from potatoes, and potatoes have a high starch content, which is why you can use vodka to starch a shirt. Rubbing alcohol does not contain starch.
Things You'll Need
- Starch
- Vodka
- Water
- Iron and Ironing Board
Warnings
- Too much starching can reduce a shirt’s lifespan. Try to limit starching to every other cleaning of the shirt.⧼thumbs_response⧽
- Starch can make a shirt stiff and brittle. You can remove starch by soaking the shirt in a large bucket filled with water, table salt, and baking soda. Then, wash it in the washing machine. Repeat the process if necessary.[7]⧼thumbs_response⧽
- Starch can be scratchy and irritating to sensitive skin. Use a different type of starch if it does irritate your skin.[8]⧼thumbs_response⧽


References
- ↑ http://propercloth.com/reference/how-to-wash-a-dress-shirt/
- ↑ http://pioneerthinking.com/home/how-to-use-starch-on-mens-dress-shirts/
- ↑ http://brendid.com/3-ways-make-non-toxic-spray-starch/
- ↑ http://brendid.com/3-ways-make-non-toxic-spray-starch/
- ↑ http://pioneerthinking.com/home/how-to-use-starch-on-mens-dress-shirts/
- ↑ http://www.greenercleaner.net/using-starch-for-dry-cleaning/
- ↑ https://www.reference.com/home-garden/remove-starch-shirt-233d82c19d28678d
- ↑ http://www.greenercleaner.net/using-starch-for-dry-cleaning/
About This Article

Starching a shirt will minimize wrinkling and make it look crisp and fresh. To starch a shirt, you’ll need powdered starch, hot water, a spray bottle, and an iron. Start by mixing 4 tablespoons of powdered starch and 1 pint of hot water in a bowl. Then, pour the mixture into a spray bottle, and spray the mixture over the front of your shirt. Iron your shirt on high heat, then repeat on the back and the arms. When you’re finished, hang your shirt on a hanger so the starch dries. To learn how to make your own starch with corn starch, keep reading!