This article was co-authored by Sarah Fogle. Sarah Fogle is a DIY Home Improvement Specialist and the creator of Ugly Duckling House. With over a decade of experience, Sarah specializes in beginner-friendly home remodeling projects. Sarah holds an MBA from Georgia State University. She has been featured in multiple publications including Better Homes and Gardens and Make Magazine. She has also partnered with brands such as Lowe's, Home Depot, and Martha Stewart Crafts.
There are 10 references cited in this article, which can be found at the bottom of the page.
This article has been viewed 41,970 times.
Finishes are great for protecting wood, but they start to look dingy over time. If your wood furniture or flooring needs to be revitalized, consider stripping off the old finish. It’s important to first protect yourself from the harsh treatment used on wood. Then, choose a chemical stripper for paint and varnish or a solvent for shellac and lacquer. If you would rather do it the old-fashioned way without chemicals, fire up a sander to wear away any type of finish. Take away the old finish to prepare wood to receive a new coating and a fresh look.
Steps
Protecting Yourself and Your Work Area
-
1Move the wood to a well-ventilated area, if possible. Try to move your project to a place where it won’t be disturbed. If you are able to work outdoors, in a garage, or another open area, set up there. Open up nearby doors and windows and turn on any ventilation systems you have. Also, keep other people and pets out of the area until you’re finished working.[1]
- If you need help ventilating the area, use fans to circulate air. Place a box fan in the nearest window to help blow air out, for instance.
- The stripping process gets a little messy, so working in a controlled environment helps protect your home in addition to ventilating the fumes from the stripping product you use.
-
2Put on a respirator mask, rubber gloves, and other safety gear. You will need to wear a respirator at all times when working with strong chemicals and solvents. Also, cover up as much skin as possible with gloves, safety glasses, a long-sleeved shirt, and long pants. If you’re sanding, all you really need is a dust mask to protect against debris kicked up by your tools.[2]
- The oldest chemical stripping products contain something called methylene chloride. It’s very strong, so it’s nothing to take chances with. There are newer chemical strippers that don’t use methylene chloride and at least don’t smell quite as bad as the old ones.
- Solvents like lacquer thinner also are pretty strong, so keep your safety gear on. The same goes from protecting yourself against debris while you’re sanding.
Advertisement -
3Use a drop cloth and painter’s tape to cover areas you won't treat. That includes upholstery as well as metal components like nails, screws, doorknobs, and hinges. If you are able to remove these parts, take them out and set them aside. Otherwise, cover them up to prevent them from getting damaged. Also, consider putting a drop cloth underneath the wood to catch any mess, especially if you’re working over a finished wood floor.[3]
- All of the protections you need are available online or at most hardware stores. Pick them up while you’re getting the products you need to strip away a finish.
- Drop cloths are great for covering large areas like on upholstered furniture. You can use straight pins to hold the drop cloth to the fabric.
- Damage prevention is part of the process. It may not seem like a big deal now, but taking the proper precautions now means fewer mistakes to fix later.


Using a Chemical Stripping Product on Paint and Varnish
-
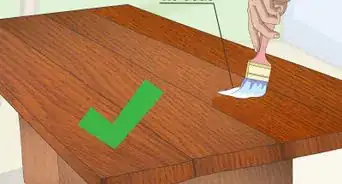
1Apply a thick coat of the chemical using a nylon brush. When you’re ready to apply the stripping product, dip an old paintbrush or roller into it. It’s like a paste you paint over the finish on the wood. Apply it liberally in a layer 1⁄8 to 1⁄4 in (0.32 to 0.64 cm) thick.[4]
- It’s best to focus on treating one area at a time. That way, the chemical won’t dry out before you’re done with it.
- Chemical products are meant for paint, varnish, and polyurethane. If you have another type of finish, you do not need to use such a harsh product.
-
2Wait at least 10 minutes for the chemical to soak into the finish. You may see the finish bubble and crack right away. That’s a great sign, but resist the temptation to start scraping it off. Instead, check the manufacturer’s instructions for a more precise recommendation on how long you should wait.[5]
- Every product is different, so the manufacturer may instruct you to wait a different length of time before continuing.
- If the surface coating doesn’t crack and bubble, wait a little longer. You could try laying a plastic bag or drop cloth over the wood to keep the stripping chemical wet while it soaks in.
-
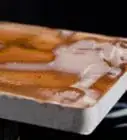
3Remove the finish using a plastic putty knife along the wood’s grain. Scrape along the dark fiber lines in the wood to avoid scratching it. The finish will come up in globs like a dried paste. Wipe your knife off on a rag, piece of cardboard, or another surface after a few scrapes.[6]
- Use a plastic scraper if you have one. While you can use a metal one, it is more likely to scratch the wood.
- If the chemical stripper dries before you finish, add more and let it soak into the wood again. It doesn’t hurt the wood, but you can’t remove the finish when it’s dry.
-
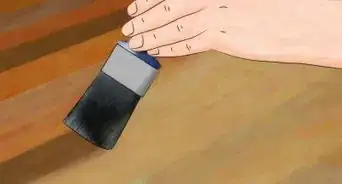
4Scrub with steel wool to treat recesses and other difficult spots. Not all wood surfaces are flat, and these ones can be a little tricky to treat. Get a pad of fine steel wool or use a stiff-bristled paintbrush and scrub along the wood’s grain, adding more of the chemical stripper as needed to moisten the finish. If you have to contend with very small recesses, try scraping them out with a straight pin.[7]
- Soaking the steel wool and brush could help you remove stubborn spots.
-
5Wash the wood with soap and water to remove any remaining product. Before you start cleaning the wood, check the manufacturer’s recommendations. The cleaning process could vary depending on the product you used. Many times, all you have to do is mix 1⁄4 tsp (1.2 mL) of a mild dish soap or wood-safe soap in warm water. Scrub the wood until it looks dull and dry.[8]
- For some products, you will need mineral spirits from a hardware store. It’s a refined type of paint thinner. Dampen a rag in it, then scrub the gunk off the wood.
- If you’re using a particularly harsh type of stripping product, you may need to get lacquer thinner. It is similar to mineral spirits and applied the same way.


Stripping Lacquer and Shellac with a Solvent
-
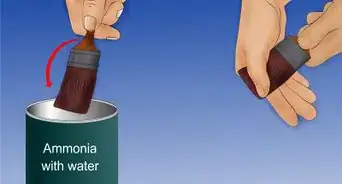
1Test the wood if you’re unsure what kind of finish you have. Rub some denatured alcohol on the finish with an old paintbrush and rag and watch for it to change. If it softens and turns into something like a sticky gum, the wood has a shellac finish. If nothing happens, try using a lacquer thinner. If the finish begins dissolving, then the wood has a lacquer finish.[9]
- If the finish turns cloudy from either the denatured alcohol or lacquer thinner, then it is a half and half type. It is a combination of shellac and lacquer, so mix equal amounts of the solvents to remove it.
- If the finish doesn’t react to either solvent, it is varnish or paint. Paint is easy to spot, but varnish is clear like shellac and lacquer.
-
2Apply denatured alcohol or lacquer thinner to the wood. Use an old paintbrush or rag to spread the appropriate solvent over the wood. Work one small section at a time to prevent the solvent from drying out before you’re finished. The finish on the wood will start to loosen right away.[10]
- These products dry very quickly, so tackle a project in sections. You're better off perfecting each part of a wood object one by one instead of scrubbing them all at the same time.
-
3Wait 5 to 10 seconds for the solvent to soak into the finish. Solvents evaporate very quickly, so you can’t wait too long to begin working on the finish. Fortunately, they cut through the finish right away. Look for it to remove any sheen on the wood caused by its finish.[11]
- If the solvent doesn’t seem to affect the finish at all, you may be using the wrong type for the finish you have. When the solvent works properly, it dissolves the finish instead of softening it and making it look cloudy.
-
4Remove the solvent with a coarse cloth. Scrub the solvent further into the wood using an old rag you don’t mind disposing of when you’re done. Follow along the wood’s grain, taking care to go over the area you brushed earlier. Work quickly so the solvent doesn’t have time to dry. If the treatment is working, you will notice the wood becoming duller as the rag lifts the finish.
- As the rag becomes dirty, replace it with a new one to avoid spreading the old finish.
-
5Scrape with a plastic putty knife to remove any remaining finish. Use a plastic knife instead of a metal one to avoid scratching the wood. Go over the area you treated, following along the wood’s grain. When you’re done, the wood will look dry and dull. Glossy spots mean that you missed some of the finish along the way, so add more of the solvent and start again.[12]
- For very stubborn spots, switch to steel wool. Try using grade 00 very fine steel wool for hardwood and grade 000 extra fine steel wool for softwood.
-
6Continue applying and wiping off the solvent to clear the wood. Move onto the next portion you wish to treat. Repeat the process, changing to a new cloth to avoid rubbing the old finish back into the wood. You may need to go over some sections multiple times in order to completely lift the finish.
- You don’t need to neutralize the solvent or do anything else to clean the wood after it has been stripped. Once the wood looks consistently dull and dry, you’re done with the finish.


Sanding Off a Finish
-
1Clean the wood with soap and water and dry it. The finish on the wood protects it, so you don’t need to worry too much about water damage. Try mixing about 1⁄2 teaspoon (2.5 ml) of a mild dish detergent from your kitchen into 1⁄4 cup (59 mL) of warm water. Use a clean rag to wipe away dust, dirt, and other debris, scrubbing along the wood’s grain.[13]
- Any debris left behind could get sanded into the wood, so make sure you get all of it before continuing.
- For stubborn stains, use something stronger, such as by mixing 1⁄4 cup (59 mL) of vinegar into the soapy water. You could also pick up a commercial wood cleaner from a nearby general store.
-
2Use an 80-grit sandpaper to remove paint. The easiest way to take care of large, flat surfaces is with an orbital sander. Fit the correct sanding disk on the end of the sander, then begin working along the wood’s grain. Hold the sander steady with a light but firm amount of pressure. Move slowly, as in no more than 1 in (2.5 cm) per second, to avoid leaving scratches and swirls on the wood.[14]
- You could also use a sanding block or sandpaper. These options aren’t as strong as a machine sander, but they also aren’t quite as quick or consistent. They’re better for small areas that can only be reached by hand.
- If you don’t have an orbital sander, you could also use a power sander. Keep in mind that it’s stronger than an orbital sander, so it chews through paint and even wood more quickly.
-
3Start with a 180-grit sandpaper if you’re removing a clear finish. Use a finer sandpaper to help you avoid scratching up the wood. Make a few passes along the wood’s grain until you’re certain that the finish is gone. Watch for the shine from the finish to disappear. The wood will look dull all over once you have successfully removed the finish.[15]
- If you aren’t having any luck dealing with the finish, switch to something coarser like 150 or 80-grit sandpaper. Coarser sandpaper is more likely to damage the wood if you're not careful with it, so work slowly.
-
4Dust the sanding debris off with a dampened rag. Sanding creates dust from the removed finish, but it’s easy to remove. Moisten a clean cloth in water and wipe the wood along the grain. You could also use a clean tack cloth if you have one. It’s perfect for picking up debris that would contaminate finished wood.[16]
- Wipe the wood clean each time you change to a different grit of sandpaper. If you take a break between steps, also take time to wipe down the wood so you don’t grind debris into it.
-
5Finish the wood with 220-grit sandpaper if needed. This type of sandpaper is useful for leveling out any stubborn or lightly-coated spots. It will also rough up the wood a little bit if you plan on painting it. You don’t need to do this if the wood looks dull and clear of any finishing material. Wipe off the debris one last time when you’re done.[17]
- Always start with the lowest grit sandpaper you plan on using and end with the highest one. The 220-grit sandpaper will always come at the end when stripping wood if you need it.


Community Q&A
-
QuestionDoes this work on guitar surfaces?
 Community AnswerYes, but be careful not to damage the guitar.
Warnings
- Chemicals and solvents used in stripping wood are harsh and even dangerous to your health. Always wear the proper safety equipment, including a respirator mask.⧼thumbs_response⧽
- Since stripping wood can be dangerous, remember to work in a well-ventilated area. Keep people and pets out of the area until you’re done.⧼thumbs_response⧽
Things You'll Need
Protecting Yourself and Your Work Area
- Respirator or dust mask
- Safety eye glasses
- Rubber gloves
- Plastic drop cloth
- Painter’s tape
- Pins (optional)
Using a Chemical Stripping Product on Paint and Varnish
- Chemical finish stripper
- Nylon paintbrush or roller
- Putty knife or paint scraper
- Steel wool
Stripping Lacquer and Shellac with a Solvent
- Denatured alcohol or lacquer thinner
- Coarse rags
- Putty knife or paint scraper
- Stiff-bristled brush or steel wool
- Water
- Mild dish soap
- Mixing bucket
- Mineral spirits (optional)
Sanding Off a Finish
- Water
- Mild dish soap
- Tack cloth
- 80-grit sandpaper
- 180-grit sandpaper
- 220-grit sandpaper
- Orbital sander (optional)


References
- ↑ https://www.familyhandyman.com/woodworking/furniture-repair/stripping-furniture-tips-for-refinishing/
- ↑ https://www.familyhandyman.com/woodworking/furniture-repair/stripping-furniture-tips-for-refinishing/
- ↑ https://www.familyhandyman.com/woodworking/furniture-repair/stripping-furniture-tips-for-refinishing/
- ↑ https://www.oldhouseonline.com/repairs-and-how-to/tested-safer-paint-strippers
- ↑ https://www.bobvila.com/articles/how-to-strip-furniture/
- ↑ https://www.familyhandyman.com/woodworking/furniture-repair/stripping-furniture-tips-for-refinishing/
- ↑ https://www.bobvila.com/articles/how-to-remove-paint-from-wood/
- ↑ https://www.oldhouseonline.com/repairs-and-how-to/tested-safer-paint-strippers
- ↑ http://www2.ca.uky.edu/HES/fcs/FACTSHTS/HF-LRA.048.PDF
- ↑ https://www.familyhandyman.com/carpentry/trim-carpentry/trim-repair-how-to-fix-and-revive-trim/
- ↑ https://www.bobvila.com/articles/how-to-remove-varnish/
- ↑ https://www.bobvila.com/articles/how-to-remove-varnish/
- ↑ https://www.youtube.com/watch?v=quW_n7nfn5c&feature=youtu.be&t=39
- ↑ https://www.thisoldhouse.com/how-to/refinishing-school
- ↑ https://bobvila.com/articles/how-to-remove-varnish/
- ↑ https://bobvila.com/articles/how-to-remove-varnish/
- ↑ https://bobvila.com/articles/how-to-remove-varnish/
About This Article