This article was co-authored by Andre Kazimierski and by wikiHow staff writer, Eric McClure. Andre Kazimierski is a Painting Specialist and the Founder and CEO of Improovy, an on-demand house painting service startup. With more than 15 years of experience, Andre and the Improovy team use data and technology to streamline the home improvement process for homeowners and painting contractors. Andre started in the painting industry as a sophomore at Depaul University in Chicago, working with one of the nation’s largest painting companies to launch new cities and territories across the Midwest. Years later, he started 3rd Gen Painting and Remodeling and had a successful exit after growing the company to two different states.
There are 10 references cited in this article, which can be found at the bottom of the page.
This article has been viewed 69,319 times.
The only way to completely and safely remove paint from brick is to use a caustic paint stripper. Paint stripper is a thick paste that is applied with a brush or putty knife. After covering your brick with the stripper, layer plastic sheeting over it to adhere it to the brick. Then, wait at least 30 minutes before peeling the sheeting off. Remove the dry stripper with a scraper or putty knife. Always take the proper safety precautions when using a caustic paint stripper by wearing thick rubber gloves, long-sleeved clothing, and protective eyewear. Removing paint from brick will typically take 6-18 hours depending on the size of your surface.
Steps
Prepping Your Brick and Getting a Stripper
-
1Buy a caustic paint stripper designed for masonry.[1] While you may be able to physically scrape your paint off with a scraper or steel wool, you won’t completely remove the paint from the pores of the masonry without using a chemical paint stripper. Look online or buy a caustic paint stripper from your local hardware store. Paint strippers vary brand by brand, so look for a stripper specifically designed for masonry.[2]
- Avoid spray strippers unless you’re working in an isolated area. These sprays tend to be a little weaker and are much harder to use.
- If you’re removing paint from a wall, look for a stripper that does not contain methylene chloride. Methylene-free strippers tend to have thick textures and won’t easily drip down a vertical surface.
- Paint strippers are often marketed as paint removers. Get a kit that comes with plastic sheeting for the stripper to make things easier. Strippers that rely on air drying need to be washed away and don’t tend to be as effective.
Tip: This is really the only way to entirely remove paint from bricks. If the paint is really old and flaking off, you can scrub it with water a stiff-bristled brush, but doing this may damage the bricks. It also won’t remove any paint that is embedded in the pores beneath the surface of the brick.
-
2Clean your walls by washing them with a hose or wet cloth. To prepare your bricks for paint stripping, clean them with lukewarm water. If you’re stripping a smaller set of bricks, soak a towel or cloth in water and wash the bricks by hand. If you have a larger brick surface that you’re stripping and it’s outside, rinse the surface with a hose. Wait 6-12 hours for your bricks to air dry.
- It’s not the end of the world if you don’t wash your bricks, but it will be a little tougher to scrape the paint away if you don’t clean them.
Advertisement -
3Set a drop cloth out underneath your brick to catch debris. Paint stripper will damage the yard or asphalt around your home if you’re stripping an exterior wall, and the old paint will fly all over the place once you begin scraping the paint away if you’re indoors. Get a large plastic drop cloth and lay it down underneath the bricks that you’re going to strip. If it’s a little windy and you’re working outside, weigh the drop cloth down with cinderblocks or bricks.[3]
- This process typically takes a few hours. Don’t start this process if it’s really cold or forecasted to rain.
- Go ahead and skip this step if you’re stripping bricks on a floor.
-
4Put on the protective gear listed on your type of paint stripper. While the safety gear is different for every brand of paint stripper, you’ll definitely need to wear protective eyewear, long-sleeve clothing, and thick rubber, neoprene, or nitrile gloves. If you’re working outside, wear a face shield to protect your face and neck. Read your container carefully to determine what you need to do to stay safe while applying your paint stripper.[4]
- You normally don’t have to wear a respirator, but you may want to wear one if you’re working inside to avoid irritating your lungs.
- If you’re using a stripper indoors, open the windows to keep the room well-ventilated. Turn on any fans to increase the air flow as well. Keep any pets or children out of the room where you’ll be working—preferably on a different floor.


Applying the Paint Stripper
-
1Work in sections based on the size of your plastic sheeting. Paint stripper comes with plastic sheeting that you lay over the stripper after you apply it. This means that you need to apply stripper in sections based on how big your sheeting is. Measure the size of one of your plastic sheets to get a good idea of how big each section needs to be.[5]
- These sheets are typically around 5 by 5 feet (1.5 by 1.5 m), but your sheets may be a little bigger or smaller. You don’t need to be exact about it, though. If your sheets are 8 by 8 ft (2.4 by 2.4 m) for example, it’s not a big deal if you cover a 10 by 12 ft (3.0 by 3.7 m) section in stripper before applying the sheet.
- If you do need plastic sheeting and it didn’t come with your stripper, purchase peel-away laminated paper. This is the same thing as the plastic sheeting that comes with the stripper kits.
- Some paint strippers don’t use plastic sheeting, but most caustic strippers do. However, if your stripper doesn’t rely on sheeting to eat away the paint, skip the steps related to the plastic sheeting.
-
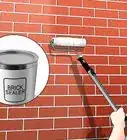
2Apply the stripper using a trowel or paint brush. Read your can of paint stripper to see if you apply it with a brush or some other tool. Usually, you use a 3–4 in (7.6–10.2 cm) flat brush to apply the stripper. Open the can of paint stripper and pour it into a paint tray. Dip your brush into the stripper and apply the stripper in the direction of the brick using back-and-forth strokes.[6]
- Your brush strokes don’t really matter. How the paint stripper is applied matters less than how thick it is once you apply it.
- If you’re using a trowel or putty knife to apply your stripper, dip the blade into the stripper and scrape it into the surface by dragging the loaded edge across the surface at a 45-degree angle. Reload your stripper as needed to apply more of it.
- If you’re stripping a tall wall, get a stable ladder and work your way from the top of the wall to the bottom. Enlist a friend to hold the ladder at the bottom so that you don’t fall off while you work.
-
3Build up a layer of stripper thicker than 1⁄4–1⁄2 in (0.64–1.27 cm). Continue applying paint stripper to your first section of the brick until you build up a thick layer. Reload your brush, knife, or trowel as needed to continue layering the stripper on top of itself. Stop adding paint stripper once the layer is at least 1⁄8 in (0.32 cm) thick.[7]
- Paint stripper is usually white, and it should be pretty easy to recognize when you’ve missed a section.
Tip: Paint stripper is usually at least semi-translucent. You can tell that your layer is built up when the brick underneath becomes kind of hard to see.
-
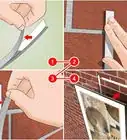
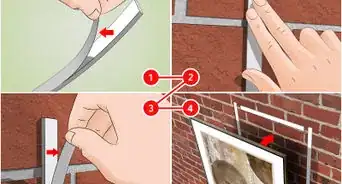
4Spread your plastic sheet over the stripper and press it into the brick. Once you’ve covered your first section, grab one of your plastic sheets. Lift the sheet up with both hands and orient the sheet with any writing facing out. Then, starting in a top corner, press the sheet into the paint stripper. Use your palm to press the sheet into the wall and smooth it out as you move towards the opposite corner. Use both of your palms to smooth the sheet down until it’s completely adhered to the wall.[8]
- Push air bubbles out towards the edges of the sheeting to remove them.
- You may need to remove an adhesive back before applying the sheet, but most plastic sheets come ready to be applied.
- If you’re using a ladder, don’t unfold your sheet until you get to the top of the ladder. Enlist a friend to hold it for you and work slowly to ensure that you stay safe.
- Some strippers don’t use plastic sheeting. If your stripper doesn’t, simply let it air dry after applying it before washing and scraping it off.
-
5Continue working in small sections until you cover the entire surface. Once your first sheet is applied, pick your paint stripper back up and work on the section next to it. Apply your paint stripper and build it up into a thick layer. Add your second plastic sheet, overlapping the edge of the sheet next to it. Continue doing this until your wall is entirely covered in the plastic sheeting.[9]
- Depending on the size of your wall, this may be time consuming. For an exterior wall, expect to spend a few hours applying the sheets.
-
6Wait for the stripper to eat away the paint based on the manufacturer’s instructions. Once the stripper is covered, read the instructions on your container to determine how long you need to wait for the stripper to eat away the paint. Wait a minimum of 30 minutes to give the stripper time to work its way into the porous bricks. At most, you may need to wait 12 hours for the stripper to work.[10]
- In most cases, the stripper will be more effective the longer you wait. If your stripper lists a range of waiting times, like 30-60 minutes, wait the maximum amount of time listed if you want to make this process easier.


Scraping Your Paint Away
-
1Peel the plastic sheets off of the brick and discard them.[11] Once you’ve waited at least 30 minutes, peel the sheets off of the wall. Either lift the corners of each sheet off by hand or use your putty knife or trowel to scrape an edge out. Peel each sheet sheet slowly to ensure that you don’t rip any of the grout or brick out with your plastic. Take off every sheet and discard them in a thick garbage bag to safely discard them.[12]
- You may notice a lot of the stripper peeling off with your sheets, revealing the clean brick underneath. Don’t worry if this doesn’t happen, though. The remaining paint should be pretty easy to remove.
-
2Use a scraper to peel the dried stripper away. With your sheets removed, grab a putty knife, paint scraper, or chisel. Press the blade of your scraping tool into the wall at a 45-degree angle. Scrape away from you in the direction of the brick to remove a layer of the dried stripper. Continue this process until you’ve scraped the remaining paint away.[13]
- This process should be fairly easy. You shouldn’t need to apply a lot of pressure to remove the weakened paint. However, this can take quite some time. Expect to spend a few hours scraping a large external wall.
- Fold your drop cloth up and discard it along with your used plastic sheeting.
Tip: Some air-dry strippers need to be washed off first. If your stripper needs to be washed away, use a standard hose and a thin nozzle to spray your brick at angle away from you.
-
3Reapply more paint stripper if you can’t remove some of the paint. If you find it extremely difficult to remove some of the paint, don’t keep grinding your scraper into the brick. Instead, reapply a small layer of paint stripper over the area and add a new sheet. Wait the minimum amount of time listed on the stripper’s container before removing the sheet and scraping the resilient paint away.[14]
- If your brick has been painted over multiple times, you may need to repeat the entire process across your entire surface.
-
4Wash the brick after removing the paint to clear any debris away. On an exterior wall, grab a hose and attach a sprayer to the end. Turn the hose on and spray your wall at an angle away from you to wipe away any remaining residue from your paint stripper. If you’re stripping an interior wall, use a damp cloth and a stiff-bristled brush to carefully scrub any residue away.[15]
- Let your brick air dry after washing it.


Community Q&A
-
QuestionHow do I remove enamel paint from the metal box?
 Community AnswerPaint remover and scrubbing should do the trick. I'd try wearing a glove (so it doesn't scratch your hand), and going at it with steel wool.
Warnings
- Sandblasting and power-washing may seem like a tempting way to go, but you can erode the brick and damage the structure of your brick, which can be quite dangerous if you’re working on a load-bearing wall. Avoid doing this unless your brick is embedded in the ground or it’s not holding anything up.[16]⧼thumbs_response⧽
- Know that, if the current paint is not peeling by itself, it is going to take a long time to strip it using only chemicals.[17]⧼thumbs_response⧽
Things You’ll Need
- Paint stripper
- Gloves
- Respirator (optional)
- Protective eyewear
- Face shield
- Water
- Cloth
- Hose (optional)
- Ladder (optional)
- Brush, trowel, or putty knife
- Scraper
- Hose attachment
- Garbage bag
- Stiff-bristled brush


References
- ↑ Andre Kazimierski. Painting Specialist. Expert Interview. 26 January 2022.
- ↑ https://www.bobvila.com/articles/best-paint-stripper/
- ↑ https://www.bobvila.com/articles/how-to-remove-paint-from-brick/
- ↑ https://www.bobvila.com/articles/how-to-remove-paint-from-brick/
- ↑ https://youtu.be/0fj3W2otrs0?t=60
- ↑ https://youtu.be/0fj3W2otrs0?t=51
- ↑ https://prosoco.com/Content/Documents/Product/SK_HD_Paint_Stripper_PDS_110315_C.pdf
- ↑ https://youtu.be/0fj3W2otrs0?t=79
- ↑ https://myalternatelife.com/how-to-strip-paint-from-brick-fireplace/
- ↑ https://www.bobvila.com/articles/how-to-remove-paint-from-brick/
- ↑ Andre Kazimierski. Painting Specialist. Expert Interview. 26 January 2022.
- ↑ https://youtu.be/0fj3W2otrs0?t=142
- ↑ https://www.sunnysidecorp.com/pdfs/Data_Sheet_666G1.pdf
- ↑ https://www.sunnysidecorp.com/pdfs/Data_Sheet_666G1.pdf
- ↑ https://www.sunnysidecorp.com/pdfs/Data_Sheet_666G1.pdf
- ↑ https://www.bobvila.com/articles/how-to-remove-paint-from-brick/
- ↑ Andre Kazimierski. Painting Specialist. Expert Interview. 26 January 2022.
About This Article

To take paint off bricks, you’ll need to use a caustic paint stripper designed for masonry. Make sure you wear protective goggles, gloves, and long-sleeved clothes. You should also protect the floor underneath your bricks by laying down an old cloth or towel. You’ll need to apply the paint stripper in sections as big as the plastic sheeting that comes with your paint stripper. Brush the paint stripper on in thick layers, spread the sheet over the stripper, and press it onto the bricks. After 30 minutes, you can peel the plastic sheeting off and throw it away. If there’s any dried paint stripper left on the brickwork, use a paint scraper or putty knife to get rid of it. If you can’t remove some of the paint, you might need to apply a second layer of paint stripper. For more tips, including how to wash your bricks after using paint stripper, read on!