This article was co-authored by Chad Zani. Chad Zani is the Director of Franchising at Detail Garage, an automotive detailing company with locations around the U.S. and Sweden. Chad is based in the Los Angeles, California area and uses his passion for auto detailing to teach others how to do so as he grows his company nationwide.
This article has been viewed 85,840 times.
You’ve spent an hour or so in the sun, cleaning the dirt and long-gone bugs from your car’s paint and windows, only to find that your gleaming paint job is marred by the presence of small, white hard water spots. While hard water deposits can be frustrating, removing them from your vehicle is a simple process. Water spot removal requires a basic protocol for windows, one for surface spots, and one for deep spots.
Steps
Removing Stains From Windows
-
1Fill a bucket with vinegar and water. Using an equal amount of each or 2 parts water to 1 part vinegar, fill a tub with enough water to wash your windows. If your watermarks are particularly bad, you will want to do the stronger of the two vinegar solutions.[1]
- Some water spots may appear to have disappeared, but return after you dry your windows. If this is the case, bump up your vinegar solution to half water and half vinegar or even straight vinegar.
-
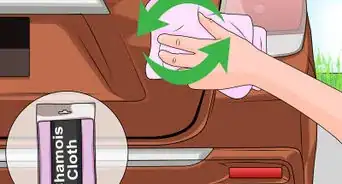
2Grab a microfiber cloth. Microfiber cloths are wonderful for cleaning windows, as they do not leave any fibers behind. When you are cleaning watermarks, it is extremely important to leave as little residue as possible.[2]Advertisement
-
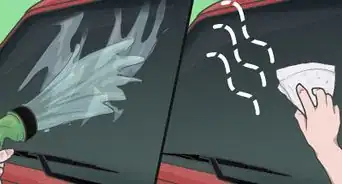
3Saturate your cloth and apply a liberal amount to the windows. Soak your cloth completely in your vinegar solution and immediately place it on your windows, washing in a circular motion. You may need to pay special attention to any areas with a lot of staining or thick, calcified deposits.
-
4Dry the windows immediately after washing them. Once you have finished washing your windows, immediately dry them with a clean, microfiber rag. If you notice any lingering spots, go over the area again, putting a little bit more elbow grease into your movements.
- Do not worry about rinsing your windows before drying, as vinegar can be wiped directly from the glass.
- Skipping this step could result in further water calcification. Always thoroughly dry your windows after washing.


Cleaning Stains Off of Surface Paint
-
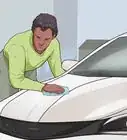
1Clean and dry your vehicle as usual. Before you begin removing surface water spots, you need to make sure your vehicle is clean and free of dirt and debris. The solutions for water stain removal will not work if the vehicle is dirty or damp.
- Different brands may require further instructions for washing or waxing, so make sure you check your solution’s bottle to be sure.
-
2Identify the areas in need of calcification removal. It is highly unlikely that your entire vehicle will need to be gone over for water staining, so identify the areas that need the greatest amount of help and start there. You can go back over any smaller problem areas after you’ve finished.[3]
- Treating your entire car for spots is not usually necessary. Completing the most difficult areas first allows you to expend the bulk of your energy on difficult spots.
-
3Purchase a clay bar. A clay bar is a putty made of clay that is gentle enough to work on paint without stripping it, but strong enough to encourage calcification to adhere to the clay. This method carefully and gently pulls mineral deposits away from the paint without harming it.[4]
- Clay bars are available at some hardware stores and most auto specialty stores.
- There are many different brands of clay bars. Some come in a pre-made bar, while others have to be mixed with water. Check your bar’s package instructions.
-
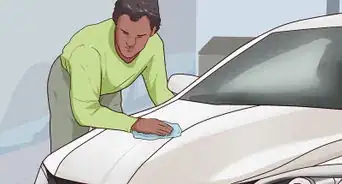
4Move the clay over the surface of the car containing the stains. For the clay to work, it has to be able to grip the mineral deposits on the surface of your paint. Run it over the areas of your car with water staining to lift the stains.
- If the water spots are tough, you may have to use more of a dabbing motion.
-
5Check the area you’ve used the clay on. Once you’ve gone over your paint, run your hand over the area to make sure there aren’t any watermarks remaining on the surface of the paint. Make a note of any problematic areas.
-
6Go back over any remaining mineral deposits. If you encounter some rough spots or bumps, use your clay on the areas again, continuing to use gentle movements. If pieces were not picked up initially, dab and pull the bar away to encourage the stains to lift.
-
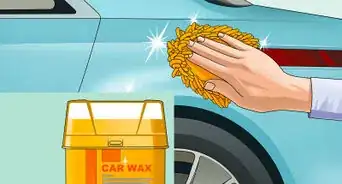
7Finish up with a wax. Because the clay you are using can strip wax and some of the top layers of finish away, you will need to finish up your cleaning session with a wax to protect your paint.


Tackling Deep Stains
-
1Wash and dry your vehicle thoroughly. As with surface spots, you must make sure your car is thoroughly cleaned and dried before you will be able to reach the deep staining. Leaving any residue behind could actually do more damage to the paint.
-
2Clean the damaged areas with a scratch cleaner. Deep staining is caused by mineral deposits eating away the paint, so the surrounding areas may have some small scratches or abrasions. Clean up the area around the pitting with a scratch cleaner to make sure the car will shine.[5]
- Scratch cleaners are available in the auto section of supermarkets, as well as through auto specialty stores and online.
- Removing scratches will make sure the resulting finish is even and smooth.
-
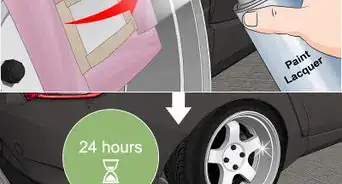
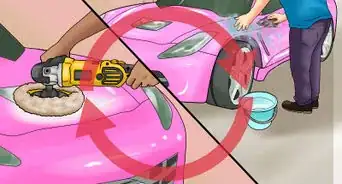
3Buff the car using a machine buffer and vehicle polish. To get down deep to the source of the stain, you will need to buff your vehicle with a machine buffer and a vehicle polish designed for water spots. Doing so will provide a gentle abrasive movement on your vehicle, stripping away small layers of paint until the divot is no longer detectable.
- If you do not have a buffer, check with your local auto store. Some stores have rental options available.
- Inexpensive buffers (think under $50) may also be purchased to have on hand in the future.
-
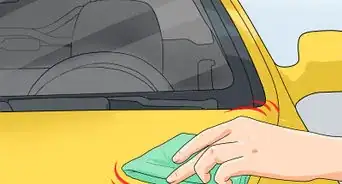
4Wipe the car down to remove any buildup. After you’ve polished your car, wipe down the polished areas to remove any lingering paint, varnish, or minerals. This should be done with a gentle cloth such as microfiber, rather than terrycloth, as terrycloth could further damage the paint.
- Although you can do this with water, using a microfiber cloth should ensure that you pick up all of the dirt and residue.
- If you do use water to go over the area, make sure you dry it before moving on to the next step.
-
5Apply a coat of wax. Finish up by applying a coat of wax to protect your vehicle from damage down the road. Because buffing actually removes small layers of paint to create an even surface, failing to wax may leave delicate areas of your vehicle exposed.


Community Q&A
-
QuestionIf water stains are under wax what damage will this cause? What is the safe way for dealership to remove wax from a vehicle without damage to the protective coat?
 Community AnswerWater stains underneath wax can cause the paint to degrade over time, as minerals can eat away at paint. To fix this, a dealership could use a buffer to gently remove wax and clean away water deposits.
Warnings
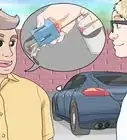
- If you experience difficulty removing deep water spots, take your car to a detailer. Trying to scrape further into the paint may make the damage worse.⧼thumbs_response⧽
- Avoid the temptation to use a brillo pad or abrasive surface to cut through water stains, as you may just scratch the paint.⧼thumbs_response⧽

References
- ↑ http://www.greatdayimprovements.com/cleaning-windows-with-vinegar.aspx
- ↑ http://rallyways.com/199/best-way-to-clean-car-windows-without-leaving-ugly-marks/
- ↑ https://www.autogeekonline.net/forum/how-articles/29134-how-remove-water-spots-hand.html
- ↑ http://www.meguiarsonline.com/forums/showthread.php?4891-How-To-Remove-Water-Spots#YRr06CHStCbXEb9U.97
- ↑ http://www.detailedimage.com/Ask-a-Pro/ask-a-pro-removing-water-spots-from-the-paint/
About This Article