This article was co-authored by James Hornof and by wikiHow staff writer, Janice Tieperman. James Hornof is a Master Electrician and the Owner and President of B & W Electric based in Denver, Colorado. With over two decades of experience in the electrical construction industry, James specializes in field installation, management, estimating, and design. He graduated top of his class in electrical trade school and studied Business Management at The Community College of Denver. James holds a Master Electrician license in Colorado, Wyoming, and Texas.
There are 13 references cited in this article, which can be found at the bottom of the page.
This article has been viewed 7,610 times.
Not sure what type of water heater you have at home? That’s totally fair—while a lot of electric water heaters are 240-volt, some are only 120-volt. We’re here to help you figure out exactly what kind of electric water heater you have, as well as how to safely test your heater’s voltage if you want to be extra certain With the proper safety precautions, you can be more in the know about this important at-home appliance.
Steps


How to Test Your Water Heater Voltage
-
1Switch off the power to your water heater. Head to your circuit breaker and switch off the power that’s connected to your water heater. The circuit switch is usually labeled as either “hot water heater” or “HWT.”[6]
-
2Double-check that the power is off with a non-contact voltage tester. Look for a clump of wires along the very top of your water heater tank. Then, switch on the voltage tester and press it against the wire for a few seconds. If it beeps, your water heater is still powered up; if it’s silent, the water heater is totally powered down and safe to test.[7]
- Tap your voltage tester against a plugged-in cord first to make sure that it’s working correctly.
- If the device beeps, go back to your circuit breaker and make sure that the right switch is turned off.
-
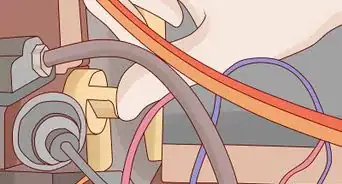
3Remove the access panel and remove the insulation. Electric water heaters house all their wires in an insulated access panel, which is covered with a rectangular metal plate. Remove the access panel with a screwdriver, and then pull out the insulation that’s covering the wires and terminal screws.[8]
- Some water heaters may not let you pull out the insulation completely. In this case, tape it to the side of the heater tank so you can clearly see all the wires and terminals.[9]
- Certain water heaters may also have plastic casing on top of the wires and terminals. Be sure to pull this cover off before you start testing.[10]
-
4Turn the power back on to your water heater. To test the voltage of your water heater, you’ll need a constant flow of power running through your device. Head back to your circuit breaker and switch the water heater’s power back on.[11]
-
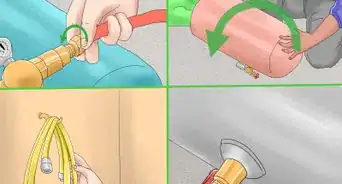
5Plug the red and black probes into your multimeter. Look for 2 circular ports along the bottom of your multimeter—a red opening marked “V” (for voltage) and a black port marked “COM” (for common). Then, plug the red probe cord into the red “V” port and the black probe cord into the black “COM” port.[12]
-
6Adjust your multimeter to a voltage setting that’s higher than 240 volts. Look for the voltage section of measurements on your multimeter—they’ll be marked with a “V” followed by a squiggly line. Then, turn or adjust your multimeter to a high voltage setting, like 600.[13]
- Double-check the bottom of your multimeter to see how many volts it can handle. You don’t want to accidentally damage your multimeter by overloading it!
- If your multimeter is set to less than 240 volts, it won’t be able to properly register the voltage of your water heater.
-
7Test your water heater’s voltage with the multimeter. Use the multimeter by pressing the red probe to the topmost screw on one side and the black probe to the topmost screw on the other side. It doesn’t matter which probe is on which screw, as long as they’re each touching a different terminal.[14]
- Make sure that you aren’t touching or handling the metal ends of the probes, or else you might get shocked.
- For extra protection, slide on a pair of rubber insulating gloves that are cleared for at least 240 volts of shock. This way, you’ll be protected even if you touch a live terminal or wire.[15]
-
8Read the multimeter screen to determine your heater’s voltage. In a moment, you’ll see either “120” or “240” popping up on your screen, confirming the exact voltage of your water heater.
- If no voltage number shows up on your device, you may need to get it repaired.


Warnings
- Only check your water heater’s voltage if you feel comfortable working with your home’s electricity system. Feel free to call a professional if necessary!⧼thumbs_response⧽


Expert Interview
Thanks for reading our article! If you'd like to learn more about water heater voltage, check out our in-depth interview with James Hornof.
References
- ↑ https://www.youtube.com/watch?v=9kjabzIcLRA&t=0m48s
- ↑ https://www3.uwsp.edu/cnr-ap/KEEP/nres633/Pages/Unit3/Section-F-Watts.aspx
- ↑ https://king-electric.com/pro-tips/sizing-the-heater-circuit/
- ↑ https://www.electrical-forensics.com/WaterHeaters/WaterHeaters.html
- ↑ https://king-electric.com/pro-tips/sizing-the-heater-circuit/
- ↑ https://www.youtube.com/watch?v=Samu69sHw8E&t=0m30s
- ↑ https://www.youtube.com/watch?v=Tvm0OuPkbYg&t=0m36s
- ↑ https://www.youtube.com/watch?v=Samu69sHw8E&t=0m56s
- ↑ https://www.youtube.com/watch?v=LxnZQZm9YcI&t=1m20s
- ↑ https://www.youtube.com/watch?v=Samu69sHw8E&t=1m16s
- ↑ https://www.bockwaterheaters.com/mwdownloads/download/link/id/31/
- ↑ https://www.bobvila.com/articles/how-to-use-a-multimeter/
- ↑ https://www.bobvila.com/articles/how-to-use-a-multimeter/
- ↑ https://www.hotwater.com/lit/training/320991-000.pdf
- ↑ https://ohsonline.com/Articles/2010/08/01/Electrical-Safety-First.aspx
About This Article