This article was co-authored by wikiHow staff writer, Eric McClure. Eric McClure is an editing fellow at wikiHow where he has been editing, researching, and creating content since 2019. A former educator and poet, his work has appeared in Carcinogenic Poetry, Shot Glass Journal, Prairie Margins, and The Rusty Nail. His digital chapbook, The Internet, was also published in TL;DR Magazine. He was the winner of the Paul Carroll award for outstanding achievement in creative writing in 2014, and he was a featured reader at the Poetry Foundation’s Open Door Reading Series in 2015. Eric holds a BA in English from the University of Illinois at Chicago, and an MEd in secondary education from DePaul University.
There are 12 references cited in this article, which can be found at the bottom of the page.
This article has been viewed 17,051 times.
Learn more...
To test the quality and power of a golf cart battery, you’ll need a voltmeter, a load tester, and a hydrometer. The voltmeter will connect to the terminals at the top of the battery to read its voltage. The load tester uses the same terminals to pump the battery full of current and assess how the it handles high levels of amperage. Finally, the hydrometer measures the specific gravity of the water inside each battery cell to determine how the battery is processing and holding charges. These three tests should be performed on each battery in a golf cart in order to diagnose faulty terminals, cells, or batteries in your vehicle. Take special care when performing a load test, since the battery and load tester will get extremely hot as the test is being performed.
Steps
Testing Voltage with a Voltmeter
-
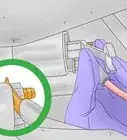
1Stay safe by putting on protective eyewear, gloves, and clearing your area. Golf cart batteries can arc, spark, or emit dangerous gasses while you’re testing them. Stay safe by putting on protective eyewear and wearing gloves to keep any gases from condensing on your skin. Work in a well-ventilated area and keep your workspace clear of flammable materials like rags, papers, or plastics.[1]
- Avoid using metal tools on your battery that aren’t insulated.
- Always attach the correct probe on your multimeter or voltmeter to the proper terminal or you may create a spark.
Warning: Never smoke when you’re working around golf cart batteries and keep the area clear from any open flames. The hydrogen and oxygen in golf cart batteries can explode if they’re ignited.
-
2Identify the positive and negative terminals on your battery. Look at the top of your battery to find the red and black terminals. The red terminal corresponds to positive, and the black terminal corresponds to negative. If you don’t see the metal terminal exposed but you see the rubber caps, lift the cap up to expose the metal screw and bolt that make up the terminal. Get your voltmeter out, but don’t turn it on.[2]
- You can use a multimeter instead of a voltmeter if you have one. Just make sure that it’s set to the voltage setting instead of the resistance setting.
- While it’s incredibly uncommon, some batteries will only have a positive (+) and negative (-) sign next to the corresponding terminal.
Advertisement -
3Touch or clamp the voltmeter’s red probe to the battery’s red terminal. Turn the voltmeter on and keep both of the exposed-metal probes up in the air. Take the red probe and hold it on the lead screw sticking out of the top of the battery. If it’s a clamp probe, open the clamp’s teeth and fit them around the lead screw. Release the clamp handles to let it grip. If you don’t have a clamp probe, simply hold the exposed metal probe still on the terminal.[3]
- Don’t stick it on the stainless steel bolt at the base of the screw. You won’t get a reading doing it that way.
-
4Attach or connect the voltmeter’s black probe to the black terminal. The same way that you connected or held the red probe to the positive terminal, connect the black probe to the black terminal. Either hold it in place or clamp it on to the screw.[4]
- If you’re holding the probes in place, try to keep your hands as still as possible so that you can get an accurate reading.
-
5Compare the voltage reading on the screen to the battery’s listed voltage. Once you get a stable reading, take the probes off of the battery and read the top or side of your battery to find the listed voltage. If the reading is at, or within 1 volt of the listed voltage, your voltage is good. If it isn’t, try charging it for 6 hours before testing it again. If it still doesn’t work, you need to replace the battery.[5]
- Almost every golf cart uses multiple smaller batteries to achieve a total power of 36 or 48 volts. You probably have a series of 4 volt, 8 volt, or 12 volt batteries that combine to reach 36-48 volts. Test each battery separately.
- If your voltage is over the listed voltage on the battery, it’s a sign that your battery is fully charged.


Using a Load Tester to Check Amperage
-
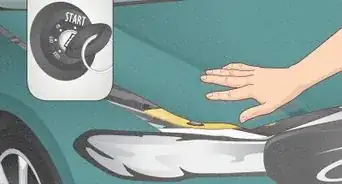
1Avoid over-charging your battery and don’t load test in cold weather. Never load test your golf cart battery in weather colder than 30 °F (−1 °C) to prevent explosions or the release of noxious fumes. Work in a well-ventilated area where you’ll be safe from any leaks in the battery. When load-testing your battery, be sure to turn the load tester off as soon as you get an accurate reading. Load testing creates high temperatures in the battery and load tester so be safe by turning it off once it gets hot.[6]
- Let the battery come to room temperature before testing it with a load tester.
- Wear protective eyewear and thick gloves when load testing a battery. Work in a well-ventilated area to avoid harmful fumes.
-
2Get a battery load tester and make sure it’s off. Take a battery load tester and check the power switch on the machine to ensure that it’s off. A load tester assesses how the voltage in a battery is effected when there’s a lot of current running through the battery. It’s possible that your golf cart battery’s voltage is fine when it’s not being used but has a ton of resistance or struggles to handle high currents, causing the battery to die.[7]
- An easy way to understand the difference between voltage and amperage is to think about a water pipe. Voltage is like the water pressure in a pipe, and current is how fast the water comes out. It doesn’t matter if the pressure is good if the hole is too small to let water out![8]
Warning: Load testing a battery is actually kind of dangerous. The high level of current will generate a lot of heat in the load tester and battery. Only test a battery on a concrete or heat-resistant surface that won’t burn.
-
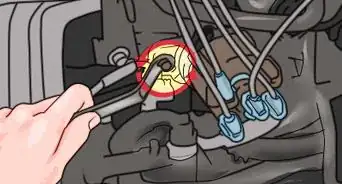
3Connect the red clamp to the red terminal. Load testers have clamps at the end of each cable to tighten around the terminals on the battery. Start with the red terminal. Flip up any protective covers if necessary and find the terminal’s lead screw. Clamp the red probe around the red terminal by releasing the clamp’s handles around it.[9]
- Do not turn the load tester on until both terminals are firmly and securely clamped.
- Hold the black clamp away from the red clamp while you’re affixing it to the terminal.
-
4Attach the black clamp to the black terminal. Uncover the terminal if it has a plastic cover on it. Take your black clamp and tighten it around the screw. Check the connections on both of your terminals to make sure that they’re secure.[10]
- Connect the green clamp to either one of the load tester’s cables if you have one. This is a separate amperage monitor, but every load tester doesn’t have one.
-
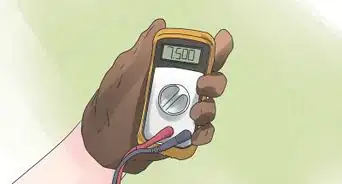
5Hit the battery with 300-350 amps to see the voltage. The amount of amperage that you hit the battery with is always half of the battery’s cold-crank amperage (CCA). This is listed on the battery itself, but it’s almost always between 600-700 for a golf cart battery, so you’re safe to hit the battery with 300 amps if you can’t find the CCA. Turn the switch on for the load tester on and turn the dial to the necessary amperage.[11]
- CCA refers to the battery’s maximum power output when it’s 0 °F (−18 °C) outside. It’s a universal measurement for calculating the power of a battery.
-
6Check to see if voltage is close to your original voltmeter reading. A drop between 1-2 volts is to be expected when performing a load test. If the voltage drops more than 3-4 volts though, it’s a sign that the battery is capable of achieving the necessary voltage but won’t maintain that voltage when a current is passing through it. If this is the case, replace your battery.[12]
- For example, if you tested your battery with the voltmeter and got a reading of 11.9 volts, and your load tester gives you a reading of 11.1 volts, your battery has adequate amperage. If it drops below 8 through, it’s a sign that your battery is struggling to function properly.
-
7Turn the load tester off as soon as you get your reading to be safe. Load testing produces a ton of heat and the battery and load tester will both reach extremely hot temperatures if you just leave it on for too long. In order to play it safe, turn your load tester off as soon as you get a stable reading. If you want to test it again, you can always do a second load testing after the battery cools down a little.[13]


Checking Charge with a Hydrometer
-
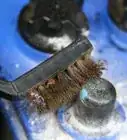
1Take the removable caps off the top of the battery. The top of your battery will have 2-4 plastic caps on the top. These are the covers for the individual cells that generate electricity. Inside, there are separate cells filled with water that cover a plate, which uses the electrolytes in the water as a conduit. Pop the top off of each cell and get a hydrometer that will fit in the opening for each cell.[14]
- Wear protective eyewear and work in a well-ventilated area when performing this test. Wear long sleeves and gloves to keep dangerous liquids off of your skin.
- A hydrometer kind of looks like a turkey baster with a little measuring float in the middle of the tube. They’re usually made out of glass, but there are rubber versions as well.
- In a golf cart battery, a hydrometer will measure the charge of the battery by measuring the weight of the water. You can tell if the charge is acceptable for the batteries if all of the cells have a similar reading.
Tip: There are special hydrometers designed for testing water in batteries. Most of these are for car batteries though, so ignore the green, red, and white markers indicating whether a water’s levels are safe or not.
-
2Inspect the plates inside each hole to see if they’re covered in water. Check the water level to see if it’s covering your battery’s cell plates or not. The water in the battery should rest at least 1⁄4 inch (0.64 cm) above the plates inside of the battery. If you can’t see any plates, that’s a sign that the water is high enough. If they’re completely dry or moistening out and the water is low, this is why your battery hasn’t been functioning properly.[15]
- Use a flashlight if you can’t see inside the holes.
- If the water is low, you can pour some distilled water into the battery until the plate is barely covered. If the plate was drying out for a long time, it’s probably a wasted effort though. The battery is likely dead or about to die.
-
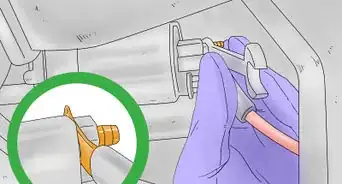
3Put a hydrometer inside the first cap and squeeze the tip to pull some water. Carefully place the glass or rubber tube inside the opening of the first cell. Dip it into the water and squeeze the little rubber ball at the top of the tool to suck some water into the tube. Give the water a second to move the float inside of the tube.[16]
- Do not remove the tube from the opening. You want to keep all of the water inside your battery and you’re going to squeeze it back out as soon as you get a reading.
-
4Check the reading level and squirt the water back into the cell. Look at the hash marks on the tube or reader to see what the specific gravity reading is. Once the float rests at a certain hash mark, jot it down then squeeze the ball at the top of the tube to squeeze the water back out into the tube.[17]
- The charge levels differ for every battery, especially in golf carts. In general, a specific gravity between 1 and 1.2 is good for a car battery, so expect it to be around there or possibly a little less.
-
5Repeat this process for each cell in the battery. For every individual cell, stick the tube into the water, squeeze the ball to pull some water up, then lift the tube a little. Let the float settle and write down the level on a piece of scrap paper. Empty the tube by squeezing the ball at the top again and repeat the process until you’ve measured each cell.[18]
-
6Compare the levels in all 3 cells to one another. Each cell in a battery is separated, so to get a good picture of whether you battery is healthy or not, you need to check the charge levels in each cell to see if they’re close. For example, If 2 of the cells have similar readings but the third is much lower or higher, it’s a sign that your battery is not generating power correctly and you should plan on replacing it in the near future.[19]
- In general, the cells should be with 0.1 of one another. There may be more variation if your battery is older or hasn’t been charged in a long time. A difference greater than 0.3 is pretty high.


Things You’ll Need
Testing Voltage with a Voltmeter
- Protective eyewear
- Thick gloves
- Voltmeter or multimeter
Using a Load Tester to Check Amperage
- Protective eyewear
- Thick gloves
- Load tester
- Nonflammable surface
Checking Charge with a Hydrometer
- Protective eyewear
- Thick gloves
- Hydrometer
- Pen or pencil
- Paper


References
- ↑ https://www.golf-carts-etc.com/golf-cart-safety.html#targetText=√%20Golf%20Cart%20Batteries%20Produce%20Explosive%20Gases&targetText=Only%20charge%20batteries%20in%20well,an%20enclosed%20place.Never%20smoke.
- ↑ https://youtu.be/jAC5CSt-e2U?t=43
- ↑ https://youtu.be/jAC5CSt-e2U?t=47
- ↑ https://youtu.be/jAC5CSt-e2U?t=58
- ↑ https://youtu.be/jAC5CSt-e2U?t=60
- ↑ http://www.eastpennmanufacturing.com/wp-content/uploads/Golf-Car_EV-Battery-Care-Maintenance-1932.pdf
- ↑ https://youtu.be/jAC5CSt-e2U?t=86
- ↑ https://science.howstuffworks.com/environmental/energy/question501.htm
- ↑ https://batteryasking.com/test-golf-cart-battery/
- ↑ https://batteryasking.com/test-golf-cart-battery/
- ↑ https://youtu.be/jAC5CSt-e2U?t=118
- ↑ https://batteryasking.com/test-golf-cart-battery/
- ↑ https://youtu.be/jAC5CSt-e2U?t=128
- ↑ https://www.golfcarcatalog.com/golf-cart-blog/testing-golf-cart-battery/#targetText=A%20fully%20charged%20battery%20will,from%20the%20hydrometer%20packaging%20instructions.
- ↑ https://www.golfcarcatalog.com/golf-cart-blog/testing-golf-cart-battery/#targetText=A%20fully%20charged%20battery%20will,from%20the%20hydrometer%20packaging%20instructions.
- ↑ https://www.golfcarcatalog.com/golf-cart-blog/testing-golf-cart-battery/#targetText=A%20fully%20charged%20battery%20will,from%20the%20hydrometer%20packaging%20instructions.
- ↑ https://www.golfcarcatalog.com/golf-cart-blog/testing-golf-cart-battery/#targetText=A%20fully%20charged%20battery%20will,from%20the%20hydrometer%20packaging%20instructions.
- ↑ https://www.golfcarcatalog.com/golf-cart-blog/testing-golf-cart-battery/#targetText=A%20fully%20charged%20battery%20will,from%20the%20hydrometer%20packaging%20instructions.
- ↑ https://www.golfcarcatalog.com/golf-cart-blog/testing-golf-cart-battery/#targetText=A%20fully%20charged%20battery%20will,from%20the%20hydrometer%20packaging%20instructions.
About This Article