This article was co-authored by wikiHow Staff. Our trained team of editors and researchers validate articles for accuracy and comprehensiveness. wikiHow's Content Management Team carefully monitors the work from our editorial staff to ensure that each article is backed by trusted research and meets our high quality standards.
There are 12 references cited in this article, which can be found at the bottom of the page.
This article has been viewed 33,618 times.
Learn more...
Huarache running sandals are a type of shoe that some barefoot runners use. These can be tied by making sure that the strap is snug around your foot, before wrapping it several times around your ankle and tying a slip knot. Alternatively, Nike Huaraches are a popular design of sneakers for men, women, and children. These can be laced by threading each end of the shoelace through the next opposite eyelet, and working your way up the shoe.
Steps
Tying Huarache Running Sandals
-
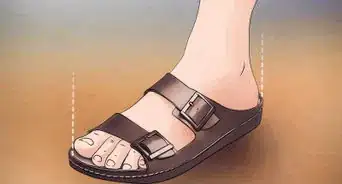
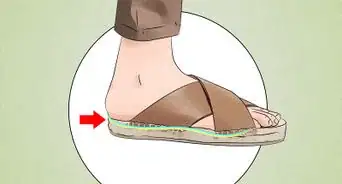
1Place your foot into the sole of the sandal . The front strap goes in between your first and second toe. Make sure that the straps aren’t twisted and that your foot feels comfortable.
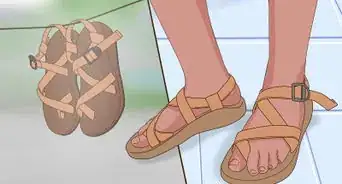
- You can purchase huarache running sandals from specialty running footwear stores or online.
-
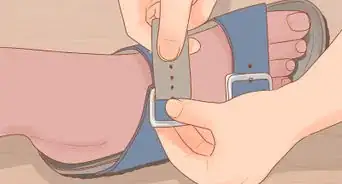
2Adjust the 3 sections of strap so that they feel snug on your foot. Adjust the strap by pulling it through each hole to make it either shorter or longer. Tighten the section that goes over the top of your foot first. Then move onto the heel section of the strap, before adjusting the side section last.Advertisement
-
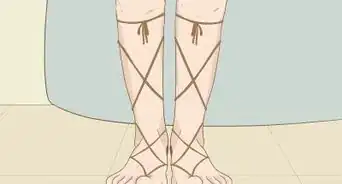
3Wrap the strap around your ankle until you have about 8 in (20 cm) left. Wind the strap several times around your ankle, beginning just above your ankle bone. Keep the strap untwisted as you wrap it, and work your way up your ankle slightly with each revolution.
- The strap should feel snug, but not too tight. If the strap feels uncomfortably tight, or too loose, unwrap it and start again.
- As you get more practice with wearing huaraches, you will find a level of tightness that works best for you.
-
4Push the end of the strap under the section that is over the top of your foot. Pull the strap end below the section of the strap that runs over your foot. Make sure that it feels snug and secure.
-
5Pull the end of the strap back towards your ankle. After you slide the strap under the section that goes over your foot, wrap it back over the top so the ends of the strap are pointing toward your ankle. Cross the end of the strap over the section that you just made to form an eye-hole.
-
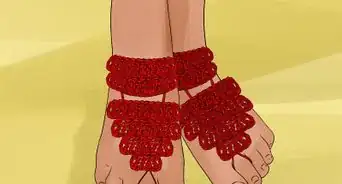
6Form a slip knot using the eye-hole. Make a small loop using the end of the strap. Put the loop into the eye-hole, and keep holding the loop as you pull the sections of the strap that form the eye-hole tight around the loop.The loop should be about the same circumference as your finger.
- Tighten the slip knot until it feels snug against your foot.
- When you have made the slip knot, this means that you have successfully tied the sandal!


Lacing Nike Huarache Sneakers
-
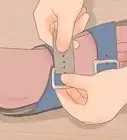
1Pull the laces towards the shoe through the bottom 2 opposite eyelets. Hold the 2 ends of the shoelace. Put 1 end through each bottom eyelet from the top of the shoe (from the outside-in). Make sure that there is an even length of shoelace on each side.[3]
- Make sure that the shoelaces aren’t twisted and rest flat across the eyelets.
- This is the factory lace which new Nike Huarache sneakers are sold with. If your pair are brand new, they may already have this part of the lacing done.
-
2Take one end of the shoelace and pull it through the lowest opposite eyelet. Bring it through the eyelet going from the inside, outward and away from the shoe. Pull it until it rests flat.[4]
-
3Bring the other end of the shoelace through the lowest opposite eyelet. Repeat the process of bringing the shoelace out from the inside of the shoe. Make sure that the shoelace isn’t twisted.[5]
- Your shoe will now have 1 lace going straight across the bottom eyelets, and 2 more crossing diagonally.[6]
-
4Pull the first end of the shoelace through the next lowest opposite eyelet. This lace will follow the same process of going through by the shoe tongue and out through the eyelet and away from the shoe. Pull the shoelace so that it isn’t twisted, and is relaxed and not too tight.[7]
-
5Repeat the process of lacing the shoelace through the next opposite eyelet. Alternate between pulling each end of the shoelace through the lowest eyelet on the other side. Work your way up the shoe until you reach 3 eyelets on each side.[8]
- Ensure that the lace stays flat the whole time. If it gets twisted, turn the lace to adjust it as it happens, as otherwise you will have to undo the laces to reach it.[9]
- You will have a series of laces that are diagonally crossed in the center going up the shoe, with 3 eyelets left on either side at the top of the shoe.
-
6Bring each end through the next opposite eyelet from the outside in. Pull the shoelace through in the opposite direction to how you tied the rest of the shoe. Repeat the same process with the other end of the shoelace.[10]
- The shoelaces will come from the outside, through the eyelet, and be against the shoe tongue.
- There will be 2 eyelets on either side of the shoe remaining after this step.
-
7Pull each end through the next opposite eyelet from the inside. The ends of the shoelace will be by the tongue of the shoe. Bring each end through the opposite eyelet from the inside, so that it exits away from the shoe.[11]
- This leaves 1 end hanging on the outside of the shoe from each eyelet.
- There will be 1 unused eyelet on each side of the shoe when you have finished lacing it.
- If you find that the ends are uneven, loosen the laces a little bit and pull on the shorter lace to even it out.[12]


-Step-13.webp)


References
- ↑ https://youtu.be/BwEusN9DCxw?t=53
- ↑ https://youtu.be/BwEusN9DCxw?t=63
- ↑ https://youtu.be/VbXGBzVr0B4?t=64
- ↑ https://youtu.be/VbXGBzVr0B4?t=93
- ↑ https://youtu.be/VbXGBzVr0B4?t=112
- ↑ https://youtu.be/VbXGBzVr0B4?t=126
- ↑ https://youtu.be/VbXGBzVr0B4?t=153
- ↑ https://youtu.be/VbXGBzVr0B4?t=321
- ↑ https://youtu.be/VbXGBzVr0B4?t=182
About This Article