This article was co-authored by wikiHow Staff. Our trained team of editors and researchers validate articles for accuracy and comprehensiveness. wikiHow's Content Management Team carefully monitors the work from our editorial staff to ensure that each article is backed by trusted research and meets our high quality standards.
There are 10 references cited in this article, which can be found at the bottom of the page.
This article has been viewed 22,215 times.
Learn more...
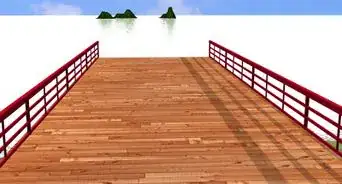
Composite decks are made of recycled wood and plastic material. Not only are they an environmentally friendly choice, but they’re more weather-resistant and require less maintenance than wood. Installing them is as easy as screwing specialty clips onto the deck frame and sliding the boards between the clip prongs. You can also improve your deck with composite railings by covering the posts with sleeves and screwing on brackets. Your work will give you a beautiful deck that lasts longer than any wood one in your neighborhood.
Things You Should Know
- Trex composite decking is made out of recycled wood and plastic, which makes it a fairly low-maintenance and weather-resistant option.
- It is not recommended that you build a Trex deck (or any kind of deck) without looking into your local permit requirements.
- You generally have to hire a licensed contractor to install Trex decking, and you may need to pay for architectural plans.
- Trex boards typically snap together using built-in grooves or clips, and you can typically connect the boards together by hand; you can cut boards to size with a circular or miter saw.
- Trex decking can be used the same exact way you use normal deck lumber.
Steps
Getting Ready to Lay Composite Boards
-
1Purchase composite boards. Composite boards from Trex and other manufacturers can be ordered online. You can also find them at lumber or home improvement stores. They’re a little more expensive and less rigid than wood, but they’re more weather-resistant and require less maintenance.[1]
- You’ll need about 20 2 by 6 inches (51 by 152 mm) boards cut 16 feet (4.9 m) long to complete a small deck of 144 square feet (13.4 m2).
-
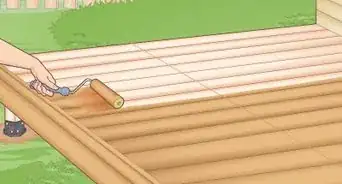
2Choose lighter boards to maintain a cooler deck. Not all composite boards are the same color. Darker boards naturally absorb more light, which means they get hot. Think of trying to walk across asphalt with bare feet. If you have a pool nearby or otherwise plan on using the deck while barefoot, choose light-colored boards.[2]Advertisement
-
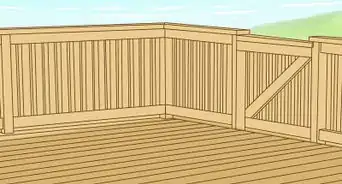
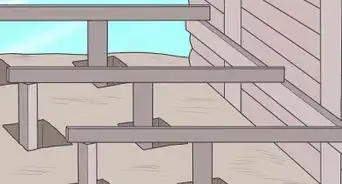
3Build the deck frame first. Before you can lay planks, you’ll need to build the frame. This is done with wood. You’ll screw a ledger board to your house, then run joists from the board to the opposite end of the deck. The joists hold the composite boards in place.[3]


Installing Composite Boards
-
1Install start/stop clips near the house. These clips hold grooved composite boards in place. Start on the side closest to the house. Pick up one of the clips and place it on the edge of the deck frame. Space the clips out about 16 inches (410 mm) from each other. They should each line up with a joist, which is a piece of timber that runs down to the other end of the deck. Secure each clip with a pair of screws.
- To calculate the number of clips you need, multiply the number of deck boards by the number of joists. For a small 144 square feet (13.4 m2) deck, you’ll need about 120 clips.
- If your boards don’t have grooves on the sides, don’t install clips. Instead, lay the boards and attach them later with hidden fasteners.
-
2Set the first board in the clip. You’ll notice that the composite boards have grooves on their sides. The board’s grooves are meant to fit over the clip’s prongs. Pick up a board and push it against the prongs.[4]
- Don’t worry if the board hangs over the side of the frame. You can cut it later.
-
3Attach a prong to the other side. Now you have to clip the other side of the board. Each clip should be across from a clip on the opposite side. This will be easy if you lined up the clips with the joists, since you can use the joists for guidance. Push the prongs into the board’s groove, then fasten the clips to the joist with a pair of screws.[5]
-
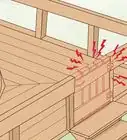
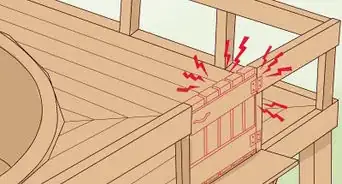
4Cut holes for posts in the boards. If you plan on including posts for deck railings, you’ll have to make space for them as you lay the boards. Measure the length and width of the post and plot out the measurements on the board. The boards cut like wood, so you can use a miter saw or jigsaw to carve out a hole to hold the posts.[6]
- Each post will most likely be surrounded by two boards. Divide the post’s length measurement in half and cut this reduced measurement evenly into both boards.
-
5Lay down the next board. Finishing the deck requires a pattern of boards and clips. Place the next board on the deck, attaching the groove into the free side of the clips you laid previously. Then, place clips on the other side of the board, screwing them in place. Continue this process until all the boards are laid.[7]
- You’ll notice that the clips leave a little space between each board. This is a good thing, since it helps water drain off the deck.
-
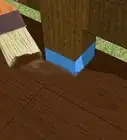
6Cut the boards to length. Now it’s time to cut down the board overhang with a circular saw. Go around the sides of the deck and cut the boards so they’re even with the frame. On the long side opposite the house, you can also cut the board until it is even, or leave about 1 1⁄4 inches (32 mm) of overhang if you plan on adding skirting.[8]
- Skirting isn’t necessary, but it looks nice. You can cut the framing so it slopes upwards towards the deck’s surface, then cover it with composite boards.
-
7Install parting boards in the center of the deck. Parting boards provide extra water drainage. In the center of the deck, measure out a space 24 feet (7.3 m) wide. Mark the space with a chalk outline all the way to the top and bottom sides of the deck. Cut it out with a circular saw and fill it with two 12 by 12 feet (3.7 by 3.7 m) boards.
- You may need to add an extra joist to support these boards. This can be done by getting a piece of wood as long as the deck, placing it in the hole you cut, and screwing it to the framing.
-
8Secure all the boards with screws. Hidden fasteners work best for securing composite planking and can be found at any home improvement store. Place the screws where the planks rest on top of the joists. Use an electric screwdriver to get the screws in place, then fill the holes by hammering in the composite plugs included with the screws.[9]
- It’s best to place all the screws first, since adding the plugs can cause you to lose track of what you’ve already done. They’re called hidden fasteners for a reason!
- To calculate how many fasteners you need, multiply the number of boards by the number of joists. You’ll need several hundred fasteners for a small deck.


Setting up Railing Posts
-
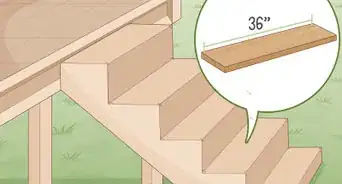
1Measure out the post spacing. Start by measuring one side of the deck between the two corner posts. The corner posts will be placed where the sides of the deck and house meet. Once you’ve measured the distance, divide it by the space you plan on leaving between posts. This gives you an estimate of the number of posts you need to cut.
- For example, if you have a 15 feet (4.6 m) space, you can place two more posts between the corner posts.
-
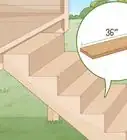
2Cut the posts to length. You’ll need wood to saw into posts. Remember that the posts will line up with the bottom of the deck joists, so cut them longer as needed. Cut out two corner posts, then cut out as many posts as specified in your measurements.
- The post length you use depends on what you want as well as what government codes specify. Check with your local government for details first.
-
3Install deck bracing. To get bracing for the posts, you’ll need to get the same wood used to create the deck frame. The bracing spans the gap between joists, so measure this gap and cut the wood to length. Then, place a piece of the bracing next to where the post will go and fasten it to the deck frame with deck screws.
-
4Attach the posts to the deck frame. Line up the posts with the bottom of the deck. Each post should rest against the joist on one side and the bracing on another. Drill a couple of screws into each side to secure the posts.[10]
- You can use clamps to hold the posts in place as you work.
-
5Mark the joists where you’ll drill security bolts. Go to the part of the joist attached to each post. In the center, measure 2 inches (51 mm) from the top and two inches from the bottom. Mark each spot with a pencil.[11]
-
6Drill bolt holes on the marked spots. Get out a power drill and dig all the way through the joist. The hole should go into the post itself. This way, you can add a few bolts to firmly hold the posts in place.
-
7Install anchor bracing. You can purchase anchor braces at a home improvement store. Install the first one by holding it over the uppermost hole you drilled. Push a carriage bolt through it and tap the bolt in with a hammer before tightening it with a nut and washer. Attach the other end of the anchor with screws in each of its smaller holes.[12]
- Plan on using two anchor braces and four bolts for each post.
-
8Fasten a bolt in the bottom bolt hole. A second bolt will make your deck posts strong and long-lasting. You don’t need a second anchor brace at the moment. Tap in the carriage bolt and tighten it with a wrench. Secure it with a nut and washer.[13]
-
9Add a second anchor bracing on the other side of bolted joists. To give your posts extra strength, bolt on a second anchor bracing the same way you did with the first one. The anchor is placed on the other side of the joist except facing in the opposite direction of the first brace. The screw end will be in the middle of the deck bracing again, but the bolt end attaches to the outside of the deck frame.


Installing Railings
-
1Slide post sleeves over the posts. You can get railing sleeves that are made of the same recycled material as composite boards. They’re sold at home improvement stores and are very easy to install. Simply slide them over the railing posts. If the sleeve is too long, cut it off with any saw you’d use on wood.[14]
-
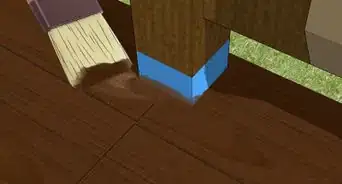
2Glue post sleeve collars with PVC cement. PVC cement is sold wherever you purchased the sleeves. If you are attaching collars (ornamentation that goes on the bottom of the post), you’ll need the glue to hold it in place. Follow the directions on the packaging for proper usage.[15]
-
3Measure out the railing length you need. You’ll need to use your tape measure for plot out both a bottom and top rail. Subtract 1⁄4 inch (6.4 mm) from the bottom rail’s measurements on both sides. Mark your measurements on the railings before cutting them.[16]
-
4Cut the rails to length. You can purchase composite railings or railing kits at home improvement stores. If the railings are too long, cut them according to your measurements earlier. You can use a circular saw to do this. Remember that the bottom railing will come out a little shorter than the top one.
-
5Glue a crush block on the bottom rail. Make sure the holes in the bottom rail face upwards. Use your PVC cement to glue the small block to the bottom-center of each rail. It should not cover the holes, since you’ll need them to attach the balusters later. This crush block strengthens the middle of the railing.
- Crush blocks can be purchased wherever railings are sold.
-
6Trace the bottom brackets on the post. First, slide the brackets onto the bottom rail. Hold it firmly against the post as you trace the bracket with a marker. The crush block should provide plenty of support as you work. Do this for both sides of the railing.[17]
- To complete your project, you’ll need two brackets for every railing.
-
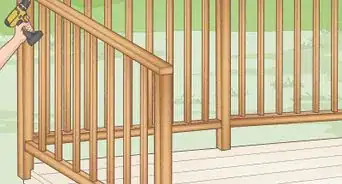
7Install the bottom brackets on the posts. Hold the bracket up and mark its holes on the post. Drop the bracket and drill the holes directly into the post. When finished, place the brackets on the post and secure them with screws. Repeat this for the post that will hold the other side of the rail.
-
8Slide the rail onto the bracket. All you need to do is set the ends of the rail on the brackets. When positioned correctly, it’ll lock in place. It’ll look even and won’t move when you touch it.[18]
-
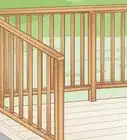
9Set the end balusters and top railing in place. The balusters are the columns spanning the length between the top and bottom railings. To start, set a baluster on either end of the bottom railing. They fit into the railing holes. Once they’re in, set the top railing over them.[19]
-
10Trace and install the top brackets. Set the brackets on the top railing and trace them against the posts. Repeat the steps to install them, marking the screw holes and drilling them out. When you’ve secured the brackets in place, you’re almost finished with the railing.
-
11Connect the railing to the brackets and balusters. Insert all the balusters into the holes under the top railing. Once secure, slide the railing onto the brackets. You can then glue caps on top of the posts with PVC cement and move on to the next railing you wish to install.


Things You’ll Need
Installing Composite Boards
- Composite boards
- Board clips
- Circular saw
- Measuring tape
- Hidden fasteners
- Electric screwdriver
- Hammer
Setting up Railing Posts
- Tape measure
- Circular saw
- Wood
- Drill
- Screws
- Carriage bolts
- Wrench
- Anchor braces
Installing Railings
- Post sleeves
- PVC cement
- Tape measure
- Crush block
- Rails
- Railing brackets
- Screws
- Drill
- Circular saw


References
- ↑ https://www.thisoldhouse.com/ideas/all-about-composite-decking
- ↑ https://www.familyhandyman.com/decks/building-a-deck/how-to-build-a-deck-with-composites/view-all/
- ↑ https://www.familyhandyman.com/decks/building-a-deck/how-to-build-a-deck-with-composites/view-all/
- ↑ https://www.todayshomeowner.com/video/diy-composite-deck-installation/
- ↑ http://www.decks.com/how-to/349/installing-composite-decking
- ↑ https://howchoo.com/g/otlmm2fly2r/how-to-notch-decking-around-a-post
- ↑ https://s7d4.scene7.com/is/content/Trex/trex-installation-guide-2017pdf.pdf
- ↑ https://www.familyhandyman.com/decks/building-a-deck/how-to-build-a-deck-with-composites/view-all/
- ↑ https://www.familyhandyman.com/decks/building-a-deck/how-to-build-a-deck-with-composites/view-all/
- ↑ https://s7d4.scene7.com/is/content/Trex/trex-installation-guide-2017pdf.pdf
- ↑ http://www.decks.com/how-to/248/deck-rail-post-attachment
- ↑ https://s7d4.scene7.com/is/content/Trex/trex-installation-guide-2017pdf.pdf
- ↑ http://www.decks.com/how-to/248/deck-rail-post-attachment
- ↑ https://s7d4.scene7.com/is/content/Trex/trex-installation-guide-2017pdf.pdf
- ↑ https://www.fiberondecking.com/assets/downloadable-resources/horizon-railing-installation-fib-0329-lit.pdf
- ↑ http://www.decks.com/how-to/353/deck-railing-height
- ↑ https://www.certainteed.com/resources/FRD_Railing_Decking_Install_Instructions.pdf
- ↑ https://s7d4.scene7.com/is/content/Trex/trex-installation-guide-2017pdf.pdf
- ↑ https://s7d4.scene7.com/is/content/Trex/trex-installation-guide-2017pdf.pdf
About This Article