This article was co-authored by Jonas Jackel. Jonas Jackel is the Owner of Huckleberry Bicycles, a bicycle retail store based in San Francisco, California. Jonas has over 20 years of experience managing bicycle retail stores and has operated Huckleberry Bicycles since 2011. Huckleberry Bicycles specializes in servicing, repairing, and custom building road, cross, gravel, touring, folding, and e-bikes. Jonas was also previously sat on the Board of Directors for Bike East Bay, a bicycle-advocacy non-profit organization based in Oakland, California.
There are 18 references cited in this article, which can be found at the bottom of the page.
This article has been viewed 31,743 times.
If you ride your bike often enough, you can get a sense of when the steering is off. It happens when the handlebars shift out of alignment, but it’s a simple correction you can do on your own to make your ride more comfortable. If you’re lucky enough to have a model with adjustable handlebars, your bike will have several you can use for fine-tuning. Threaded and threadless bikes require a little more creativity, but both have a hexagonal bolt you can remove to detach the steering wheel. Old-fashioned threaded bikes have visible locking nuts you can also rotate by hand. Whether you’re packing up your bike or trying to fit a package on it, you can adjust the handlebars to make maneuvering easier.
Steps
Turning Handlebars for Storage
-
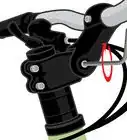
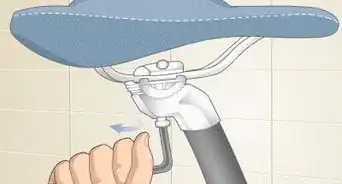
1Unscrew the pinch bolt on the bike’s stem. Follow the handlebars from the front part of the bike to the stem. On many bikes, you will see a single bolt on the side of the stem facing the seat. Use a 6 mm (0.24 in) hex key to turn the bolt counterclockwise, enough to loosen the handlebar fork.[1]
- Some bikes, including older models, have a bolt on top of the stem. It can also be undone with a hex key.
-
2Stand in front of the bike with the front wheel between your legs. Get close enough that you’re able to reach the bike’s stem. Grip the wheel between your legs so it can’t move. You should have plenty of leverage to rotate the handlebars.
- If you try to stand elsewhere, be prepared for the bike to roll forward. Hold onto it or set it up against a solid surface.
Advertisement -
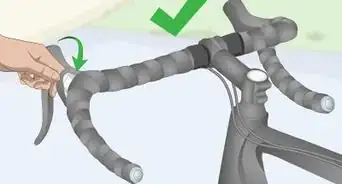
3Rotate the handlebars as far as you can to the side. While holding the wheel still, pull the handlebars to one side. Think of how you want to store the bike, then pick the side where the handlebars will be most out of the way. It usually doesn’t matter which way you choose, but you can turn them all the way to one side if you’re going to store the bike next to something else that might be in the way. Try turning them so they are perpendicular to the bike’s stem.[2]
- You can also detach the handlebars. Pull the handlebar fork off the stem and store them separately. If you have detachable handlebars, you could pull them off as well.
-
4Screw the bolt back onto the bike to secure it in place. Fit the bolt back onto the handlebar fork, either behind the stem or on top of it. Rotate it clockwise using a hex key. Once it is back in, the handlebars won’t be movable. You can then walk your bike to storage or shipment.
- If you’re keeping any parts separate from the rest of the bike, keep them well-protected. Save the pinch bolt until you’re ready to put the bike back together again.


Operating Adjustable Handlebars
-
1Unscrew the pinch bolt on the stem with a 6 mm (0.24 in) hex key. Look along the handlebars to find any noticeable screws. The main screw will be behind the vertical length of tubing joining the handlebar fork to the rest of the bike. Rotate it counterclockwise to loosen it. Some bikes have more than one screw, so be sure to note any additional ones you see closer to the handlebars as well.[3]
- If your bike has extra screws, you can use them for more precise adjustments. To collapse the handlebars, loosen the screws on them. The extra screws on the stem have to be loosened to shift the handlebars to the side.
- If your bike doesn’t have these screws, then the handlebars aren’t adjustable. Instead, loosen the threaded or threadless stem to turn the handlebars.
-
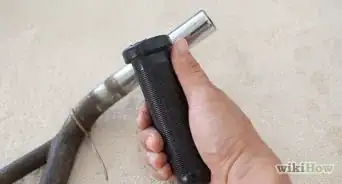
2Slide the handlebars to the correct position. The handlebars slide off the bike once the screws are gone. If you’re unable to move them at first, try squeezing the brakes. You could also spray a lubricant, such as an anti-seize grease, to deal with stuck handlebars.[4]
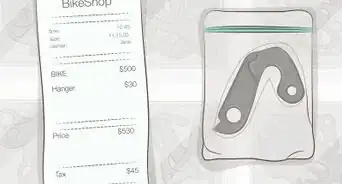
- The handlebars are completely removable on some bikes. Save the screws in a plastic bag or another secure spot so you have them when you’re ready to put the handlebars back on.
-
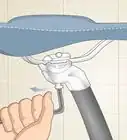
3Undo the stem bolt with a hex key if the handlebars require further adjustment. Check the very top of the stem, above the spot where it meets the handlebars. Insert a hex key into the bolt you see there. Rotate the bolt counterclockwise to loosen it. Once you’re able to get a grip on it, you can finish turning it by hand to remove it.[5]
- The bolt is often centered within a cap meant to cover the stem. Set the bolt and cap aside to reinstall later.
-
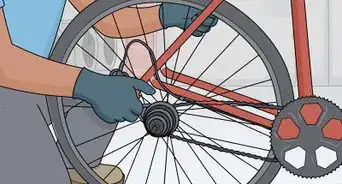
4Pull the handlebar fork off the stem by hand. Stand in front of the bike and hold onto the front wheel. With the bolt removed, the handlebars will be free from the bike’s stem. Lift the column up while holding the bike steady. If it sticks in place, wiggle it from side to side while simultaneously attempting to lift it.[6]
- The handlebars don’t come off. They stay attached to the rest of the fork, including the piece connecting them to the stem.
-
5Turn the handlebar fork to the side to reposition it. Hold the column over the stem and rotate it in the direction you desire. When you’re done, lower the fork back onto the stem. Make sure the end of the fork is securely on bike so you can bolt it back in place.[7]
- You may also see some black rings on the bike’s stem. These spacers are used to change the handlebar’s height. Raise the spacers on the stem to set the handlebar higher than usual, for instance.
-
6Reinsert and tighten the bolts to secure the handlebars in place. Start with the uppermost screw. Lower the screw and cap, turn it clockwise by hand, then finish tightening it with a hex key. Retighten the remaining screws on the stem afterward by also turning them clockwise with the hex key.[8]
- Make sure the cap isn’t flush with the top of the stem. Leave a small space so it isn’t pushing down on the stem. This will allow the handlebars to move without putting too much pressure on the stem.
- While adjusting the handlebars, do not put them in a position where the brake levers are parallel to the ground instead of being at a 45-degree angle. It will make it harder to squeeze the brake levers.[9]
- Do not clamp the stem bolts incorrectly and let handlebars be loose and not properly installed on the stem.
- When you install the handlebar and tighten the stem bolts ensure the gap between the faceplate and the stem is even on the top and bottom.


Rotating Handlebars on a Threadless Bike
-
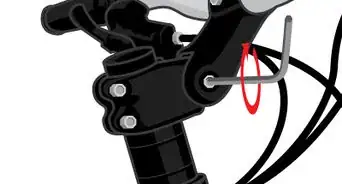
1Find the hexagonal expander bolt on top of the stem. Follow the stem up from the base of the bike to locate the bolt. You could also follow the handlebars down toward the stem. The bolt is usually on the very top of the stem. It will be sunken into the stem to keep the handlebar fork locked in place.[10]
- Threadless bikes have only the bolt holding the handlebars to the rest of the bike. You won’t see any additional rings lower on the stem for extra adjustment.
- Most bikes made after the year 2000 are threadless. Bikes with multiple speed settings are always threadless so riders can make simple adjustments on the go.
-
2Stand in front of the bike and hold the wheel still. Move toward the front wheel and face the bike. Position the wheel between your legs. Keep a strong hold on the wheel so the bike can’t move while you’re trying to detach the handlebars. They handlebar fork can be a little tough to remove, and you won’t have much luck without being able to generate a little leverage.[11]
- Hold onto the bike for safety as well as to prevent the hex key from slipping off of the bolt.
-
3Use a 6 mm (0.24 in) hex key to turn the bolt counterclockwise. The bolt will most likely be difficult to turn at first, so apply plenty of pressure to it. Rotate the bolt 2 or 3 times to loosen it. You don’t have to remove the bolt to adjust the handlebars.[12]
- If you choose to remove the bolt, set it aside in a safe spot until you’re ready to reinstall it. Try keeping it in a small container so it doesn’t get lost.
-
4Pull the handlebar fork off the bike by turning and lifting it. While holding the bike still, begin turning the handlebars back and forth from side to side. Attempt to lift them at the same time. The fork is pretty stubborn, so it won’t slide straight off the stem. However, with a little bit of repeated effort, it won’t stay stuck for long.[13]
- The fork becomes more difficult to remove as it gets dirty and wears out with age. Sometimes, tapping the top part of the stem with a rubber mallet helps loosen it.
- This is a good time to wipe the stem clean and even lubricate it with an anti-seize grease.
-
5Rotate the handlebars to reposition them on the bike. Hold the detached handlebars over the bike and turn them toward the direction you desire. When you’re done, fit the fork back onto the stem. Make sure it is on straight and well-secured to the stem before screwing everything back together.[14]
- Keep in mind that the bike will be a little harder to control if the handlebars point in a different direction from the wheel. Readjust the handlebars when you’re ready to ride again.
-
6Lock the handlebars in place by using a hex key to tighten the bolt. Hold the front wheel steady with your legs. Then, slide the hex key into the bolt on top of the bike’s stem. Rotate the bolt clockwise 2 or 3 times to finish putting the bike back together. You can test it afterward by attempting to move the handlebars.[15]
- When the bolt is at the right setting, the handlebars will stay in place without being difficult to move. Make adjustments as needed, especially if you’re going to be moving the bike.
- Loosen the bolt to loosen the steering. Tightening the bolt makes steering the bike feel a little stiffer, but it also puts additional pressure on the stem.


Adjusting a Threaded Bike
-
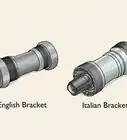
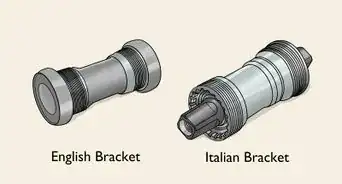
1Locate the threaded lock nut separating the handlebars and stem. Starting at the handlebars, look along the length of the stem. The locking nut will be between the handlebar fork and the rest of the bike. It looks like a metal ring wrapped around the stem. It will also be positioned on top of a second nut.
- The top nut is used to unlock the handlebar. The bottom one controls the tension in the stem, so it’s an important part of keeping your bike functional.
- A lot of bikes made before the year 2000 are threaded. Some modern, inexpensive single-speed and fixed gear bikes still have threaded lock nuts.
-
2Stand in front of the bike and grip the wheel between your legs. Face the handlebars, then get a firm hold on the wheel. Make sure you’re able to comfortably reach both of the nuts without losing your hold on the bike. Keep it steady so you’re able to get enough leverage to turn the locknuts.
- Sometimes you have to use a bit of force to move the lock nuts, so the bike could get away from you if you don’t have a good grip on it.
-
3Turn the upper lock nut with a wrench to free the handlebars. Get an adjustable wrench that fits well around the lock nut. A 32 mm (1.3 in) wrench works well for most bikes. Fit the wrench onto the top lock nut on the stem, then rotate it counterclockwise. After the initial turn, it will be loose enough for you to finish rotating by hand.[16]
- Test the lock nut when you are done. If you are able to turn it back and forth by hand, the handlebars have been unlocked and are ready for adjustment.
-
4Use a 6 mm (0.24 in) hex key on the stem bolt if your bike has one. Most bikes have an additional bolt holding the stem in place. If you look down on the stem from above, you will be able to see it. Insert the hex key, then turn it counterclockwise 2 or 3 times. Finish removing the bolt by hand once it has come loose.[17]
- The bolt is what holds the handlebars to the stem. While it’s in place, you won’t be able to remove the handlebars to turn them.
-
5Pull the handlebar fork off the bike and readjust it. While you’re holding the bike steady between your legs, begin trying to lift the handlebars off of the stem. On a lot of threaded models, the fork slides off without issue. You can then rotate the handlebars to the side. When you’re done, slide the fork back onto the stem.[18]
- If the fork sticks to the stem, turn it from side to side while also lifting it up. It will eventually come out. You could also tap it with a rubber mallet to help it come loose.
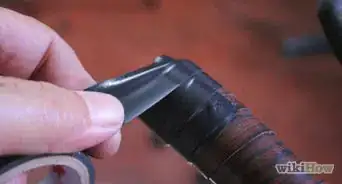
- While you have the fork out, wipe off any debris and treat it with an anti-seize grease.
-
6Reinstall the hex bolt to secure the handlebars to the bike. Make any final adjustments to the handlebar positioning before locking the fork in place. When you’re ready, slot the screw back through the hole on the stem. Turn it clockwise 2 or 3 times until it has been sufficiently tightened. Check the handlebars afterward to make sure they are stable.
- If the handlebars feel difficult to move, loosen the bolt a little. Tighten it if they feel wobbly.
- Be careful to avoid overtightening the bolt. It could get stuck in place and become harder to remove next time.
-
7Turn the bottom locking nut by hand if the handlebars are difficult to move. The second locking nut controls the internal components in the stem, so it can have a serious effect on your bike. Try moving the handlebars back and forth a few times. If it feels stiff, rotate the nut counterclockwise by hand to loosen it. Turn it clockwise to tighten it if the steering feels wobbly.[19]
- Tightening the nut can lock the handlebars in position, but it puts more stress on the stem. If you attempt to ride the bike, the extra pressure could cause the stem to wear out.
-
8Tighten the top locking nut with a wrench to secure the handlebars in position. Before doing anything else, attach a wrench or pliers to the lower nut. Hold it in place while you’re rotating the top nut with a wrench. Turn the nut clockwise until you are no longer able to move it by hand. It requires 2 to 3 turns before it locks the handlebars in place.[20]
- Test the locking nuts before riding. Make sure you aren’t able to move them at all. If they feel loose, the handlebars could come out of alignment while you’re on the bike.


Warnings
- An improper adjustment could cause permanent damage to your bike. Be careful to avoid overtightening the locking mechanisms. If the steering feels too stiff, the lock is putting too much pressure on the stem.⧼thumbs_response⧽
Things You’ll Need
Turning Handlebars for Storage
- 6 mm (0.24 in) hex key
Operating Adjustable Handlebars
- 6 mm (0.24 in) hex key
- Clean cloth
Rotating Handlebars on a Threadless Bike
- 6 mm (0.24 in) hex key
- Clean cloth
Adjusting a Threaded Bike
- 6 mm (0.24 in) hex key
- 2 32 mm (1.3 in) wrenches
- Clean cloth
References
- ↑ http://www.adventurecycling.org/default/assets/resources/headsets.pdf
- ↑ http://www.adventurecycling.org/default/assets/resources/headsets.pdf
- ↑ https://www.youtube.com/watch?v=geSok-YQN-U&feature=youtu.be&t=53
- ↑ https://www.youtube.com/watch?v=geSok-YQN-U&feature=youtu.be&t=206
- ↑ https://www.youtube.com/watch?v=Q1rmPj2kmqg&feature=youtu.be&t=79
- ↑ https://www.youtube.com/watch?v=Q1rmPj2kmqg&feature=youtu.be&t=196
- ↑ https://www.youtube.com/watch?v=awag66wjX4k&feature=youtu.be&t=58
- ↑ https://www.youtube.com/watch?v=geSok-YQN-U&feature=youtu.be&t=378
- ↑ https://bikerumor.com/tech-how-to-choose-the-correct-road-bike-handlebar-size-shape/
- ↑ http://www.adventurecycling.org/default/assets/resources/headsets.pdf
- ↑ https://www.youtube.com/watch?v=OHGonAPmFvY&feature=youtu.be&t=6
- ↑ https://www.youtube.com/watch?v=1LTCthtmjD0&feature=youtu.be&t=271
- ↑ https://www.youtube.com/watch?v=D33BfAtgKcI&feature=youtu.be&t=71
- ↑ http://www.adventurecycling.org/default/assets/resources/headsets.pdf
- ↑ http://www.adventurecycling.org/default/assets/resources/headsets.pdf
- ↑ https://www.youtube.com/watch?v=mkCC2lz540E&feature=youtu.be&t=70
- ↑ https://www.youtube.com/watch?v=7aXu2J3m5ws&feature=youtu.be&t=19
- ↑ https://www.youtube.com/watch?v=_dlKzTB8xGg&feature=youtu.be&t=58
- ↑ https://www.youtube.com/watch?v=mkCC2lz540E&feature=youtu.be&t=174
- ↑ https://www.youtube.com/watch?v=oUKDY8FsrQg&feature=youtu.be&t=698
- ↑ https://www.bicycling.com/repair/a20016075/bike-repair-16/
- ↑ http://www.championunited.com/home/content/how-replace-road-bike-handlebar
About This Article