This article was co-authored by wikiHow Staff. Our trained team of editors and researchers validate articles for accuracy and comprehensiveness. wikiHow's Content Management Team carefully monitors the work from our editorial staff to ensure that each article is backed by trusted research and meets our high quality standards.
There are 11 references cited in this article, which can be found at the bottom of the page.
This article has been viewed 43,166 times.
Learn more...
The position of your handlebars will dictate your posture. Handlebars that are too low can make you uncomfortable as you ride. Luckily, raising your handlebars is easy as long as you know what you’re doing. First, you'll need to determine whether you have threadless or threaded handlebars. Then, you can reposition your handlebars by unscrewing them with an Allen wrench. If you follow the right steps, raising your bike handlebars can be quick and easy!
Steps
Raising Threadless Handlebars
-
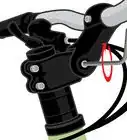
1Find the spacers above and below your handlebar stem. Your handlebar stem is the rod that the handlebars connect to. If you have a threadless system, you should see spacers, or plastic rings, wrapped at the top and bottom of your stem. If you don’t have these rings, then you most likely have threaded handlebars.[1]
- Threadless handlebars will also have additional screws on the back of the handlebars. Look for these if you’re unsure of what type you have.
-
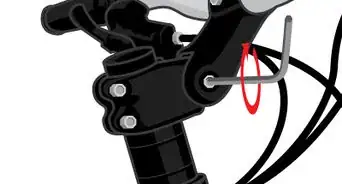
2Loosen the screws in the back of the handlebars. The screws located on the backside of the handlebars are called the pinch bolts and keep your handlebars from rotating side to side. Find an Allen wrench or hex key that fits the screws in the back of your handlebars. Turn the screws counterclockwise to loosen them. When they are loose, your handlebars should freely move side-to-side, independent of the wheel.[2]
- Read the product details on the bike to determine which size Allen wrench you need.
- The most common sizes of Allen wrenches used on bikes are 4mm, 5mm, and 6mm.[3]
Advertisement -
3Unscrew the bolt and top cap on the handlebars. Insert your hex key or Allen wrench into the bolt on the top of the handlebars and turn it counterclockwise to remove the top bolt. Once you remove the bolt, the cap will come off. Spacers should be attached above and below of the handlebars. Slide the spacers off above the handlebars and set them and the top bolt aside for later.[4]
-
4Lift your handlebars off the stem. Once you remove the cap, slide the handlebars off of the top stem. Set the handlebars aside.
-
5Place more spacers on the handlebar stem. Place the spacers that were on top of the handlebars over the spacers below. This will position your handlebars higher when you slide them back onto the stem.[5]
- If your handlebars don't have spacers above the stem and your steerer tube is too short to add some, then you may need to use a threadless stem raiser instead. This attaches to your handlebar stem to raise it higher. However, if you raise your handlebar stem too high, you may need to install longer cables and housing.
-
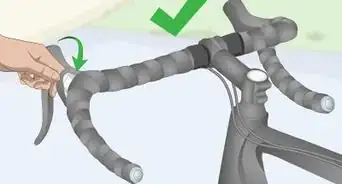
6Slide your handlebars back onto the stem. Stand behind your bike and line up the center of the handlebars with the wheel. If you don’t align them perfectly, it will feel awkward when you ride your bike. Keep the bars straight as you move onto the next step.[6]
-
7Tighten the bolts on the top and back of the handlebars. Slide any remaining spacers above the bars. Fit your hex key into the bolts on the back and top of the handlebars and turn them clockwise. Tighten them until you can’t move your handlebars up, down, or side to side.[7]
- If you don’t like the new height of your handlebars, remove your handlebars again and place fewer spacers below the handlebars.


Adjusting Threaded Handlebars
-
1Look for spacers and screws to see if your handlebars are threaded. Threaded handlebars have long stems that fit into the bike’s frame, whereas threadless handlebars will have bolts which attach the handlebars to the top of the handlebar stem. Look for screws on the backside of the handlebars, or plastic rings on the top and bottom of your handlebar stem. If you don’t have these, then you have threaded handlebars.[8]
-
2Measure from the top of the stem to the bike frame. Use a tape measure to determine the length from the top of the handlebars to the area where it goes into your bike’s frame. Write this measurement down on a piece of paper. This will help you revert back to your old handlebar height if you don’t like how your handlebars feel after you raise them.[9]
-
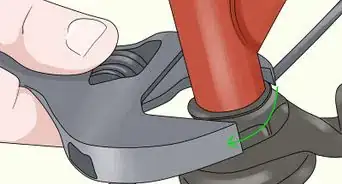
3Loosen the bolt on the top of the handlebars with an Allen wrench. Hold onto your handlebars with one hand and use the other hand to turn the top bolt counterclockwise with an Allen wrench or hex key. Turn the bolt 4-5 times, or until the handlebars are loose enough to move up and down freely.[10]
- A 6mm Allen wrench is a common size for the top bolt.
-
4Lift your handlebars and straighten them out. If you’re having trouble lifting the handlebars, rotate them left and right while lifting to loosen them. Stand in front of the bike to make sure that the bars are straight. Line up the front wheel with your handlebars once they are at the height that you want.[11]
- There are usually markings on your handlebar stem that designate how high the handlebars should go. Don’t raise them higher than these lines or your bike will be unsafe to ride.
-
5Tighten the top bolt on your handlebars. Once you’ve raised the handlebars to the height that you want, keep the handlebars straight and tighten the bolt on the top of them. If you did everything correctly, your handlebars should be raised higher up.[12]
- If you don’t like the new height of your handlebars, loosen your handlebars again and readjust them until they are at a height that feels comfortable.


Determining Optimal Handlebar Height
-
1Position your handlebars so you’re most comfortable. If you experience shoulder or back pain, it might be a sign that your handlebars are too low, and that you’re stretching too much as you’re riding. Experiment with different handlebar heights by adjusting the height and sitting on your bike. Choose the one that feels most comfortable to you.
- In an ideal position, your shoulders should feel relaxed and your core should feel engaged. You should lean forward at the hips but your spine should be straight.[13]
- Your handlebar placement can create a neutral, relaxed, or aggressive posture. For a neutral posture, keep your handlebars level with your seat. If you want a relaxed posture, raise your handlebars higher than your seat. To get an aggressive posture, lower your handlebars below your seat. Keep in mind that most riders prefer a neutral or relaxed posture.
-
2Raise your handlebars for a casual posture. Handlebars that are raised higher reduce how aerodynamic your body is as you cycle, but may be more comfortable for some people. However, if you raise your handlebars too high, it may be harder to turn your bike.[14]
- If your handlebars are too high, you won't be able to lean forward and it can cause saddle soreness or soreness in your back.
-
3Lower your handlebars for a more aerodynamic posture. If you want to ride your bike fast, you’ll probably want to lower your handlebars. Lowering the bars will curve your back and lower your shoulders which reduces wind resistance. If you want to race or gain a lot of speed, consider lowering your handlebars.[15]
- If you have to strain to reach your handlebars, they are too low.


Things You’ll Need
- Allen wrench set
- Threadless stem raiser (optional)

References
- ↑ http://www.bikeradar.com/us/gear/article/how-to-adjust-handlebar-height-38622/
- ↑ https://youtu.be/kGpVt0B6qIs?t=1m7s
- ↑ http://www.bikeradar.com/us/gear/article/bike-allen-keys-42917/
- ↑ http://www.cyclingweekly.com/videos/bike-fit-and-maintenance/handlebar-height-how-low-should-you-go
- ↑ http://www.bikeradar.com/us/gear/article/bike-allen-keys-42917/
- ↑ https://youtu.be/kGpVt0B6qIs?t=3m31s
- ↑ https://youtu.be/kGpVt0B6qIs?t=3m33s
- ↑ https://youtu.be/NjjMgPNieyk?t=23s
- ↑ http://www.madegood.org/bikes/repair/adjust-handlebars-attached-to-a-threaded-steerer/
- ↑ https://youtu.be/lIYw7WG82WM?t=11s
- ↑ http://www.madegood.org/bikes/repair/adjust-handlebars-attached-to-a-threaded-steerer/
- ↑ https://youtu.be/lIYw7WG82WM?t=44s
- ↑ https://www.liv-cycling.com/global/campaigns/proper-body-position-on-a-road-bike/20716
- ↑ http://www.cyclingweekly.com/videos/bike-fit-and-maintenance/handlebar-height-how-low-should-you-go
- ↑ http://www.cyclingweekly.com/videos/bike-fit-and-maintenance/handlebar-height-how-low-should-you-go
About This Article