This article was co-authored by Lauren Kurtz. Lauren Kurtz is a Naturalist and Horticultural Specialist. Lauren has worked for Aurora, Colorado managing the Water-Wise Garden at Aurora Municipal Center for the Water Conservation Department. She earned a BA in Environmental and Sustainability Studies from Western Michigan University in 2014.
This article has been viewed 185,546 times.
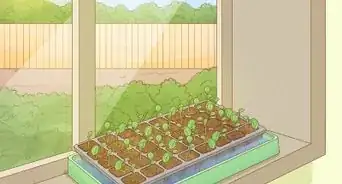
Growing bags are plastic or fabric bags that are used to grow plants with shallow roots. They are ideal for balconies or small gardens, where space is a premium. Growing bags are also great because they are re-usable and put out very little waste. To use a growing bag, prepare the grow bag for your chosen plant, install the plant, and care for the bag so that you have a healthy plant for the duration of the season.
Steps
Getting Your Grow Bag Ready
-
1Purchase your growing bag. You can purchase a growing bag at a nursery or home improvement store. You can choose a plastic or fabric growing bag, but fabric growing bags often need to be watered more than plastic bags. Choose the bag according to the size of the roots. Don’t buy a very large bag unless you are going to plant something large.
- For example, you would need a 50-gallon bag if you’re planting something as large as a grapefruit tree.
-
2Line the grow bag with clay pebbles to aid drainage. If the type of potting mix you’re using isn’t susceptible to drainage, you may need to line the bottom of your grow bag. You can line the bag with clay pebbles or chunky perlite. Put enough of the pebbles or perlite at the bottom of the bag to cover it completely.
- Use at least 1 inch (2.5 cm) of pebbles or perlite in the bag.
Advertisement -
3Add soil to the grow bag. You can use a compost-like gardening soil, a compost made specifically for containers, or you can make your own mix. A mix that is ideal for growing bags is 1/3 moss, 1/3 compost mixture (like chicken manure or mushroom compost), and 1/3 vermiculite (a moisture-retentive mineral). Fill the growing bag up almost all the way, leaving a a couple of inches (5 cm) of space at the top of the bag.
-
4Loosen and shape the bag if it doesn't have any already. Once the soil is in the bag, shake it a bit and knead it as if it were a pillow to loosen it up. Then, shape the bag into a low hummock (hill-like shape). This is to ensure that the soil has been evenly spread.[1]
-
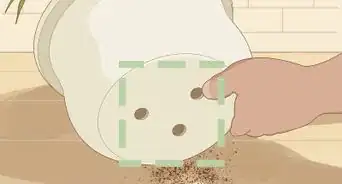
5Pierce drainage holes in the bag if it doesn't have any. Pierce the bottom of the bag with scissors. The holes should be the size of the hole punctured by the scissors, and they should be about half an inch (1.3 cm) apart. The holes are only meant to release excess moisture.[2]
- If your bag already has drainage holes, you can skip this step.


Adding Plants
-
1Choose plants with shallow roots for best results. Shallow-rooted plants are ideal in the bag because they will not be stunted by the bottom of the bag. Good choices include tomatoes, peppers (capsicum), eggplants, zucchini, cucumbers, marrow, strawberries, French beans, lettuce, potatoes, herbs, and flowers.[3]
- You can, however, grow larger items, like trees, if you have purchased a very large growing bag.
-
2Position the bag where you will grow your plants. Growing bags are easy to move and can be placed in a variety of locations. They can be put on a balcony, outside in a garden, or in a greenhouse. Consider the amount of sunlight and warmth your plants will need when choosing the location.[4]
-
3Scoop out soil to make room for the plants. Scoop out the soil with your hands or a trowel. Make sure that you’ve scooped out enough soil so that the entire root of the plant can be covered once it has been planted.[5]
-
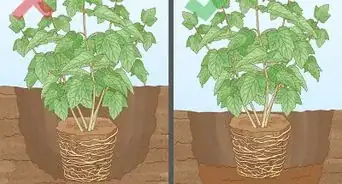
4Install the root ball in the soil. Insert the root ball into the placed where the soil has been scooped out. Make sure that the entire root ball is covered in the soil. Then, cover the top of the root ball with some of the soil you’ve dug out.[6]


Caring for the Plants
-
1Water the bag often. Grow bags typically require more water than potted plants. Check the growing bags on a daily basis. Water the soil anytime you see that it is drying out. The plastic heats the peat mix up considerably, so keeping the soil moist is essential for the growing plants to succeed.
- Fabric bags usually need to be watered more often than plastic bags.
-
2Install a self-watering system. It can be difficult to keep a growing bag well-watered, so a self-watering system is often beneficial. One option is to install a drip system. Essentially, a drip system is where a container slowly and consistently releases water into the soil. Or, you can put a container underneath the growing bag and fill it with water.
- If you put a deep container under the growing bag, you may need a container to catch the overflow.
-
3Fertilize heavy feeder plants. Heavy feeder plants are plants such as corn, tomatoes, and cabbage family crops. You can buy a fertilizer or make your own natural fertilizer. You can make your own fertilizer out of Epsom salt and eggshells, worm castings, and compost tea. Spread a thin layer of fertilizer on top of the soil. There should be room if you left a couple of inches (5 cm) at the top of your bag. Fertilize your plants at least once a week.
-
4Prop up tall plants as needed. You will likely need to add support to tall or top-heavy plants. You can use cane sticks to do this. Insert a cane stick into the soil next to the plant. Then, tie the plant to the cane, and attach the cane stick to a frame.[7]
-
5Plant smaller plants under tall plants to make the most of limited space. When space is a premium and gardening in this way is the only opportunity you have to grow your own vegetables, you can increase the crop by under-planting. For example, if you are growing tomatoes, add some lettuce or radishes underneath the tomatoes. Just be sure to wait until the tomatoes are well grown before planting the under-plants.[8]
- If you plant more than one plant in the same bag, make sure you water them thoroughly.
-
6Reuse the soil when the crops are finished. If the soil still seems healthy, you will be able to reuse the soil next season. The soil can be kept and reused for up to 2 to 3 seasons, as long as you amend the soil with compost, organic matter, or fertilizer. Even the bag can be used for one more season if you wash it out, allow it to dry, and then store it in a dry place until next growing season.


Expert Q&A
Did you know you can get expert answers for this article?
Unlock expert answers by supporting wikiHow
-
QuestionIs it safe to grow veggies in it?
 Lauren KurtzLauren Kurtz is a Naturalist and Horticultural Specialist. Lauren has worked for Aurora, Colorado managing the Water-Wise Garden at Aurora Municipal Center for the Water Conservation Department. She earned a BA in Environmental and Sustainability Studies from Western Michigan University in 2014.
Professional GardenerYes, you can grow veggies in a bag as long as you haven't previously used the bag for anything toxic or harmful to human health.
Support wikiHow by unlocking this expert answer.
-
QuestionWhy are we keeping the plants in the bags?Lauren KurtzLauren Kurtz is a Naturalist and Horticultural Specialist. Lauren has worked for Aurora, Colorado managing the Water-Wise Garden at Aurora Municipal Center for the Water Conservation Department. She earned a BA in Environmental and Sustainability Studies from Western Michigan University in 2014.
Professional GardenerYou are using the bags in place of a pot. They're great for small spaces because they take up less space when they're not in use, plus they're lighter than pots.Support wikiHow by unlocking this expert answer.
-
QuestionFor pots, can we put stone and sand before putting green coco peat or compost mixture?
 Community AnswerUsing rock and gravel in the bottom of plant pots is unnecessary. It does not improve soil drainage but does decrease the space for roots to grow.
Warnings
- Don't grow deep-rooted vegetables such as carrots or beetroot, as they will not succeed in the shallow bag soil.⧼thumbs_response⧽
Things You'll Need
- Growing bag or make-your-own equivalent
- Additional fertilizer treatments
- Scissors or gardening knife to slit the bag and make drainage holes
- Shallow-rooted plants
- Watering containers


References
- ↑ http://www.bbc.co.uk/gardening/basics/techniques/growfruitandveg_usingagrowingbag1.shtml
- ↑ http://www.bbc.co.uk/gardening/basics/techniques/growfruitandveg_usingagrowingbag1.shtml
- ↑ https://www.dobbies.com/ideas-advice/seasons/spring/11-ways-to-use-garden-grow-bags/
- ↑ http://www.bbc.co.uk/gardening/basics/techniques/growfruitandveg_usingagrowingbag1.shtml
- ↑ http://www.bbc.co.uk/gardening/basics/techniques/growfruitandveg_usingagrowingbag1.shtml
- ↑ http://www.bbc.co.uk/gardening/basics/techniques/growfruitandveg_usingagrowingbag1.shtml
- ↑ http://www.bbc.co.uk/gardening/basics/techniques/growfruitandveg_usingagrowingbag1.shtml
- ↑ https://www.dobbies.com/ideas-advice/seasons/spring/11-ways-to-use-garden-grow-bags/
- ↑ http://www.realworldsurvivor.com/2015/10/14/use-grow-bags-for-healthy-garden/#tomato-grow-bag
About This Article

To grow plants in growing bags, line the bottom of each bag with about 1 inch (2.5 cm) of pebbles or perlite to help with drainage. Then, add soil. For most plants, an equal mixture of moss, compost, and vermiculite works well. Leave about 2 inches (5 cm) of space at the top of the bag. Gently shake and knead the bag to loosen the soil and make sure it’s evenly distributed. Poke a few drainage holes in the bottom of the bag with a pair of scissors. Space them out about ½ inch (1.3 cm) apart. Put the bag in a location that gets the right amount of sunlight for your plants and scoop out enough soil to make room for the roots. Insert the root ball into the hole, then fill in around the roots with loose soil.