This article was co-authored by wikiHow Staff. Our trained team of editors and researchers validate articles for accuracy and comprehensiveness. wikiHow's Content Management Team carefully monitors the work from our editorial staff to ensure that each article is backed by trusted research and meets our high quality standards.
There are 8 references cited in this article, which can be found at the bottom of the page.
wikiHow marks an article as reader-approved once it receives enough positive feedback. In this case, 96% of readers who voted found the article helpful, earning it our reader-approved status.
This article has been viewed 88,232 times.
Learn more...
A Kreg Jig is a type of tool used to join wood. Kreg Jigs can help you drill what are known as pocket holes, which allow screws to be inserted at an angle. Because the screws run along the grain of the wood rather than through it, the joint will be much stronger and more secure. Though they may look complicated to first time crafters, using a Kreg Jig is surprisingly simple. All you need to do is measure your wood, set the Kreg Jig to the corresponding width and use the guided slots to drill perfect pocket holes.
Steps
Adjusting the Kreg Jig for Your Project
-
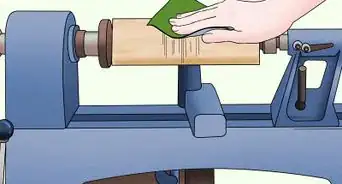
1Measure the wood you’re using. Before you begin drilling, it’s important to measure the width of the boards you’ll be working with. The thickness is what you’re looking to gauge here. Knowing the exact thickness of the board will enable you to drill the pocket holes at just the right angle.[1]
- Always measure your wood, regardless of the specifications given on the label. It’s possible for wood to shrink or for a board’s width to be based on averages rather than precise measurements.
- The difference of a fraction of an inch could potentially throw off your whole project.
-
2Set your drill bit collar to the correct depth. Line the pocket hole drill bit up with the specifications indicated on the base of the jig. The step (the place on the bit where it narrows to a point) should be even with the notch that corresponds to the thickness of your board. Slide the depth collar to the appropriate height and tighten it using an Allen wrench.[2]
- The depth collar is slightly wider than the guide holes of the jig, and will keep you from drilling too far into the wood.
- A special pocket hole drill bit should be included with your new Kreg Jig.
Advertisement -
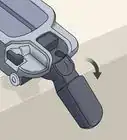
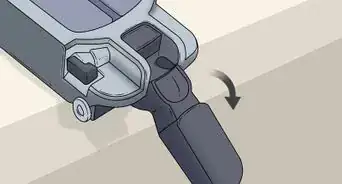
3Change the placement of the jig. Using the same measurements, adjust the height of the jig to the appropriate position. To do this, loosen the thumbscrew on the back so that you can raise or lower guide hole piece freely. Once the jig is where you want it, tighten the thumbscrew to secure it.[3]
- Raising and lowering the jig will change the angle of the guide holes slightly to make them suitable for boards of varying widths.
- Remember to reset the guide hole piece every time you drill a board of a different size.
-
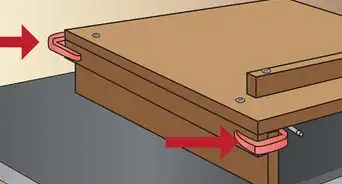
4Secure the jig to the workbench. Clamp the jig down so that it will remain firmly in place. This will prevent the wood from coming loose while you’re drilling. Make sure the guide holes of the jig are facing toward you on the workbench.[4]
- You’ll be drilling into the back side of the board, which won’t be visible once the piece is completed.[5]


Drilling the Pocket Holes
-
1Clamp the wood into the jig. Place one end of the wooden board vertically against the clamp backing on the opposite side of the jig, then pull the lever to press the clamp tight against it. Test the board to make sure that it doesn’t slide around.[6]
- The clamp lever should lock into position once the clamp is fully extended.
-
2Fit the drill bit into the guide holes in the jig. The guide holes should be just large enough to comfortably accommodate the drill bit. Most standard Kreg Jig models will have at least three guide holes so that you can drill as many holes as needed to support the joint.[7]
- For greater precision and security, keep your pocket holes spaced at even distances.
- Should you need more pocket holes than your jig allows, you can make room for more by shifting the wood down in the clamp after drilling your first set.
-
3Drill the desired number of pocket holes. Begin drilling into the guide holes using steady pressure until you’re stopped by the depth collar. Pull back on the drill as you work to free the guide holes of loose wood chips. Drill as many holes as you need to create a strong joint that will suit the purposes of your project, then turn the board around and repeat the process on the other end.[8]
- Try drilling on a scrap piece of wood first to confirm that the settings on the jig are correct.
- You’ll need to drill at least two pocket holes—otherwise, the boards will pivot around the single screw.[9]
- The jig will allow you to drill at a shallow angle into the wood, which results in a more structurally sound joint than if you were to drill straight through.


Fastening the Joint
-
1Press the pieces of wood together to form a joint. Now that you’ve drilled the boards, arrange them the way they’ll go in the finished project. Make sure the edges are evenly aligned. If you prefer, you can clamp the boards in place to make them easier to manage.[10]
- Line up the boards carefully to avoid making a costly mistake.
- If you’re using a smaller clamp, clamp both pieces of wood to the table at the seam.[11]
-
2Glue the edges of the joint together for added security. Spread a thin layer of wood glue onto the edges of the boards where they connect. This will reinforce the joint even further and prevent the boards from coming apart as you fasten them.[12]
- Give the glue a few minutes to set up to make the joint more sturdy while drilling.
- If you're using wood glue in addition to a conventional clamp, apply the glue before you align the edges of the boards.
-
3Drill the screws into place. Fit the screws into the pocket holes so that they’re aimed at the body of the adjoining board. Drive the screws deep until they disappear inside the pocket hole. The pocket hole bit conveniently bores its own thread as it drills, so you should have no problem getting the screws to hold.[13]
- For softer woods, use screws with a coarse thread. Finer threads should be reserved for hard, dense varieties of wood like maple and oak.
- Select the right type of screw for the exact specifications and type of wood you’re using.[14]
-
4Conceal the pocket holes with wood plugs or adhesive. Once you’re done, you may notice shallow depressions left behind at the openings of the pocket holes. These can easily be filled with a glob of putty or wood glue. You could also invest in a set of Kreg wood plugs, which are specially tapered to slide right in for a smooth, seamless finish.[15]
- Plugging the pocket holes is merely a cosmetic choice, and won’t affect the strength of the joint in any way.
- Since you’ll be drilling into the back or underside of the boards, the pocket holes on the finished piece shouldn’t be visible even if you haven’t taken steps to conceal them.[16]


Warnings
- If you don’t clear the wood chips out the pocket holes while you’re drilling, the drill bit will meet with extra resistance and quickly become overheated, which can cause it to wear out faster over time.⧼thumbs_response⧽
- Exercise caution when working with electric drills and other power tools. Carelessness can lead to accidents or injuries.⧼thumbs_response⧽
Things You'll Need
- Kreg Jig
- Electric drill
- Wood screws
- Table clamp
- Wood glue
- Tape measure
- Wood plugs or bonding adhesive (optional)


References
- ↑ http://www.prettyhandygirl.com/how-to-use-a-kreg-jig/
- ↑ https://www.youtube.com/watch?v=oaSZKOl3jsQ
- ↑ https://www.youtube.com/watch?v=GjEKCQqbabQ
- ↑ http://www.prettyhandygirl.com/how-to-use-a-kreg-jig/
- ↑ https://www.youtube.com/watch?v=oaSZKOl3jsQ
- ↑ https://www.youtube.com/watch?v=5jd9Ip16iik
- ↑ http://www.thatswhatchesaid.net/how-to-use-a-kreg-jig/
- ↑ https://www.youtube.com/watch?v=5jd9Ip16iik
- ↑ http://www.prettyhandygirl.com/how-to-use-a-kreg-jig/
- ↑ https://www.lowes.com/projects/woodworking-and-crafts/pocket-hole-joinery/project
- ↑ https://www.youtube.com/watch?v=oaSZKOl3jsQ
- ↑ http://www.woodmagazine.com/woodworking-tips/techniques/joinery/pocket-hole
- ↑ https://www.youtube.com/watch?v=oaSZKOl3jsQ
- ↑ http://www.woodmagazine.com/woodworking-tips/techniques/joinery/pocket-hole
- ↑ http://www.prettyhandygirl.com/how-to-use-a-kreg-jig/
- ↑ http://www.myrepurposedlife.com/how-to-use-a-kreg-jig/
About This Article

To use a Kreg jig, start by measuring the thickness of the board you’re using and selecting the drill bit that corresponds to that depth. Then, adjust the height of the jig to fit the board’s thickness and tighten the thumbscrew on the back to secure it. Next, clamp the jig to your workbench and place the board into the jig. Once it’s in place, pull the lever to press the clamp against the board so it doesn’t slide around. Finally, insert the drill bit into the guide holes and drill into the wood using steady pressure until you’re stopped by the collar on the jig. For tips on how to use a Kreg jig to create a strong joint for your project, read on!