X
This article was co-authored by wikiHow Staff. Our trained team of editors and researchers validate articles for accuracy and comprehensiveness. wikiHow's Content Management Team carefully monitors the work from our editorial staff to ensure that each article is backed by trusted research and meets our high quality standards.
This article has been viewed 33,232 times.
Learn more...
The stench of hockey gear is the worst! But it’s okay—you can enjoy playing the sport and stave off the smell to appease cries from family and friends. All it takes is commitment to drying your gear after each use, the space to let it all dry, and proper cleaning once a month. Easy, peasy.
Steps
Method 1
Method 1 of 4:
Preventing Odors
-
1Wear full-body base layers to absorb the bulk of your sweat. Long sleeve shirts, pants, and socks made of wicking or compression material will work best to absorb the sweat. These layers will also create a barrier between you and your gear—keeping it from absorbing dead skin particles and body oils, which contribute to the growth of bacteria.[1]
- Bacteria causes that distinct hockey smell and it likes to grow in warm, moist places, which makes hockey gear a literal breeding ground.
- Keeping your equipment clean of bacteria isn’t just to keep away the smell—it’s an important preventative measure against infections. When injured playing hockey, bacteria from your gear can directly enter open wounds and result in ghastly—sometimes life-threatening—staph infections.[2]
-
2Get in the rink with fresh socks. The socks you’ve been wearing all day are already sweaty and building bacteria. Wearing a new pair to play will help keep your skates smelling better.Advertisement
-
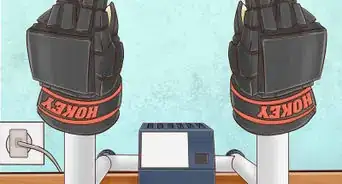
3Hang your equipment to dry every time you get home from the rink. This is the most important step to prevent bacteria growth and smell. Using a drying rack or specially-designed equipment rack to hang your gear off of the floor allows air to circulate, which results in faster drying speed (and therefore, less bacteria), but also ensures that air gets to all parts of the gear.
- Hang your: jersey, helmet, gloves, skates, jockstraps, elbow and shoulder pads, and pulled-out shin pads. After hung, you can lightly spray them with white vinegar (a natural disinfectant) or other anti-bacterial agent to keep them clean longer.
- Hang your athletic bag to dry after each use. Every time you come off the rink, you fill it will all that sweaty equipment, so it’s bound to grow bacteria. Turn it inside-out and leave it upside-down to dry.
- Use a fan or dehumidifier to help everything dry faster.[3]
-
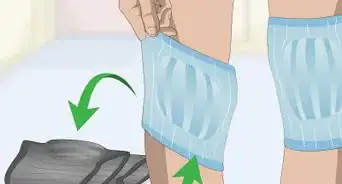
4Remove skate inserts to dry separately after each use. Also pull open the tongue of the skate so air can circulate. This will help the whole skate dry and prevent rusting. If the blades aren’t already dry, wipe them with a dry cloth.[4]


Advertisement
Method 2
Method 2 of 4:
Using the Washing Machine
-
1Wash your base layers every time you leave the rink. Keeping those layers clean will prevent buildup on your gear. If you let them sit in your laundry, bacteria will continue to grow, making them harder to keep clean long-term.
- Between the rink and your house, keep your base layers in a separate plastic bag to prevent them from contaminating the rest of your gear.
-
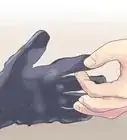
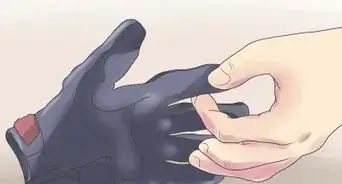
2Wash your protective equipment once a month. Use the washing machine for everything but your helmet and skates. The machine is completely safe for your jersey, jock (cup removed and Velcro fastened), shin pads, hockey pants and shorts, shoulder pads, elbow pads, and gloves.[5]
- If your gear is particularly stinky, start by soaking it in the washer. You can do so with just water, or you can add a cup of white vinegar to the water to help kill the bacteria.[6] Let it soak for fifteen minutes, then drain, add detergent, and begin a new washing cycle.
- Make sure any Velcro is fastened. Leaving it loose will cause everything to get tangled in the washer and may pull and rip at the materials.
- If you’re using a top loading machine, be careful not to overload it. You may have to divide into 2 loads. Without space to spin around, the gear won’t be cleaned properly—but more importantly, it may cause breakage.
-
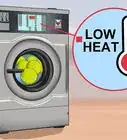
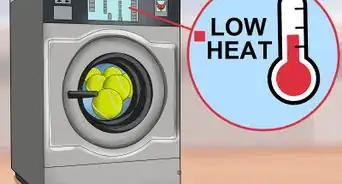
3Use warm water, regular detergent, and the gentle cycle. Warm water, regular detergent, and the gentle cycle will be strong enough to really clean your gear, but not so harsh that they damage the materials.[7]
- Never use bleach or detergent with bleach in it. It is too harsh and will break down your equipment and ruin your padding.[8]
-
4Dry your gear in the dryer on the low setting. Any protective equipment without leather can go in the dryer. However, if this makes you uncomfortable, you can air dry everything on a rack so that it’s not lying on the floor, and use a fan or dehumidifier to help speed the process.
- It’s perfectly safe to dry your base layers, socks, jock, and jerseys in the dryer.[9]


Advertisement
Method 3
Method 3 of 4:
Hand-Washing Equipment
-
1Start with a freshly cleaned tub, rinsed free of harsh chemicals. You may actually add new bacteria to your gear if you don't make sure to clean your tub before putting your equipment in it.
-
2Fill ⅓ of the tub with hot water and add a ¼ cup of laundry detergent. It's best to add the detergent while the tub is filling so that it mixes more evenly with the water. You may add 1 cup of white vinegar to the water to boost its antibacterial effectiveness. Never use bleach or detergent with bleach in it.
-
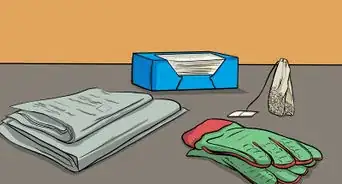
3Put in all of the gear (minus the helmet and skates) into the tub. Hold each item down until it stays submerged and doesn’t float. Let the equipment soak for 45 minutes to an hour.
-
4Drain and rinse the tub of soap. Refill the tub with clean water and let the gear soak for five minutes, swishing it around a bit to help rinse out the soap. Drain the tub again and rinse out each item individually, until the water runs clear and there is no more soap.
-
5Wring out as much water as you can before hanging on a rack to dry. After you've initially wrung out everything, you may want to wrap each item in a towel and wring it out again to help dry it as much as possible. Make sure the drying rack is placed in a well-ventilated area. Using a fan or dehumidifier will significantly speed the drying process.[10]


Advertisement
Method 4
Method 4 of 4:
Cleaning Other Gear
-
1Clean your helmet with tear-free shampoo. Dab a bit of the shampoo on a wet (not dripping) towel and scrub the whole helmet inside and out, including the face mask and chin cup. Once applied, wipe out the soap with another wet towel and hang it to dry.
- Tear-free shampoo prevents any stinging that could occur if residue remains on the surface and drips onto your face the next time you use it.
- Instead of shampoo, you can easily substitute white vinegar in this process. Vinegar is a better disinfectant; but, it could burn a bit if some leftover residue drips into your eyes when you're sweating.
-
2Disinfect your skate inserts. Using a sponge or cleaning brush, scrub inserts thoroughly with a 50-50 white vinegar and water mix or antibacterial soap.[11] Rinse and hang to dry completely before your next use. In between cleanings, you can lightly spray the inserts with vinegar or antibacterial spray help keep them clean longer.
-
3Sanitize your athletic bag to prevent cross contamination. Once you've cleaned your gear, you shouldn't put it back into a dirty bag. Wipe your athletic bag out with white vinegar, disinfectant, or antibacterial spray and let it dry completely before putting your equipment back in.[12]


Advertisement


References
- ↑ http://newtohockey.com/whats-smell-getting-rid-hockey-stench/
- ↑ http://usahockeymagazine.com/article/2011-09/sink-stink-hockey-odor
- ↑ http://newtohockey.com/whats-smell-getting-rid-hockey-stench/
- ↑ https://www.purehockey.com/c/how-to-clean-hockey-equipment-at-home
- ↑ http://usahockeymagazine.com/article/2011-09/sink-stink-hockey-odor
- ↑ https://www.bhg.com/homekeeping/house-cleaning/tips/cleaning-with-vinegar/
- ↑ http://www.chicagonow.com/hockey-noob/2014/01/the-stench-of-hockey-you-can-wash-your-equipment/
- ↑ http://usahockeymagazine.com/article/2011-09/sink-stink-hockey-odor
- ↑ http://newtohockey.com/whats-smell-getting-rid-hockey-stench/
About This Article

wikiHow Staff
wikiHow Staff Writer
This article was co-authored by wikiHow Staff. Our trained team of editors and researchers validate articles for accuracy and comprehensiveness. wikiHow's Content Management Team carefully monitors the work from our editorial staff to ensure that each article is backed by trusted research and meets our high quality standards. This article has been viewed 33,232 times.
Co-authors: 4
Updated: January 6, 2021
Views: 33,232
Categories: Cleaning Sports Gear
Advertisement