This article was co-authored by Jonathan Frank, MD and by wikiHow staff writer, Danielle Blinka, MA, MPA. Dr. Jonathan Frank is an Orthopedic Surgeon based in Beverly Hills, California, specializing in sports medicine and joint preservation. Dr. Frank's practice focuses on minimally invasive, arthroscopic surgery of the knee, shoulder, hip, and elbow. Dr. Frank holds an MD from the University of California, Los Angeles School of Medicine. He completed an orthopedic residency at Rush University Medical Center in Chicago and a fellowship in Orthopedic Sports Medicine and Hip Preservation at the Steadman Clinic in Vail, Colorado. He is a staff team physician for the US Ski and Snowboard Team. Dr. Frank is currently a scientific reviewer for top peer-reviewed scientific journals, and his research has been presented at regional, national, and international orthopedic conferences, winning several awards including the prestigious Mark Coventry and William A Grana awards.
This article has been viewed 42,389 times.
Wearing a knee brace can help you manage pain and avoid re-injury, but it can quickly become soiled. A dirty brace can become a breeding ground for bacteria, so you’ll want to wash your knee brace. The safest way to wash your brace is by hand, but some braces can be washed in a washing machine on a gentle cycle. You can keep your brace clean by washing it regularly and disinfecting it often.
Steps
Washing Your Brace by Hand
-
1Remove any plastic or metal pieces from the brace if you can. These parts can become damaged or may even cause damage to the fabric during washing. Place them off to the side.
- If your plastic or metal pieces are dirty, then you can wipe them down with a soapy towel. Then pat them dry with a towel.
- If you can’t remove the pieces, then close your brace before washing it. This helps protect the clasps.[1]
-
2Fill your sink, tub, or a container with cool water. Cool water is easier on the fabric and eliminates the risk of burning your hands. Make sure you have enough water to fully cover the brace.[2]
- Your wash bin should be clean.
- Avoid using hot water, as it is harsh on the fabric.
- Don’t put the brace in first. It’s important that detergent be put in before the brace, as this puts less stress on the fabric.[3]
Advertisement -
3
-
4Press the brace down into the water to saturate it. Don’t twist the brace or rub it against the sides of the bin, as this can cause damage. Simply push the brace down with your fingers until the water soaks in.[8]
- You may see sweat or dirt come out of the brace, and that’s okay.
-
5Allow the brace to soak for about 30 minutes. Once the brace is saturated, it just needs to soak. This allows the detergent to remove the sweat, dirt, and oils that may be trapped in the fabric.[9]
- If your water is dirty after you saturate the brace, then you might want to drain the water and refill the bin. Add more detergent before returning your brace to the wash bin.
-
6Rinse the brace by refilling the wash bin with clean, cool water. Drain the wash bin, rinse it, then refill it with clean water. Place the brace in the water, then gently move it in an up-and-down motion to remove the soap.[10]
- You may need to refill the tub with clean water more than once to get all of the soap out.
- Don’t run the water directly over your brace, as this can damage your brace.[11]
-
7Let the brace air dry on a flat surface. Place the brace on a waterproof surface, such as a countertop or plastic tablecloth. Alternatively, lay it out on a towel.[12] [13]
- If you want to speed up drying, you can place the brace in the sun.
- Don’t replace the plastic or metal pieces until after your brace is dry.


Washing Your Brace in a Washing Machine
-
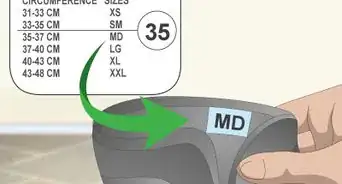
1Check the label to make sure it can go in the washing machine. Most braces cannot be washed in a machine, so make sure that yours can. If it can be washed in the machine, follow all of the instructions on the label.
- If you wash your brace inappropriately, then you may damage it. Even if the brace has a warranty, the company will not replace it if you washed it incorrectly.[14]
-
2Remove any hinges or clasps, if they come off. These pieces are easily damaged in a washing machine. They can also cause damage, especially in the case of metal clasps or plates.
- If these pieces are dirty, you can wipe them down with a soapy towel, then dry them with a clean, dry towel.
- If they don’t come off, then you should close them.[15]
-
3Set your washing machine on a gentle cycle. Your washing machine should have a knob or button that allows you to adjust the setting. This lighter setting is less likely to damage the fabric.[16]
- You can also use a delicate cycle.
-
4Set the water temperature to “cold.” Your washing machine should have a knob or button that allows you to change the water temperature. Cold water is safer for your fabric, but it will still get your brace clean.[17]
- If the label says it’s okay, you can use warm water instead.
-
5Add a mild detergent to your washer. Follow the directions on the detergent label to determine how much to add. Use the amount suggested for a small load of laundry.[18]
- Do not use bleach on your brace, even if it’s white. This can weaken the fabric.
-
6


Keeping Your Brace Clean
-
1Wash your brace every 4-6 days for daily wear. Even if you wear your brace every day, you’ll only need to wash it once or twice a week, unless you get it very dirty. This is enough to prevent your brace from becoming infected with bacteria or fungi, such as ringworm.
- If you wear your brace during athletics, wash your brace every 2-3 days.
- If you do a dirty activity, such as gardening, wash the brace directly after that activity.[21]
-
2Spray the brace with a disinfectant between washes. Apply the disinfectant as soon as you take it off every day. This helps limit the growth of bacteria and microbes without constantly washing the brace. Hold the spray 6 inches (15 cm) over the brace and spritz it in 1 smooth motion.[22]
- Let your brace dry after you spray the disinfectant.
-
3Allow your brace to air dry for a few hours each day. You need to give your knee a break for at least a few hours each day. Fortunately, that gives your brace time to air out! Make sure that your brace is fully dry before you put it back on.[23]
- If your brace takes too long to dry, then it’s best to rotate your braces. Do not wear a wet or damp brace.


Expert Q&A
-
QuestionWhat type of knee brace would we use for knee injury prevention?
 Kevin Stone, MDDr. Kevin Stone is an orthopaedic surgeon and the founder of The Stone Clinic, a leading orthopaedic surgery, sports medicine, and rehabilitation clinic in the San Francisco Bay Area. With over 30 years of experience, Dr. Stone specializes in knee, shoulder, and ankle repair, using biologic reconstruction and joint replacement. He holds a BS in Biology from Harvard University and a Doctor of Medicine (MD) from the University of North Carolina at Chapel Hill. Dr. Stone completed his residency in Internal Medicine and Orthopaedic Surgery at Harvard University and in General Surgery at Stanford University. He then completed a fellowship in Orthopaedic Research and Surgery at the Hospital for Special Surgery and Tahoe Orthopaedics. He lectures around the world as an expert in cartilage and meniscal growth, replacement, and repair and holds over 40 U.S. patents on novel inventions to improve healthcare. Dr. Stone is a physician for Smuin Ballet and has served as a physician for the U.S. Ski Team, the U.S. Pro Ski Tour, the United States Olympic Training Center, and World Pro Ski Tour.
Board Certified Orthopaedic SurgeonProphylactic knee braces are used to prevent knee injuries. They are made of neoprene or thick, warm material that one pulls up over the knee to minimize the risk of a knee injury.
Warnings
- A dirty brace can result in an infection.[25]⧼thumbs_response⧽
- Some braces come with a warranty that will be voided if you wash them incorrectly.⧼thumbs_response⧽


Expert Interview
Thanks for reading our article! If you'd like to learn more about washing medical equipment, check out our in-depth interview with Jonathan Frank, MD.
References
- ↑ http://www.carefreehealth.com/docs/Knee_Brace_CK-111_Instructions.pdf
- ↑ http://www.carefreehealth.com/docs/Knee_Brace_CK-111_Instructions.pdf
- ↑ https://www.goodhousekeeping.com/home/cleaning/tips/a31973/mistakes-hand-washing-clothes/
- ↑ https://www.bhg.com/homekeeping/laundry-linens/clothes/how-to-wash-clothes-by-hand/
- ↑ http://www.carefreehealth.com/docs/Knee_Brace_CK-111_Instructions.pdf
- ↑ Jonathan Frank, MD. Sports Orthopedic Surgeon & Joint Preservation Specialist. Expert Interview. 2 March 2023.
- ↑ https://health.clevelandclinic.org/clean-medical-sports-brace-matters/
- ↑ https://www.goodhousekeeping.com/home/cleaning/tips/a31973/mistakes-hand-washing-clothes/
- ↑ https://health.clevelandclinic.org/clean-medical-sports-brace-matters/
- ↑ http://www.carefreehealth.com/docs/Knee_Brace_CK-111_Instructions.pdf
- ↑ https://www.goodhousekeeping.com/home/cleaning/tips/a31973/mistakes-hand-washing-clothes/
- ↑ Jonathan Frank, MD. Sports Orthopedic Surgeon & Joint Preservation Specialist. Expert Interview. 2 March 2023.
- ↑ http://www.carefreehealth.com/docs/Knee_Brace_CK-111_Instructions.pdf
- ↑ http://www.carefreehealth.com/docs/Knee_Brace_CK-111_Instructions.pdf
- ↑ https://www.futuro-usa.com/3M/en_US/futuro-us/resources/product-care/
- ↑ https://www.futuro-usa.com/3M/en_US/futuro-us/resources/product-care/
- ↑ https://www.futuro-usa.com/3M/en_US/futuro-us/resources/product-care/
- ↑ https://www.futuro-usa.com/3M/en_US/futuro-us/resources/product-care/
- ↑ https://www.futuro-usa.com/3M/en_US/futuro-us/resources/product-care/
- ↑ Jonathan Frank, MD. Sports Orthopedic Surgeon & Joint Preservation Specialist. Expert Interview. 2 March 2023.
- ↑ https://health.clevelandclinic.org/clean-medical-sports-brace-matters/
- ↑ https://health.clevelandclinic.org/clean-medical-sports-brace-matters/
- ↑ https://health.clevelandclinic.org/clean-medical-sports-brace-matters/
- ↑ https://health.clevelandclinic.org/clean-medical-sports-brace-matters/
- ↑ https://health.clevelandclinic.org/clean-medical-sports-brace-matters/


Medical Disclaimer
The content of this article is not intended to be a substitute for professional medical advice, examination, diagnosis, or treatment. You should always contact your doctor or other qualified healthcare professional before starting, changing, or stopping any kind of health treatment.
Read More...