This article was co-authored by Ralph Childers. Ralph Childers is a master electrician based in the Portland, Oregon area with over 30 years of conducting and teaching electrical work. Ralph received his B.S. in Electrical Engineering from the University of Louisiana at Lafayette and holds an Oregon Journeyman Electrical License as well as electrician licenses in Louisiana and Texas.
This article has been viewed 120,492 times.
A 3-way switch allows you to turn a light on or off from two different switches. 3-way switches are useful for large rooms with multiple entrances but require a bit more wiring than a standard, single-pole switch. The wiring method will depend on whether your power goes to the switch first or the light first.
Steps
Taking Safety Precautions
-
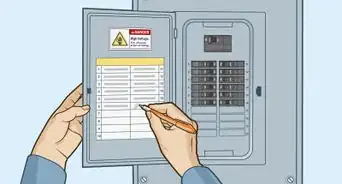
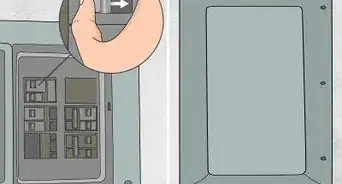
1Switch off the circuit. Ensure that the circuit for the room you are working in has been flipped off. This will prevent accidental electrocution and reduce the risk of fire.[1]
- Most circuit breakers are located in the garage or basement, but placement will vary from home to home.
- When you find the breaker box, locate the breaker that controls the lights for the room you are working on. Flip it to the off position to keep power from traveling down those wires. Most electrical panels label switches for the different rooms in your home.
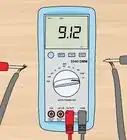
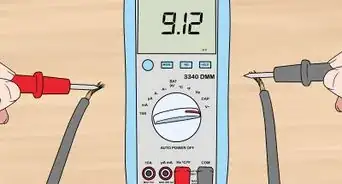
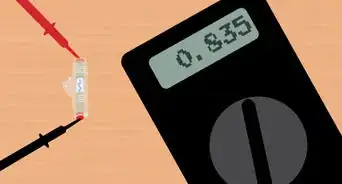
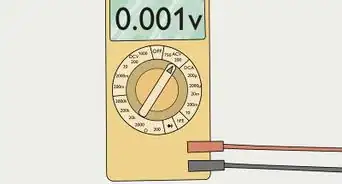
- Use a voltage tester to check that power is no longer flowing to that room.
-
2Determine if the power goes to the light or the light switch. This will affect the way that you perform the installation. You can tell if the power is coming into the switch by removing the light switch panel. If two black wires are coming into the switch box, then the power is coming into the switch first. If there is only one black wire, then the power is coming into the switch from the light fixture. You can usually use an electrical tester to be sure.Advertisement
-
3Replace any regular switches with the 3-way switches. A 3-way switch will not have the words on or off written on it. Before you start installing, take a look at your new 3-way switch to identify all of the terminals that you will be connecting wires to.[2]
- Traveler wire terminals - These are located on each side of the switch towards the top of the switch.[3]
- Ground wire terminal - Older switches may not have this, but all new switches must. This is usually a green screw located on the top or bottom of the switch, mounted to the frame. [4]
- Common wire screw - This is located on the left side of the switch, and is a different color than the two traveler terminals.
-
4Install larger electrical boxes. You will likely need larger boxes than you already have if you are replacing a regular single-pole switch. 3-way switches involve more cables, so you will need a little more room to work.
-
5Run 2 2-wire conductors between the two boxes. Choose 14-2 or 12-2 NM cable, depending on the breaker.[5] 14 gauge wire needs a 15 amp breaker, while a 12 gauge wire requires a 20 amp breaker. You’ll be using the top conductor to run your hot wires and your neutrals while the bottom conductor will be used for your traveler wires.
- See this guide for details on running wire through your wall.
- The first number specifies the gauge and the second number is the number of wires carrying current.
- You may also use a single 14/3 or 12/3 cable, which contains 1 bare ground wire, 1 white wire, 1 black wire, and 1 red wire.
- If the power comes from the light’s location, run the 2-wire conductors up from each switch to the light fixture. Many of the conductor connections will be made in the light’s device box, so make sure you have enough room for all the wires.


Converting a Single-Pole Switch to a 3-Way
-
1Run a black wire from the new switch to the power source. Use the black wire in the top 2-wire conductor to attach the switch to the source. Make a J-hook in the wire with a pair of pliers and wrap it around the black common screw on the light switch. Tighten the screw to secure it in place. Cap the wires connecting the source and the switch.
- The screw is typically on the bottom of the switch.
- Don’t attach the traveler wires to the common screw since they’re only used to connect the switches together.
-
2Connect another black wire from the light to the original switch location. Use the existing 2-wire conductor leading from the light to the switch. Attach the wire to the black common screw on the switch.
- Make sure you don’t attach the traveler wires to the common screw, or else the switches won’t work properly.
-
3Cap the white neutral wires to each switch box. Place a plastic cap on the end of the white wire from the top conductor in the new switch location. Take the neutrals from the other end of the top conductor, the power source, and the light and cap them in the original switch location.
- Neutrals need to be in place at every switch box according to the NEC 2017 electrical code. Older homes may not have neutrals in the switch boxes. It is okay to replace switches in this instance.
- If you install smart switches, the neutral will attach to them and make it work. If there isn’t a neutral wire in the switch box, you have to run one from another location before installing the smart switch.
-
4Connect the traveler wires using the bottom conductor. Use the black and white cables from the bottom conductor to attach the traveler terminals on each switch. It doesn’t matter which terminals they are attached to on each switch. Use a pair of pliers to bend the exposed ends of the wire around each screw.
- Mark the white traveler cable with a black piece of electric tape so you know that the wire is hot.
- If you’re using a 12/3 or 14/3 cable, use the black and red wires as your travelers.
-
5Cap the equipment grounding conductors together at each switch and the light. Find the grounding screw on the top or bottom of each of the switches. Wrap the wires tightly around the screw and use a screwdriver to tighten the screws. Cap the grounding conductors at each switch box. Push the wires into the back of your box.
- Make sure you ground both switches, or else they may not be safe.
- If your switch boxes are made of metal, the grounding conductor needs to bond to them as well.
-
6Replace the switch box covers. Screw the switches into the electrical box and secure the wall plate over the opening. Flip the breakers back on and test the switches.


Warnings
- Always make sure the power to the area where you are working is off to avoid electrocution.⧼thumbs_response⧽
- Call a licensed electrician if the wiring in your house is aluminum. The inside of the coating will be light gray instead of copper. You should not work on it yourself.⧼thumbs_response⧽
Things You'll Need
- 14-2 or 12-2 wire cable
- 3-way switches
- Voltage tester (non-contact)
- Screwdriver
- Needle-nose pliers
- Wire stripper
- Black electrical tape
- Utility knife


References
- ↑ https://www.cnet.com/how-to/how-to-replace-3-way-light-switch/
- ↑ https://www.how-to-wire-it.com/wiring-a-3-way-switch.html
- ↑ https://www.how-to-wire-it.com/wiring-a-3-way-switch.html
- ↑ https://www.how-to-wire-it.com/wiring-a-3-way-switch.html
- ↑ https://www.familyhandyman.com/electrical/wiring-switches/how-to-wire-a-threeway-switch/
- ↑ http://www.ncdoi.com/OSFM/Engineering_and_Codes/Documents/2017%20Amendments%20to%20be%20adopted%20with%20the%20NEC%20Version%201.pdf
About This Article

Before you begin wiring your 3-way switch, turn off the circuit for the room you’re working in. Then remove the light switch panel to see where the power is going. You’ll follow one set of directions if you see two black wires coming into the switch, but another set if there’s just one. In both cases, install a larger electrical box and run a 3-way cable between the 2 boxes before you do the wiring. When you’ve finished the wiring, screw the switch into the electrical box, turn the breaker back on, and try it out. For more tips from our Electrician reviewer, including how to be safe while wiring, read on!