This article was co-authored by wikiHow staff writer, Nicole Levine, MFA. Nicole Levine is a Technology Writer and Editor for wikiHow. She has more than 20 years of experience creating technical documentation and leading support teams at major web hosting and software companies. Nicole also holds an MFA in Creative Writing from Portland State University and teaches composition, fiction-writing, and zine-making at various institutions.
This article has been viewed 62,615 times.
Learn more...
You can use Adobe Photoshop to turn any part of a JPEG image into a clickable web link. Photoshop's Slice Tool allows you to select areas of your image that you want people to click. It works by "slicing" up your JPEG into square segments and arranging them back into a table in an HTML file. It's not possible to save a hyperlink in a JPEG file—hyperlinks are a type of HTML code, so they require an HTML file. But don't worry—you can easily copy the code from Photoshop's HTML file and add it to your own website. This wikiHow article teaches you how to create a clickable link on an JPEG for the web using Photoshop.
Steps
Creating the Hyperlink(s)
-
1Open your JPEG in Photoshop. You can drag the image right into Photoshop, or just right-click the image on your computer, select Open with, and then choose Adobe Photoshop.
-
2Add the image or text layers that you want to turn into hyperlinks. You can create hyperlinks anywhere on your JPEG image, so add text, icons, buttons, or anything else you want viewers to click on.[1]Advertisement
-
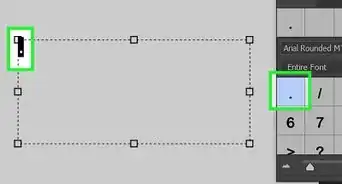
3Click the Slice Tool on the toolbar. The Slice Tool's icon looks like an Xacto knife, but you may not see it on the toolbar by default. It shares the same toolbar icon as the Crop tool, which looks like a square with two overextended lines. To open Slice Tool, click and hold the Crop tool until you see a sub-menu, and then click Slice Tool on the menu.
-
4Select the location you want to hyperlink. For example, if you want to add a hyperlink to your company's name, click and drag the mouse around your company's name to select it.
- If you want to create multiple hyperlinks on the same larger image, just move on to select the next area after finishing the first. You can set the same (or different) URL for multiple areas of the image.
-
5Right-click the sliced area and select Edit slice options. This opens the editing options for the selected slice.
-
6Name your slice. The name will be applied to this slice once you convert the image into slices.
-
7Enter the URL and other details. When the viewer clicks the selected area, they'll be transported to the URL you enter in the "URL" field. This can be a full URL (e.g., https://www.wikiHow.com) or a relative URL (e.g., /index.html).
- If you want the URL to open in a new browser window, type _blank into the "Target" field.[2]
- To make the link accessible to sight-impaired visitors, add some text that describes the link to the Alt Tag field.
-
8Click OK and repeat for other slices. If you want to create hyperlinks on other parts of the image, just right-click the next slice, select Edit slice options, and enter your preferences.


Saving the Image and Code
-
1Click the File menu and select Export. This expands some options for exporting the image.
-
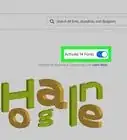
2Select Save for Web (Legacy). This opens the Save for Web panel.
-
3Select JPEG as the image type. The default type is GIF, which you'll already see in the menu at the upper-right corner. Change this to JPEG to keep your image format the same.
-
4Click the Save… button. It's at the bottom of the window. This opens the Save Optimized As window.
-
5Select HTML and Images as the format. This tells Photoshop to save an HTML file that contains the code for your hyperlink(s) along with the images.
- When you save your hyperlinked image, you'll actually be saving multiple files: an HTML file that contains your hyperlink code, and a sub-folder called "images." The "images" folder will contain your original photo, which is now sliced into multiple files.
- Don't worry—the HTML code generated by Photoshop knows to join the images back up so that nobody will notice it's in multiple pieces.
-
6Select a saving location. You can save the files to an existing folder if you want—just remember you're actually saving one HTML file and a sub-folder of images—they'll need to stay together. It might be easier to create a new folder called "Hyperlink Photos" or similar so you don't accidentally move any of the files away from one another.
-
7Name the HTML file and click Save. By default, the HTML file will have the same name as the original JPEG. You can change it if you'd like.
-
8Double-click the HTML file to view your hyperlinked image. It's the file you just named that ends with ".html". Double-clicking the file will open it in your default web browser (like Chrome or Safari). As you can see, you can now click the hyperlinks you created on the image.
- If you open the .html in a text editor like Notepad or TextEdit, you'll see that Photoshop created a table that contains the parts of your image.
-
9Add the hyperlinked image to your own website. You can copy all of the code between the <!-- Save for Web Slices> <!—End Save for Web Slices --> tags and add it to any other HTML file. Just make sure to also copy the "images" folder to the same directory as that other HTML file so the images are visible.


-Step-9-Version-2.webp)
References
About This Article

1. Select the Slice Tool.
2. Select the area you want to link.
3. Right-click the selection and choose Edit slice options.
4. Enter the URL for the link and other preferences.
5. Click OK.
6. Export the image as Save for Web (Legacy).
7. Switch to JPEG and click Save.
8. Save the files as HTML and Images.
9. Double-click the .html file to view your hyperlinked image.