This article was co-authored by wikiHow staff writer, Jessica Gibson. Jessica Gibson is a Writer and Editor who's been with wikiHow since 2014. After completing a year of art studies at the Emily Carr University in Vancouver, she graduated from Columbia College with a BA in History. Jessica also completed an MA in History from The University of Oregon in 2013.
There are 7 references cited in this article, which can be found at the bottom of the page.
This article has been viewed 8,507 times.
Learn more...
If your gas oven isn't heating, save yourself a call to the appliance repair specialist. If your pilot light keeps going out, the flame might be too low, but if the flame is too high, you'll waste money on gas. Simply turn the shutter screw to adjust the gas flow so your pilot light stays lit and efficient. If the pilot light inside the oven has gone out, all you need to do is relight it.
Steps
Making the Flame Higher or Lower
-
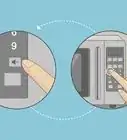
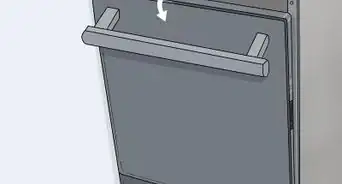
1Turn off the oven and remove the control panel to get to the thermostat control. Read your owner's manual to determine if the thermostat control is behind the control panel or if it's at the bottom of your oven behind a screen. Pull off the oven control knob to remove the control panel or use a screwdriver to unscrew the screen that's covering the thermostat control.[1]
- Set the knob or screw in a safe place so you can find it easily when it's time to put it back in place.
-
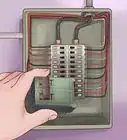
2Turn the shutter screw counter-clockwise if the pilot flame is yellow. If your pilot light frequently goes out and the flame is yellow, it's not getting enough gas. Fortunately, you just need to open the shutter so it gets more gas. Take a flathead screwdriver and turn the screw counterclockwise until you see the flame get larger. Keep loosening the screw until the flame is blue and between 1 to 1 1⁄2 inches (2.5 to 3.8 cm) high.[2]
- You should also adjust the screw if the flame is blue with yellow tips. Loosen the screw until the flame is completely blue and about 1 inch (2.5 cm) high.
Advertisement -
3Turn the shutter screw clockwise if the blue flame is too high. If you can hear the flame making a roaring sound and the flame looks higher than 1 1⁄2 inches (3.8 cm), it's getting too much gas. For this simple adjustment, use a flathead screwdriver and tighten the screw clockwise until the flame is between 1 to 1 1⁄2 inches (2.5 to 3.8 cm) high.[3]
-
4Put the control panel back and screw it in place. Once you've finished adjusting your oven's pilot light, place the long, flat control panel back or put the access screen over the shutter screw and put the screw back in. Tighten it in place so the screen doesn't fall off.[4]
Tip: Check your pilot light again later to ensure that it's still lit and that the flame is still between 1 and 1 1⁄2 inches (2.5 and 3.8 cm) high.


Lighting the Oven's Pilot
-
1Turn off the oven and open a window to ventilate the kitchen. Your oven might be releasing gas if you've tried several times to turn it on. Turn the oven and stovetop burners off. Then, open a window to get some fresh air in the room.[5]
- Turn on a ceiling fan to get even more air moving in the kitchen.
-
2Open the oven door and find the pilot light hole inside the front or back of the oven. Look across the oven floor for a small hole that's connected to gas pipes. Although it might be tricky to spot, the hole should say "pilot light." Look near the front of the oven in the middle or check the back left corner of the oven for the hole.[6]
-
3Remove the oven door if it makes it easier to access the pilot light. Once you've found your oven's pilot light, decide if you need to take the oven door off. You'll have a much easier time reaching the pilot light if it's in the back corner, for instance.[7]
- If your pilot light is at the front of the oven, you might be able to relight and adjust it without taking the door off.
-
4Take off the baseplate from the bottom of the oven to access the control panel. Depending on your oven, you may be able to just lift the baseplate from the bottom so you can see the pilot light. If your baseplate is screwed onto the oven, use a flathead screwdriver to unscrew it so you can lift it out.[8]
- If your oven has a drawer at the bottom, you might have to take it off to access the control panel for the pilot flame adjustment screw.
-
5Turn the oven control knob to "ignite" and hold a flame to the hole of the pilot light. Look at the knob that turns your oven on and turn it to "ignite." It may click to let you know that gas is running through the line. While the knob is set to "ignite" take a long lighter and hold it near the pilot light that you found earlier.[9]
- Your oven knob might show a picture of a flame instead of the word "ignite."
Tip: It's best to use a long lighter since the flame may spring up high and could burn you if your hand is too close.
-
6Continue to push in the thermostat knob for up to 1 minute. Your owner's manual might direct you to keep pushing in the thermostat knob after you've lit the pilot light. If it tells you do keep the knob pressed, hold it for about 1 minute so the pilot light stays lit.[10]
- This is pretty common for most ovens that were made after 2004.
-
7Turn off the oven and check to see if the pilot light is still lit. Turn off the oven control knob. Now that your pilot is lit, you should have no trouble turning the oven back on and off. Check it a few times before you put the baseplate and door back. Remember to turn off the oven once you're finished.[11]
- If the pilot light has gone out, you might need to make the flame larger or replace the thermocouple.


Warnings
- If your pilot light continues to go out after you've adjusted the flame size, call an appliance repair specialist who can check for gas leaks in the line. You may need to contact your gas company for further repairs.⧼thumbs_response⧽
References
- ↑ http://pdf.lowes.com/useandcareguides/717309025367_use.pdf
- ↑ https://youtu.be/x6gK36va1t0?t=78
- ↑ http://pdf.lowes.com/useandcareguides/717309025367_use.pdf
- ↑ https://youtu.be/x6gK36va1t0?t=87
- ↑ https://www.thekitchn.com/how-to-light-a-stovetop-and-oven-pilot-light-253182
- ↑ http://www.appliance411.com/faq/gas_range_ignition_systems.shtml
- ↑ https://youtu.be/glX70JM-aFY?t=35
- ↑ https://youtu.be/glX70JM-aFY?t=43
- ↑ https://www.thekitchn.com/how-to-light-a-stovetop-and-oven-pilot-light-253182
About This Article