This article was co-authored by wikiHow Staff. Our trained team of editors and researchers validate articles for accuracy and comprehensiveness. wikiHow's Content Management Team carefully monitors the work from our editorial staff to ensure that each article is backed by trusted research and meets our high quality standards.
There are 26 references cited in this article, which can be found at the bottom of the page.
This article has been viewed 17,770 times.
Learn more...
If you’re looking for a fun summertime project that you can bring to parties, make your own dunk tank. While you can rent one or purchase a kit, you could also make your own for a fraction of the cost. The easiest way to do it is by using PVC pipe. Assembling a dunk tank doesn’t require much experience with DIY projects, although it involves sawing and cementing the pipes together. When you’re done, sit under the bucket and watch the water pour out when someone hits the target!
Steps
Constructing the Target and Pourer
-
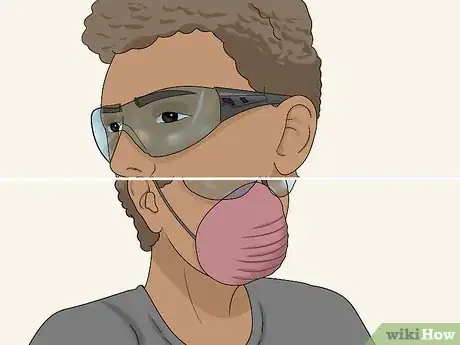
1Put on safety gear when cutting material for the tank. Always wear a dust mask and safety glasses for protection. Don’t wear long-sleeved clothing, jewelry, gloves, or anything else that could get caught in the saw blades. Also, keep other people out of the area until you’re done working.
- Both dust masks and safety glasses are available at most hardware stores.
- To reduce the mess left behind, work outdoors. If that isn’t possible, open up nearby doors and windows to ventilate some of the dust and fumes from the glue.
- Consider vacuuming up any remaining dust after you have finished building the tank.
-
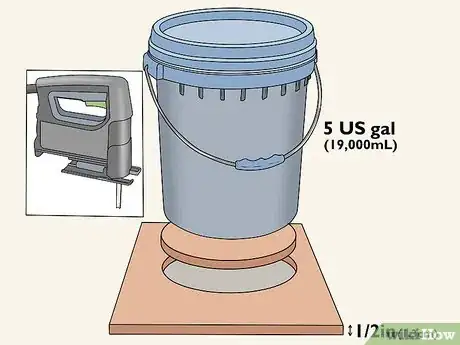
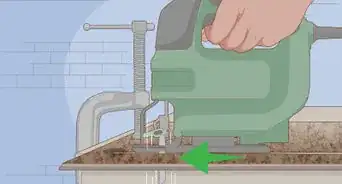
2Use a bucket to outline and cut a hole in a piece of plywood. Set a 5 US gal (19,000 mL) bucket on top of a 1⁄2 in (1.3 cm)-thick piece of plywood. To keep the bucket steady, clamp the plywood to a workbench using a bar clamp. Trace around the bottom of the bucket with a pencil. Then, cut the hole with a jigsaw.[1]
- The bucket and other materials needed are available online or at most hardware stores. Purchase a new bucket or save old buckets used for other projects, such as mixing concrete.
- Save the wood circle you cut out. It’s meant to be the target for the dunk tank.
- If you don’t have a jigsaw, you could simply use a square piece of plywood for the target. You could also use another type of material. The size of the target can also vary, so adjust it as you would like!
Advertisement -
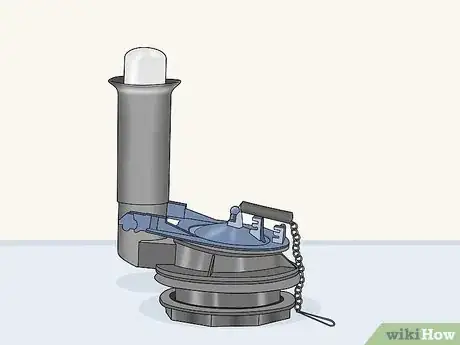
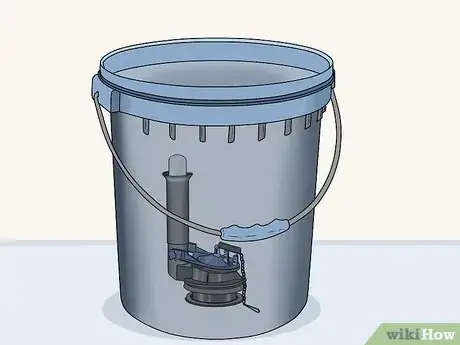
3Block the overflow valve on a toilet flusher float valve. Assemble the flusher, then locate the overflow valve sticking out of the top. It is a big pipe, usually black, that opens the flapper when the water reaches a certain level. It will stop your dunk tank from working correctly, so stick a 3⁄4 in (1.9 cm) PVC cap into it. Use a silicone adhesive to keep the cap inside the pipe.[2]
- Check online or at hardware stores for flusher valve kits. It is the same product used in a toilet’s tank to control the water flow. The PVC cap and adhesive are also available there.
- If the dunk tank spills water on its own, it’s because of the overflow valve. Make sure it is plugged to prevent this from happening.
-
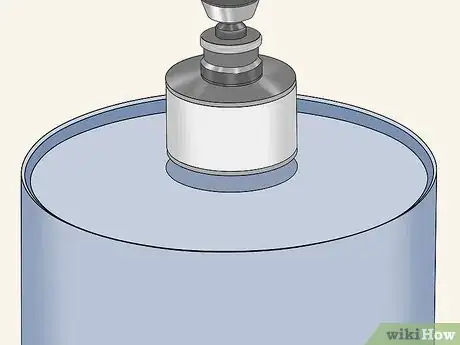
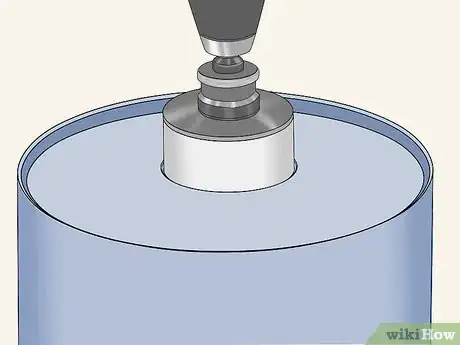
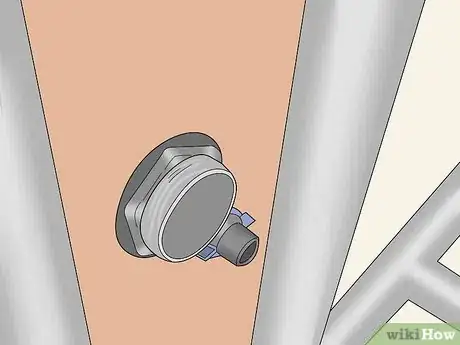
4Cut a hole through the center of the bucket for the valve. Use a 3 1⁄4 in (8.3 cm) hole saw to make a neat hole. Keep the bucket firmly on the ground with the bottom up as you cut through it. When you’re done, position the valve in it to make sure it fits.[3]
- Hole saws are designed to cut perfect circles into surfaces like the bucket you’re using. Check hardware stores to see if you can purchase or even rent one. If you don’t have one, try using an alternative, like another type of saw or a utility knife.
- Leaking is a common problem, so consider spreading a silicone sealant around the edges of the flapper.
- Flappers usually come with a rubber gasket meant to protect against leaks. Twist it onto the bottom part of the flapper emerging from the bucket if you wish.
-
5Drill a 3⁄4 in (1.9 cm) hole through the side of the bucket. Measure down about 1 1⁄2 in (3.8 cm) from the top of the bucket. Mark the spot and drill through it. You only have to make a hole on one side of the bucket. After making it, use a utility knife as needed to scrape away any remaining sharp edges around the hole.[4]
- Create the hole using a power drill. They are available, along with the proper drill bit, online or at hardware stores.
- The exact size of the hole will vary depending on what kind of float valve you use. For accuracy, purchase the float valve first, then make the hole big enough to match it.
-
6Fit the float valve through the hole in the bucket. Position the valve so it is inside the bucket. If you’re having trouble getting it to stay in position, slide it onto a stainless steel float valve rod purchased separately. Get a rod that’s about 3 in (7.6 cm) long and 1⁄4 in (0.64 cm) in diameter. Then, set a 1⁄2 in (1.3 cm) hose adapter on the end of the valve, turning it clockwise to tighten it.[5]
- Most hardware stores carry float valve rods and hose adapters if you need them. The valve is meant to connect hold the valve in place while connecting it to the adapter, which you can use to fill the bucket with water.
- The valve will cause the bucket to tip over when someone hits the target. The hose adapter is a way to quickly refill the bucket by using the valve.
- Many valve kits come with silicone sealant. Try spreading some of the silicone sealant around the installed valve to prevent it from leaking.
-
7Screw the float ball into the valve. The float ball connects to the part of the valve inside the bucket. It will have a metal rod the plugs into a hole on the valve. Look for a small nut on the side of the valve that you can turn clockwise by hand to secure the float ball.[6]
- The float ball is often included with the float valve if you buy a kit. These parts can be purchased separately online or at many hardware stores. The float ball is a round piece of plastic that helps the valve open up properly so it dumps water onto any unsuspecting person below it.
- The float ball and valve are the same components used in toilets. If you need an example of how the ball fits on the valve, look inside the tank on the back of a toilet in your home.
Assembling the Dumping Mechanism
-
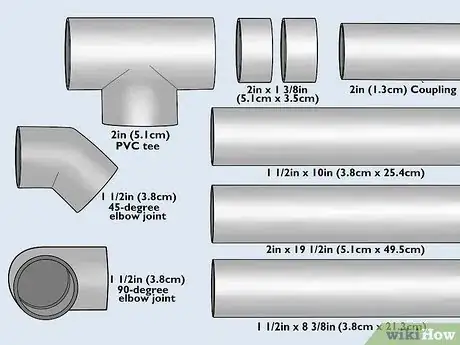
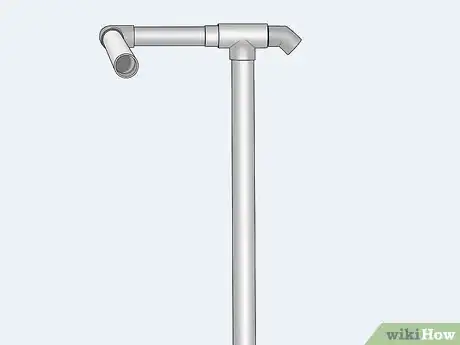
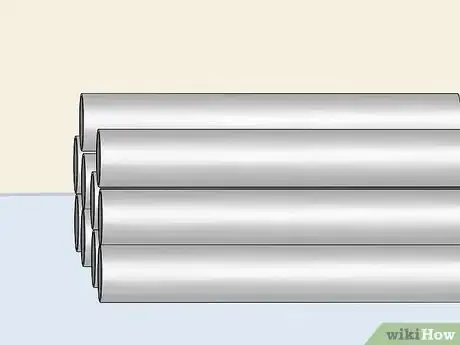
1Purchase and cut PVC pipes to build the dumping mechanism. Use a hacksaw for a straightforward way to slice the pipes up to the length needed for the design. If you have a miter box, you could also put the pipes in the box to hold them in place. Another option is to bring the measurements with you to a hardware store when you buy the pipes to see if someone will them for you. To build the mechanism, you need pipes listed with a width times height of:[7]
- A pair of pipes 2 in × 1 3⁄8 in (5.1 cm × 3.5 cm).
- A 1 1⁄2 in × 8 3⁄8 in (3.8 cm × 21.3 cm) pipe.
- A 1 1⁄2 in × 10 in (3.8 cm × 25.4 cm) pipe.
- A 2 in × 19 1⁄2 in (5.1 cm × 49.5 cm) pipe.
- A 2 in (5.1 cm) PVC tee.
- A 1⁄2 in (1.3 cm) coupling.
- A 1 1⁄2 in (3.8 cm) 45-degree elbow joint.
- A 1 1⁄2 in (3.8 cm) 90-degree elbow joint.
-
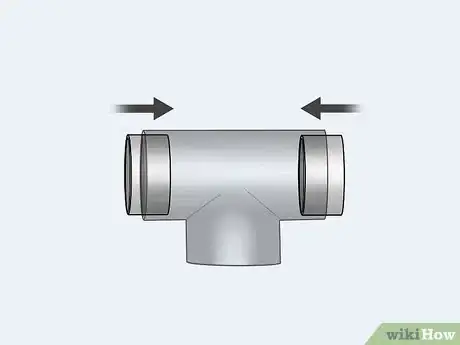
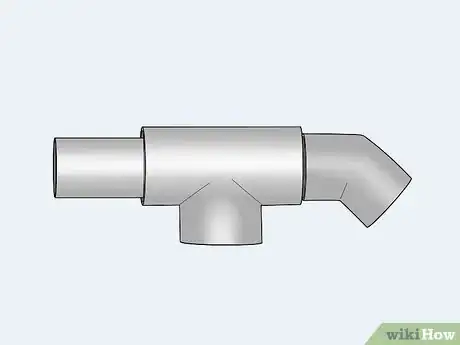
2Fit the 1 3⁄8 in (3.5 cm) pipes into the tee. The tee is just a T-shaped connector, so it’s not too tough to deal with. The cut pipe lengths fit directly inside the opposing ends of the tee. Push them all the way in until they are flush with the tee.[8]
- Take your time to ensure the pipes are positioned correctly. Consider setting up all the pipes first, then cementing them together once you’re sure they are in the right place.
-
3Slide a 1 1⁄2 in (3.8 cm) pipe and elbow through the tee. Start by placing a 45-degree elbow joint on one end of the pipe. Then, slide the pipe all the way through the tee. Make sure the elbow joint is up against the tee. Mark the opposite end of the pipe about 1 in (2.5 cm) past where it emerges from the other end of the tee.[9]
- The 45-degree elbow joint is a connecting piece designed to join straight pipes together at an angle.
- The extra length at the end is needed to connect this component to the rest of the mechanism.
-
4Cut the long pipe according to the spot you marked earlier. Fit the pipe into a miter box or clamp to hold it still. Then, cut off the excess length. Smooth the cut as needed with a utility knife to eliminate any sharp edges.[10]
- Order a miter box online or at a hardware store if you plan on using one. The box holds the PVC pipes in place while you cut it with a saw.
- You could gently sand the edges with 120-grit sandpaper to smooth them out. Be careful around any cut pipes that feel sharp.
-
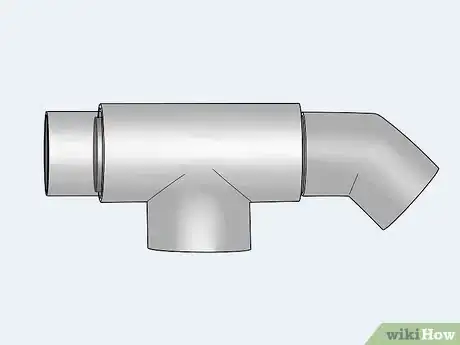
5Spread some PVC cement on the exposed end of the pipe. Select PVC cement to ensure the connections are as strong and waterproof as you can make them. PVC cement generally comes with an applicator brush you can use to spread the product around the opening of the pipe. The glue goes on the outside of the exposed pipe, since you will be putting a connector over it.[11]
- PVC cement is a special kind of glue used to ensure PVC pipes stick together and stay waterproof. It’s usually sold in buckets at hardware stores.
- Make sure the pipe is clean before applying the cement. Dirt and moisture could prevent it from working properly.
-
6Place a 1 1⁄2 in (3.8 cm) coupling on the end of the pipe. A coupling is a small piece of PVC that joins other pipes together. Position it on the end of the tee opposite from the 45-degree elbow joint. Make sure it is also flush with the end of the tee.[12]
- Pick up at least 1 PVC coupling when you purchase the PVC pipes you need. It’s important for hooking straight pipes to one another.
- Make sure you are able to rotate the pipe freely inside the tee without having it slide out. It’s necessary for the dumping mechanism to work properly.
-
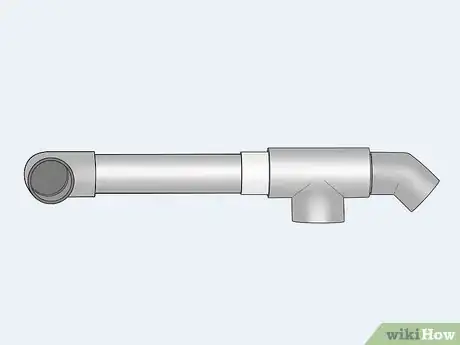
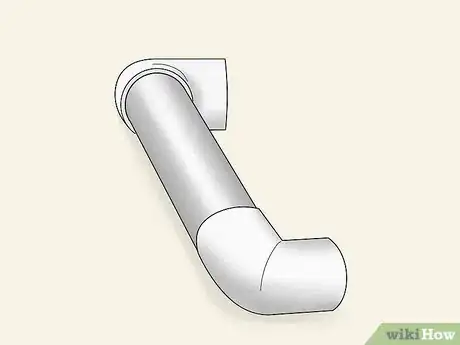
7Set an 8 1⁄2 in (22 cm) pipe and elbow on the coupling. Select a 1 1⁄2 in (3.8 cm) pipe for this component. Add cement to the outside, then slide the pipe into the coupling. Then, put a 90-degree elbow joint on the end of that pipe. Turn the elbow so it faces away from you.[13]
- The 90-degree elbow is a connecting piece like the 45-degree one, but it joins pipes at less of a steep angle. That makes it useful for arranging pipes in a square or another consistent formation.
- Arrange the pipes so the opening of the 45-degree elbow faces downward. If you plan on adjusting it later, wait to add the cement until you’re sure you have all the pipes positioned correctly.
-
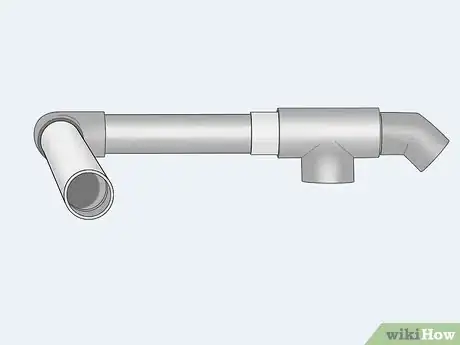
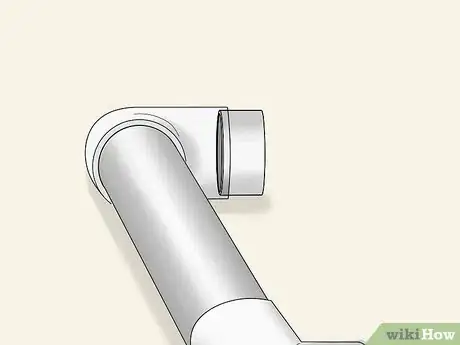
8Position a 10 in (25 cm) pipe on the 90-degree elbow. Use a pipe that is 1 1⁄2 in (3.8 cm) in diameter. Add glue to the end, then push it as far as you can into the elbow. Twist it clockwise until it is tightly in place.[14]
-
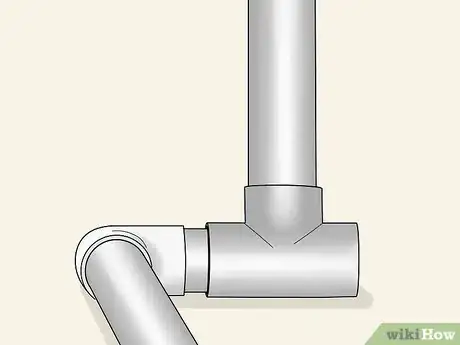
9Secure a long pipe to the bottom of the tee. Finish the mechanism by plugging a 19 1⁄2 in (50 cm)-long pipe into the tee. Use a PVC pipe with a diameter of 2 in (5.1 cm), the same as the tee’s opening. Add cement to secure the pipe in place.[15]
Creating the Dunk Tank Frame
-
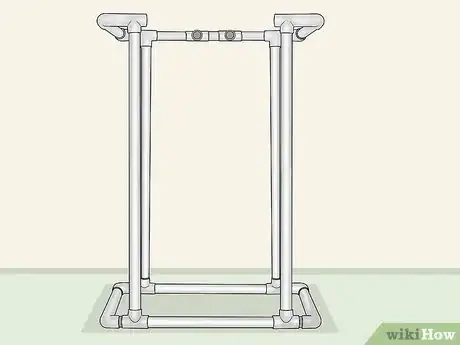
1Purchase and cut additional PVC for the frame. The simplest way to build the frame is with PVC, although you could also use wood. PVC is easy to plug in and glue together. It’s also sturdier and easier to take apart than wood. You will need:[16]
- 4 2 in × 60 in (5.1 cm × 152.4 cm) pipes.
- 7 {2 in × 30 in (5.1 cm × 76.2 cm) pipes.
- 4 2 in × 13 1⁄2 in (5.1 cm × 34.3 cm) pipes.
- 2 2 in × 10 in (5.1 cm × 25.4 cm) pipes.
- 2 2 in × 6 in (5.1 cm × 15.2 cm) pipes.
- 2 2 in × 1 1⁄2 in (5.1 cm × 3.8 cm) pipes.
-
2Build the base of the frame out of the 3 in (7.6 cm) pipes. The dunk tank’s frame is essentially a cage built out of PVC. To build the base, arrange the pipes in a square. Plug the ends of each pipe into 3-way PVC elbow joints. Use cement to secure the pipes together.[17]
- A 3-way elbow joint is very similar to a tee, but the openings are set at different angles. Tees are good for joining parallel pipes, but 3-ways are better for joining ones placed perpendicularly.
- Keep the PVC pipes positioned at 90-degree angles so the base forms a perfect square. Position the connecting joints so the free ends are face up.
-
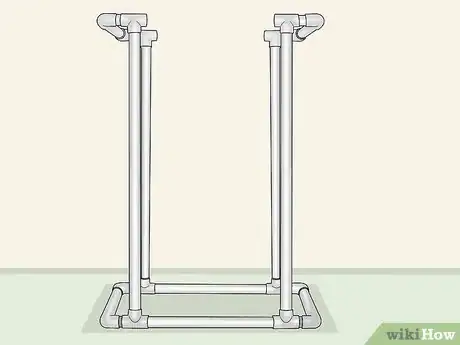
3Fit the 60 in (150 cm) pipes into the elbows on the base. If you plan on taking the tank apart, don’t add cement to these pipes. These pipes will form the middle part of the tank, which will connect the base to the top platform holding the bucket of water. The length of these pipes can be adjusted if you need to change the height of the tank.[18]
- Make sure these pipes fit well into the elbow joints. They need to stand up straight to stabilize the tank’s top platform.
-
4Glue 3-way elbow joints to the remaining 30 in (76 cm) pipes. You will basically make a second frame, but this one is a little more complicated than the one used for the base. Don’t glue all of the pipes and connectors together yet. Instead, arrange the pipes in a square first. Then, secure the left and right pipes to the elbow joints.[19]
- Turn the elbow joints so the free end faces downward. Those openings will line up with the pipes on the rest of the tank.
-
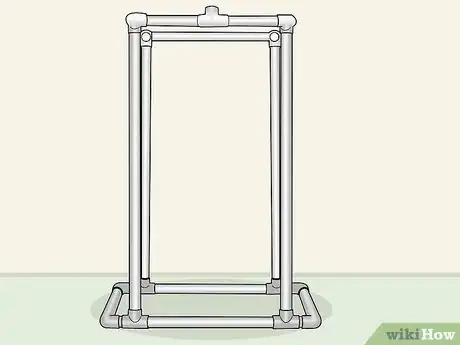
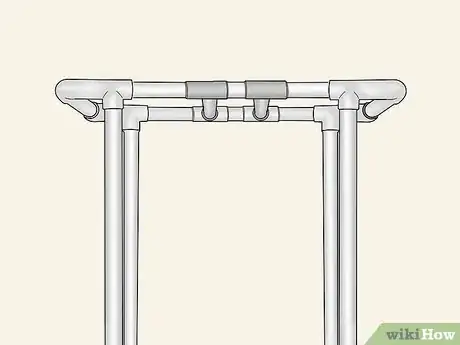
5Create a top frame using several pipes and a tee. Place a 30 in (76 cm) pipe between the connecting joints on the right side of the frame. For the opposite side, slide a pair of 13 1⁄2 in (34 cm) pipes into the connecting joints. Place a T-shaped connector between them and cement everything together.[20]
- You need the tee to set up some pipes in the center in order to hold the bucket and flushing mechanism. Don’t glue the frame pipes together without adding the tee first!
- Rotate the tee so the open end points upward. This is where you will attach the dunking mechanism later.
-
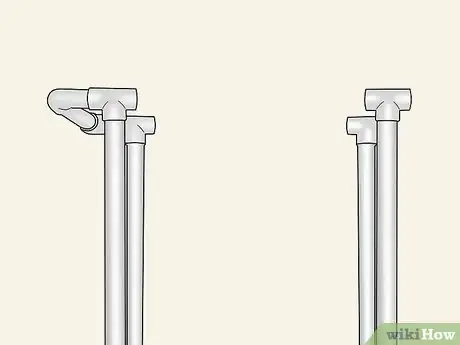
6Secure 13 1⁄2 in (34 cm) pipes to the joints. Position these pipes along the upper and lower ends of the frame. For consistency, glue them to the connecting joints on the right. This side will be the front part of the frame.[21]
-
7Attach 10 in (25 cm) pipes to the left end of the frame. Take 2 of the pipes and fit them into the open ends of the connecting joints on the left. Glue them in place as well. These pipes will be used to form the back part of the frame.[22]
- These pipes are shorter than the ones on the right side so you can fit elbow joints on the frame. It is necessary to create a platform for the dumping mechanism.
-
8Complete the outer edge of the frame with pipes and tees. Slide a T-shaped connector onto the end of each of the frame points. You will need 4 tees in total, 2 for the upper and lower end of the frame. Slide a 1 1⁄2 in (3.8 cm) pipe between each joint. Then, use cement to bond all of the pipes and connectors.[23]
- Position the tees so the open end points toward the center of the dunk tank. This part will be used to make a platform for the bucket.
-
9Cement the remaining 30 in (76 cm) pipes between the tees. Place the pipes in the center of the frame. Run a pipe from a tee on the top part of the frame to one on the bottom. Make sure everything is flush and well-connected before you allow the PVC cement to dry.[24]
- Adjust the pipes as needed before the cement dries. It makes them difficult to disconnect, so don’t cement anything you plan on taking apart.
-
10Set the top frame onto the rest of the dunk tank to complete it. The top frame fits onto the cage like the bottom frame did. Use the 3-way corner joints to position the frame. The exposed openings in the joints fits right on top of the long pipes used for the body of the tank.
- You don’t need to glue the frame to the long pipes. If you plan on taking apart the tank for storage, don’t glue them. However, check the frame to make sure it’s stable on top of the tank.
Connecting the Target and Mechanism
-
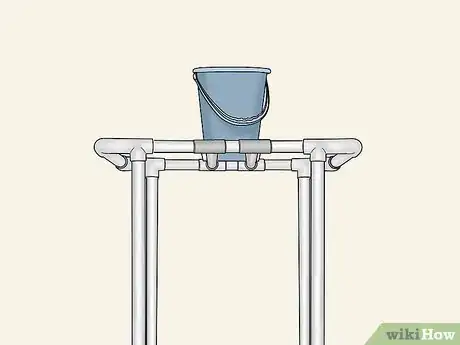
1Place the bucket and dunking mechanism on top of the tank. Set the long pipe from the dunking mechanism into the tee on the top frame. Cement it in place to secure it. Next, position the bucket over the small pipes in the center of the frame. Rotate it so the flapper valve faces the overhanging pipe on the dunking mechanism.[25]
- Make sure the bucket is stable on the frame and has plenty of room to dump water on the person sitting below it. The water will spill through the gap in the pipes on the frame.
-
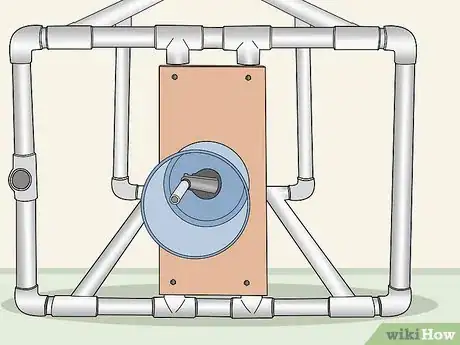
2Connect the target to the tank with a pair of screws. Position the target so it is on the front side of the long pipe used to make the dunking mechanism. To attach it, use 2 strips of a metal plumber’s tape. Screw 1⁄2 in (1.3 cm) galvanized screws through the holes in the tape or clamps. Position a screw on each end of the tape where it connects to the wood, then place another screw directly in the middle of the tape and through the pipe.[26]
- Look for plumber’s tape online or at a nearby hardware store. The screws will likely be available there too.
- Plumber’s tape is very easy to use and it already has holes in it to help you position the screws. You could also use or 1 1⁄2 in (3.8 cm) pipe clamps instead.
-
3Install screw eyes on the bucket and dumping mechanism. Drill a or 1⁄4 in (0.64 cm) pipe clamps hole through the top edge of the bucket near the valve you installed earlier. Make a second hole underneath the arm of the dumping mechanism that hangs over the bucket. Then, twist a 3⁄8 in (0.95 cm) eye screw clockwise into each hole.
- The screw eyes provide a spot to string the bucket to the dumping mechanism. They are basically screws with a circular opening on the end and are available at most hardware stores.
-
4Tie a string between the eye screws and the flapper. Run a length of string from the flapper to the eye screw on the PVC pipe. Knot it to the flapper, then route the string first to the eye screw on the bucket. Pass it through the bucket’s screw before knotting it to the one on the PVC pipe.[27]
- To ensure the string doesn’t break, you could also use a heavy fishing line or another type of material. Try getting a fishing line online, at a general store, or at a fishing supply shop.
-
5Plug the hose into the adapter on the valve. Use a standard garden hose connected to a faucet near your home. To keep the hose in position, consider using plumber’s tape to secure it to the dunk tape’s frame. Once it is attached, you can turn on the water to start filling up the bucket![28]
- If you don’t have a garden hose, you can get one at most general stores or hardware stores.
- Give the dunk tank a test by throwing some 1 lb (450 g) bean bags at the target. If it’s set up correctly, the arm will pull up the flapper, causing water to spill onto anyone sitting inside the tank.
Warnings
- Take proper safety precautions to avoid problems when cutting or gluing dunk tank components. Wear a dust mask and glasses, but also ventilate the area as much as possible.⧼thumbs_response⧽
Things You’ll Need
- 5 US gal (19,000 mL) bucket
- 1⁄2 in (1.3 cm)-thick piece of plywood
- 2 2 in × 1 3⁄8 in (5.1 cm × 3.5 cm) PVC pipes.
- A 1 1⁄2 in × 8 3⁄8 in (3.8 cm × 21.3 cm) pipe.
- A 1 1⁄2 in × 10 in (3.8 cm × 25.4 cm) pipe.
- A 2 in × 19 1⁄2 in (5.1 cm × 49.5 cm) pipe.
- 6 2 in (5.1 cm) PVC tee.
- A 1⁄2 in (1.3 cm) coupling.
- A 1 1⁄2 in (3.8 cm) 45-degree elbow joint.
- A 1 1⁄2 in (3.8 cm) 90-degree elbow joint.
- 3⁄4 in (1.9 cm) PVC cap
- 4 2 in × 60 in (5.1 cm × 152.4 cm) pipes.
- 7 {2 in × 30 in (5.1 cm × 76.2 cm) pipes.
- 4 2 in × 13 1⁄2 in (5.1 cm × 34.3 cm) pipes.
- 2 2 in × 10 in (5.1 cm × 25.4 cm) pipes.
- 2 2 in × 6 in (5.1 cm × 15.2 cm) pipes.
- 2 2 in × 1 1⁄2 in (5.1 cm × 3.8 cm) pipes.
- 6 3-way PVC connecting joints
- PVC cement
- Toilet flush kit valve with flapper
- Plumber’s tape
- 6 1⁄2 in (1.3 cm) galvanized screws
- 1⁄2 in (1.3 cm) hose adapter
- Power drill
- 3 1⁄4 in (8.3 cm) hole saw
- Hacksaw or miter saw
- Jigsaw
- Clamps
References
- ↑ https://www.youtube.com/watch?v=o725sdCVRYA&feature=youtu.be&t=16
- ↑ https://www.youtube.com/watch?v=o725sdCVRYA&feature=youtu.be&t=30
- ↑ https://www.youtube.com/watch?v=lCw-JRHB1QU&feature=youtu.be&t=21
- ↑ https://www.youtube.com/watch?v=o725sdCVRYA&feature=youtu.be&t=62
- ↑ https://www.youtube.com/watch?v=XvDvaBwPYUs&feature=youtu.be&t=621
- ↑ https://www.youtube.com/watch?v=XvDvaBwPYUs&feature=youtu.be&t=662
- ↑ https://diy.dunnlumber.com/projects/how-to-build-a-diy-dunk-tank
- ↑ https://www.youtube.com/watch?v=o725sdCVRYA&feature=youtu.be&t=89
- ↑ https://www.youtube.com/watch?v=o725sdCVRYA&feature=youtu.be&t=100
- ↑ https://www.youtube.com/watch?v=o725sdCVRYA&feature=youtu.be&t=113
- ↑ https://www.bobvila.com/articles/gluing-pvc-pipe/
- ↑ https://www.youtube.com/watch?v=o725sdCVRYA&feature=youtu.be&t=131
- ↑ https://www.youtube.com/watch?v=LCajHd-V7-E&feature=youtu.be&t=313
- ↑ https://www.youtube.com/watch?v=o725sdCVRYA&feature=youtu.be&t=137
- ↑ https://www.youtube.com/watch?v=LCajHd-V7-E&feature=youtu.be&t=320
- ↑ https://diy.dunnlumber.com/projects/how-to-build-a-diy-dunk-tank
- ↑ https://www.youtube.com/watch?v=LCajHd-V7-E&feature=youtu.be&t=24
- ↑ https://www.youtube.com/watch?v=LCajHd-V7-E&feature=youtu.be&t=53
- ↑ https://www.youtube.com/watch?v=LCajHd-V7-E&feature=youtu.be&t=107
- ↑ https://www.youtube.com/watch?v=o725sdCVRYA&feature=youtu.be&t=185
- ↑ https://www.youtube.com/watch?v=LCajHd-V7-E&feature=youtu.be&t=176
- ↑ https://www.youtube.com/watch?v=LCajHd-V7-E&feature=youtu.be&t=132
- ↑ https://www.youtube.com/watch?v=LCajHd-V7-E&feature=youtu.be&t=208
- ↑ https://www.youtube.com/watch?v=XvDvaBwPYUs&feature=youtu.be&t=518
- ↑ https://www.youtube.com/watch?v=LCajHd-V7-E&feature=youtu.be&t=268
- ↑ https://www.cityline.tv/2017/07/18/diy-summer-splash-bucket/
- ↑ https://www.cityline.tv/2017/07/18/diy-summer-splash-bucket/
- ↑ https://www.youtube.com/watch?v=o725sdCVRYA&feature=youtu.be&t=248
