This article was co-authored by wikiHow staff writer, Hunter Rising. Hunter Rising is a wikiHow Staff Writer based in Los Angeles. He has more than three years of experience writing for and working with wikiHow. Hunter holds a BFA in Entertainment Design from the University of Wisconsin - Stout and a Minor in English Writing.
This article has been viewed 26,144 times.
Learn more...
A gymnastics bar is a single horizontal bar that’s used during many routines. If you want to practice gymnastics at home, rather than buying expensive equipment, you can build your own gymnastics bar with a few tools and supplies. Start by building the leg pieces before putting the bar between them. After you sand the edges and add padding, your gymnastics bar is ready to use!
Steps
Building the Leg Pieces
-
1Cut 2 vertical supports so they’re 6 ft (1.8 m) long. Get at least 12 feet (3.7 m) of 4 in × 4 in (10 cm × 10 cm) lumber to use for the vertical supports on your gymnastics bar. Mark 6 ft (1.8 m) sections on the lumber and use a handsaw or table saw to cut through the wood. Make straight cuts through the wood so the ends are flush with one another.[1]
- If the lumber is too expensive, glue 2 pieces of 2 in × 4 in (5.1 cm × 10.2 cm) boards together so it forms a 4 in × 4 in (10 cm × 10 cm) post. Once the glue dries, put 3 in (7.6 cm) screws along the length of the board every 6 inches (15 cm).
Tip: You may be able to ask the employees at the store to cut your wood for you if you don’t have a saw.
-
2Trim 2 base pieces that are each 5 ft (1.5 m) long. Get 1 piece of 2 in × 4 in (5.1 cm × 10.2 cm) board that’s 10 feet (3.0 m) long so you can make the base pieces for the gymnastics bar. Measure 5 feet (1.5 m) from the end of the board and make a mark on the wood. Cut a straight line through the middle of the board so you’re left with 2 pieces of wood that are each 5 feet (1.5 m) long.[2]
- You can also use a table saw to cut your boards if you have one.
Advertisement -
3Saw 4 additional boards to 3 ft (0.91 m) for your angle braces. Buy a couple of 2 in × 4 in (5.1 cm × 10.2 cm) boards that are 6 feet (1.8 m) long to cut your angle braces from. Cut each board in half so you have 4 pieces that are each 3 feet (0.91 m) long.[3]
-
4Cut 45-degree angles into the ends of the angle braces with a miter saw. Adjust the bevel on the miter saw so the blade is at a 45-degree angle to the board. Line up the blade of the saw with the end of the board before turning on the saw. Slowly pull the saw handle down to cut through the end of the board so it has an angled edge. Repeat the process on the other end so the board looks like a trapezoid. Continue mitering the other 3 boards the same way.[4]
- Be sure that the angled cuts on the ends of the board are not parallel with one another or else it won’t fit on the base properly.
-
5Screw the vertical supports into the centers of the base pieces. Lay down your 4 in × 4 in (10 cm × 10 cm) vertical supports so they’re horizontal. Center the vertical support on one of the 5 ft (1.5 m) boards and clamp it in place with a C-clamp. Drive 4 wood screws that are 3 in (7.6 cm) long through the base board into the bottom of the vertical support. Repeat the process with the other vertical support and base piece.[5]
- Avoid using nails since they could pull out after regular use.
-
6Secure the angle braces to the bases and vertical supports with wood screws. Position the angle brace so it forms a triangle with the vertical support and base piece, and make sure the edges are flush. Drive 2 screws through each end of the angle brace and into the vertical support and base. Secure a second angle brace on the other side of the vertical support. Repeat the process on the other vertical support to finish the legs.[6]
- Ask a helper to hold the vertical supports steady while you attach the angle braces so they’re less likely to move around.


Attaching the Bar
-
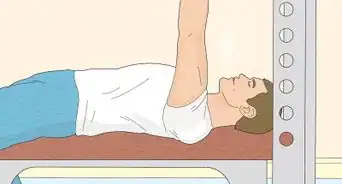
1Measure your chest height so you know how tall to make the bar. Stand up straight with your shoulders and heels against a wall so you can get an accurate measurement. Use a measuring tape to find the height from the floor to the center of your chest, or to the top of your armpit. Write down your measurement so you don’t forget it later on.[7]
- If you’re building the gymnastics bar for someone else, measure their chest height instead.
-
2Add 4 in (10 cm) to your measurement and mark it on each leg. Since you’ll have a mat underneath the gymnastics bar when it’s finished, add an additional 4 in (10 cm) to the chest height measurement to be more accurate. Measure up from the bottom of the leg piece to the height you found and make a mark in the centers of the vertical supports.[8]
- Make sure the marks on the leg pieces line up with one another or else the bar will be crooked when you try to install it.
-
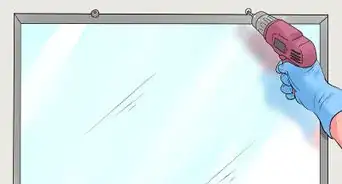
3Drill 1 3⁄4 in (4.4 cm) holes in each leg on the marks you made. Put a 1 3⁄4 in (4.4 cm) hole saw attachment onto your drill. Line up the center of the hole saw with the mark you made on the leg piece before you turn your drill on. Slowly push the hole saw straight into the leg piece to cut a hole completely through it. Cut another hole through the mark on the second leg piece.[9]
- Don’t try to force the saw through the wood since you could cause the attachment to break or chip the wood.
- You may also use a drill press to cut the holes if you have access to one.
-
4Feed a 4 ft (1.2 m) bar through the holes on the legs. Look for a wooden bar that’s 1 3⁄4 in (4.4 cm) in diameter so it fits perfectly in the holes. Push the end of the bar into the hole on one of the leg pieces until the end is flush with the edge. Guide the other end of the bar into the hole on the other leg piece and push it through the wood completely.[10]
- You can buy wood bars from your local hardware store.
- You may also use a metal bar instead of wood, but be sure not to use any hollow pipes since they won’t be as strong. If you use a metal bar, make sure at least 1–2 inches (2.5–5.1 cm) extends out from the sides.
Tip: If it’s difficult getting the bar into the holes, try hitting the wood with a mallet or hammer to force the bar in further.
-
5Screw the bar into place so it doesn’t shift around. Drive a 3 in (7.6 cm) wood screw into the vertical support so it’s perpendicular to the bar. Make sure the screw goes into the wooden bar to secure it in place. Work slowly so you don’t accidentally break or chip the wood. Then add another screw on the opposite side of the leg support 1 in (2.5 cm) over. Repeat the process on the other leg piece.[11]
- If you used a metal bar, then slide a flange coupler over each end of the bar. Drive wood screws into each of the holes on the flange couplers to secure them to the supports. Tighten the screw on top of the flange to secure the bar in place.


Adding Safety Features
-
1Install 2 crossbars between the feet pieces for additional stability. Measure the distance between the base pieces of your gymnastics bar and write down the measurements. Trim 2 pieces of 2 in × 4 in (5.1 cm × 10.2 cm) boards to the size of your measurement with a handsaw. Position the crossbars so they’re flush with the edges of the base. Drive 2 wood screws through the bases into the ends of the crossbars to secure them in place.[12]
- You can also add another crossbar in the center of the bases if you want, but it’s not required.
-
2Sand the edges and corners of the wood so they aren’t as sharp. Use 120- or 160-grit sandpaper to smooth any sharp edges on the wood so you don’t get injured while you use the bar. Work around the corners to give them a soft, rounded edge to prevent you from getting hurt if you bump into them. Continue working until all of the edges are smooth.[13]
- Use an electric sander if you have one to finish working on the wood faster.
Tip: If you notice any broken pieces of wood, sand them until they’re smooth so you don’t get any splinters.
-
3Put a 4 in (10 cm) thick gymnastics mat under the bar for padding. A gymnastics mat helps cushion your landing and prevents you from getting hurt if you fall. Use a mat that’s at least 4 inches (10 cm) thick so you don’t get injured if you slip off of the bar. Make sure the cushion covers both of the crossbars on the bottom so you don’t land on them by accident.[14]
- You can buy gymnastics mats online or from a specialty store.
- If you can’t find a mat that’s 4 inches (10 cm) thick, then stack 1–2 in (2.5–5.1 cm) mats on top of one another to use as padding.


Warnings
- Always use caution while you’re working with power tools so you don’t hurt yourself.⧼thumbs_response⧽
- Keep the gymnastics bar away from other furniture or decoration so you don’t accidentally damage anything while you’re using it.⧼thumbs_response⧽
Things You’ll Need
- 12 feet (3.7 m) of 4 in × 4 in (10 cm × 10 cm) lumber
- 2 in × 4 in (5.1 cm × 10.2 cm) boards that are 10 feet (3.0 m) long
- 2 in × 4 in (5.1 cm × 10.2 cm) boards that are 6 feet (1.8 m) long
- Handsaw
- Miter saw
- C-clamp
- Drill with a screwdriver attachment
- 1 3⁄4 in (4.4 cm) hole saw
- 3 in (7.6 cm) wood screws
- Tape measure
- 4 ft (1.2 m) metal or wooden bar with a diameter of 1 3⁄4 inches (4.4 cm)
- 120- or 160-grit sandpaper
- 4 in (10 cm) gymnastics mat


References
- ↑ https://gymnasticslab.com/how-to-build-a-gymnastics-bar/
- ↑ https://gymnasticslab.com/how-to-build-a-gymnastics-bar/
- ↑ https://gymnasticslab.com/how-to-build-a-gymnastics-bar/
- ↑ https://youtu.be/_HdLkHwOwSE?t=119
- ↑ https://www.sportsrec.com/make-gymnastic-bars-7481534.html
- ↑ https://www.sportsrec.com/make-gymnastic-bars-7481534.html
- ↑ https://gymnasticslab.com/how-to-build-a-gymnastics-bar/
- ↑ https://gymnasticslab.com/how-to-build-a-gymnastics-bar/
- ↑ https://gymnasticslab.com/how-to-build-a-gymnastics-bar/
About This Article