X
This article was co-authored by wikiHow Staff. Our trained team of editors and researchers validate articles for accuracy and comprehensiveness. wikiHow's Content Management Team carefully monitors the work from our editorial staff to ensure that each article is backed by trusted research and meets our high quality standards.
This article has been viewed 38,859 times.
Learn more...
If you’re ready to improve your health at home by installing your own personal pull-up bar, you can do so in a few easy steps. Depending on the type of bar you have, you can hang your bar in a doorway or on the wall using some basic hardware and simple measurement techniques.
Steps
Method 1
Method 1 of 2:
Installing a Doorway Pull-Up Bar
-
1Decide which direction you want to face while using your bar. With a doorway pull-up bar, you will face toward the doorway while using it. If your doorway does not have a door, or you choose to remove your door, you have a choice as to which side you will face. If your door remains in the doorway, you’ll have to install your bar so that you hang on the opposite side from where the door is when it’s open.[1]
- You will not be able to close the door while a doorway pull-up bar is in place. Either install your bar in a doorway that doesn’t need a closed door, or remove your pull-up bar after each use by not using the hardware to permanently attach it.
-
2Rest the rear horizontal piece above your door frame on the other side. If you look at your pull-up bar, it has a flat piece that’s narrower than the rest of the parts of the bar. It may have a piece of foam or rubber on it. Raise this piece up and through the door, so that it’s resting on top of the door frame on the opposite side from where you’ll be hanging.[2]
- Make sure the horizontal piece rests smoothly and flat on top of the door frame. If it’s crooked at all, the bar will not be safe to use.
Advertisement -
3Center the bar so rubber is touching both sides of your door frame. You want your bar to be centered so that the parts touching the sides of your door frame are rubber. If it’s off-center, metal parts may touch your door frame and you risk putting a dent in the frame.[3]
-
4Screw mounting brackets in if you want a permanent bar. Some doorway bars come with mounting brackets to keep the bar permanently in place. To install them, lift on the rear horizontal piece to remove it, and use a power drill to install the brackets about 13.75 inches (34.9 cm) apart above your door frame where the horizontal piece was.[4]
- Consult the instruction guide of your pull-up bar model to determine exactly how far apart to install the mounting brackets.
- Mounting brackets for doorway pull-up bars are optional, since your body weight is on the opposite side of the rear horizontal piece which acts as a lever to hold the bar in place while you use it. You must actually lift up on the back of the bar to get it to come down.
-
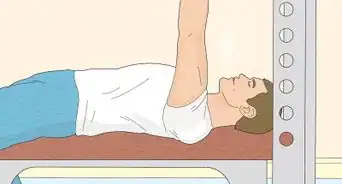
5Test the bar to be sure it’s sturdy. Without using your full body weight, pull down on the bar a couple of times to make sure it doesn’t move. If the bar is centered and level with the door frame in the back, it should be sturdy enough to hold all your weight. Next, try hanging on it without doing a pull-up to see if it holds all your weight.[5]
- If the bar holds your hanging weight without moving, you’re ready to start working out and doing pull-ups on it.
- Check the instruction guide to be sure about the weight limit that your specific bar can hold.


Advertisement
Method 2
Method 2 of 2:
Hanging a Wall Mounted Pull Up Bar
-
1Locate wall studs if you’re hanging the bar on a non-concrete wall. If you’re hanging your bar inside on a regular wall, you must hang it from the wooden studs behind your wall so that the weight on the bar doesn’t rip your wall apart. Find studs by gently hammering small nails into the wall near an outlet; if the nail hits wood as you’re hammering, there’s a stud there.[6]
- Once you find 1 stud, you can generally find another by measuring 16 inches (41 cm) over from the first and conducting the nail test again.
- If the nail easily goes straight into dry wall, and you can wiggle the nail around because there’s nothing on the other side, you have not found a stud.
-
2Choose a height for your bar. Your bar should be high enough that you have to stretch your arms up to reach it. Some people like to jump up to their bar; others want to reach it by standing. A popular height for pull-up bars is about 80 inches (200 cm) from the floor.[7]
- Choose a height for your bar based on your preference, and use a ladder for marking the wall and drilling if you want your bar high enough so that you have to jump to reach it.
-
3Mark the walls where your brackets will hang. Once you have found studs in a regular wall, or if you’re using a concrete wall, and have chosen a height for your bar, measure the same distance from the floor for each mark with a tape measure. Use a pencil to mark where you will drill your holes.[8]
- Use the width of your specific pull up bar to mark the wall at the correct width, making sure that studs are behind the marks if you’re hanging your bar on a non-concrete wall.
-
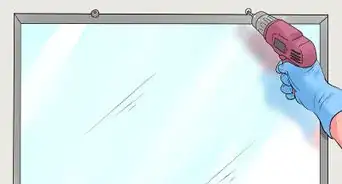
4Pre-drill your holes where the marks are. Look at your bar’s instruction manual to determine what size your mounting screws are. Use the same size drill bit to begin drilling holes into your wall where you marked it. The holes will need to be deep enough for the entire screw to fit.[9]
-
5Hammer your mounting plugs into the holes. If your pull-up bar kit came with mounting plugs, gently tap them into your holes with a hammer. Repeat the pre-drilling step and this step for however many places you will be screwing in your specific bar.[10]
-
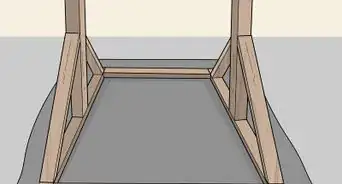
6Attach your assembled bar to the wall with its hardware. Using the screws, nuts, and bolts that came with your pull-up bar, attach your bar to the wall on 1 side. Have someone help you hold the bar in place on the other side while you are drilling in the screws. Tighten all the bolts and try to move your bar around to test its stability.[11]
- Check your bar’s instruction guide to see what size screwdriver bits to use on your specific bar.
- All the bolts on your bar should be tight enough that your bar doesn’t move at all when you try to move it.
-
7Test your bar’s stability. Without using your full body weight, pull down on the bar a couple of times to make sure it doesn’t move. Next try hanging on it without doing a pull-up to see if it holds all your weight. If the bar holds your hanging weight without moving, you’re ready to start working out and doing pull-ups on it.[12]


Advertisement
Things You’ll Need
- Assembled doorway or wall-mounting pull up bar
- Power drill with assorted size hardware


References
- ↑ https://snapguide.com/guides/install-an-iron-gym-pullup-bar/
- ↑ https://www.slideshare.net/InterRev/installing-a-doorway-pull-up-bar
- ↑ https://www.youtube.com/watch?v=hhFd1VKop7w&feature=youtu.be&t=43
- ↑ https://healthfully.com/install-golds-gym-pullup-bar-7717209.html
- ↑ https://healthfully.com/install-golds-gym-pullup-bar-7717209.html
- ↑ https://www.youtube.com/watch?v=QkYf-qMTnN0&feature=youtu.be&t=15
- ↑ https://garagegymplanner.com/wall-mounted-pull-up-bars-and-ceiling-mounted-pull-up-bars/
- ↑ https://garagegymplanner.com/wall-mounted-pull-up-bars-and-ceiling-mounted-pull-up-bars/
- ↑ https://garagegymplanner.com/wall-mounted-pull-up-bars-and-ceiling-mounted-pull-up-bars/
About This Article

wikiHow Staff
wikiHow Staff Writer
This article was co-authored by wikiHow Staff. Our trained team of editors and researchers validate articles for accuracy and comprehensiveness. wikiHow's Content Management Team carefully monitors the work from our editorial staff to ensure that each article is backed by trusted research and meets our high quality standards. This article has been viewed 38,859 times.
Co-authors: 4
Updated: April 21, 2021
Views: 38,859
Categories: Upper Body Strengthening and Toning | Gym
Advertisement