X
wikiHow is a “wiki,” similar to Wikipedia, which means that many of our articles are co-written by multiple authors. To create this article, 14 people, some anonymous, worked to edit and improve it over time.
This article has been viewed 126,237 times.
Learn more...
A shelter for a horse can be as elaborate as your imagination can make it. The truth is that the most you need for the horse is just a place for it to get out of the weather. Include a place to store the tack and the horse feed. A pole barn works great and is the cheapest way to go when you need to build a simple one horse barn.
Steps
-
1Understand that building a pole barn is straight forward and pretty much as simple as it gets. It is built with poles that are 4 x 4-inches (10.16 x 10.16 cm). These protected posts, or utility poles, are set in a grid 8 feet (2.44 meters) apart.
-
2Build an 8 x 16-foot (2.44 X 4.88 meters) structure with a shed roof that is 8 feet (2.44 meters) high in the front and 6 feet (1.83 meters) tall in the back.
- The barn, depending on your location, can be enclosed on 3 sides (or with half of the front covered).
- Another choice is to open it on the side, facing the sun in winter. This way you will have prevailing winds for summer cooling of the horse.
- Make the roof from fiberglass or sheet metal. Both of these come in varying lengths and are 26 inches (10.14 cm) wide. The wall cladding is the same material used for the roof.
Advertisement -
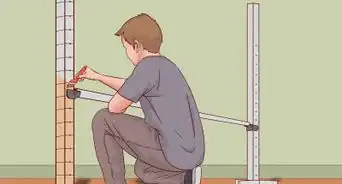
3Start building the pole barn by laying out the location of the posts on the ground that drains well and is relatively flat. Make sure you keep the posts square to each other when you lay out the post locations. Remember, it is in 8-foot (2.44 meter) grids. You will need 6 post locations for an 8 x 16-foot (2.44 x 4.88-meter) shed.
-
4Dig the post holes a minimum of 2 to 4 feet (.61 to 1.22 meters) deep and 1 foot (. 3 meters) wide. Opt for the measurements to be 4 feet (1.22 meters) deep if your climate has a lot of freeze and thaw cycles. Moderate climates require 2 feet (.61 meters).[1]
-
5Set the treated 4 x 4-inch (10.16 X 10.16 cm) wood posts into place, bracing them to keep them plumb. Pour a premixed sack of concrete into the hole around the post, up at least 1 foot (. 3 meters). Wait a couple of days for the concrete to set and then backfill the remainder of the way with dirt dug from the holes.
-
6Tamp down the dirt as you backfill. Keep checking as you go to ensure your post is square. Use a string line run on the back and front to keep the center post in-line.
-
7Attach a treated 2 x 6-inch (5.08 x 15.24 cm) wood skirt board around the bottom of the back and sides of the pole barn if you have it open in the front. Run a skirt board on one side of the front if the ban is to be closed off. This is usually an 8-foot (2.44 meters) section of the front.
- Use 2 x 4-inch (5.08 x 10.16 cm) wood grits, or lattice board, 2 feet (.61 meters) apart from the bottom of the skirt board to the top of the wall on 3 sides.
- Opt for 2 x 6-inch (5.08 x 15.24 cm) treated wood board all around the outside of the pole barn for the roof frame to sit on the top grit.
- Set the stringer top edge (on the side wall section) 6 feet (1.83 meters) from the ground. Now raise the front end up to the 8-foot (2.44 meters) mark on the front.
- Cut the post off flush with the roof stringers.
-
8Add another 2 x 4-inch (5.08 x 10.16 cm) grit on the side level with the one you placed against the bottom of the stringer at the back.
-
9Use 2 x 6-inch (5.08 x 15.24 cm) wood for the roof rafters that sit on 4-foot (1.22-meter) centers. Nail the 2 x 4-inch (5.08 x 10.16 cm) wood flat on 1 end.
-
10Fasten metal hurricane hold-down straps to the posts and to the rafters to prevent high wind gusts from pulling the roof off of the support posts.
-
11Overlap 29-gauge galvanized corrugated roofing panel by 2 inches (2.12 cm) to the skirt board, stringers and grits.
- The holes are pre-drilled and use special #12 2-inch (2.12 cm) metallic steel hex drill-point roofing screws.
- Cut to fit using a circular saw fitted with a metal cutoff blade on the sloped sides.
-
12Finish with preformed foam sealer strips that fit between the roofing and joist. Add doors to the front, if needed, by building a 2 x 4-foot (.61 x 1.22-meter) frame. Use the same sheet metal as the roof and walls, and hang it from the post.


Advertisement
Community Q&A
-
QuestionHow long would this possibly take?
 Community AnswerIt could vary wildly depending on your skills, materials, budget, and the number of people you have working on the project.
 -
QuestionCan I build this by myself?
 Community AnswerYou can try, but having more than one person would be very helpful. It is unlikely that you'll be able to build a horse barn by yourself.
 -
QuestionHow much does it usually cost?
 Stacy SteeleCommunity AnswerDepending on the size of the barn, it can vary between $5,000 and $10,000. (It could be more, but that's the average range.)
Advertisement
Warnings
- Big gaps anywhere is a possibility for the horse to get stuck. Most likely their feet. So when building, keep this in mind⧼thumbs_response⧽
Advertisement
Things You'll Need
- Pressure treated 4 x 4-inch (10.16 x 10.16 cm) posts in 8-foot (2.44 meters) and 10-foot (3.05 meters) lengths minimum
- 2 x 6-inch (5.08 X 15.24 cm), minimum 8-foot (2.44 meter) length, pressure-treated wood boards for skirt, joist and rafters
-
16 p framing nails
- 12 2-inch (2.12 cm) metallic steel hex drill point roofing screws
- Metal hurricane straps
- 29-gauge galvanized corrugated roofing panels
- Circular saw with a 24-tooth blade and a metal cut off blade
- Corded or cordless drill with drive bit
- Level
- String line
- Measuring tape
- Premixed concrete
- Post-hole diggers
- Round-pointed shovel
- Framing hammer
- Preformed foam sealer strips
- 2 x 4-inch (5.08 X 10.16 cm) treated wood for stringers or grits


References
- ↑ https://extremehowto.com/digging-perfect-post-hole/
- https://careertrend.com/how-to-build-a-cattle-tub-13639807.html
- http://home.howstuffworks.com/home-improvement/construction/projects/build-pole-barns.htm
- https://www.youtube.com/watch?v=ktxRrhHV0Qk
- http://www.youtube.com/watch?v=jkWu_lqIem0&feature=related
About This Article
Advertisement