This article was co-authored by wikiHow Staff. Our trained team of editors and researchers validate articles for accuracy and comprehensiveness. wikiHow's Content Management Team carefully monitors the work from our editorial staff to ensure that each article is backed by trusted research and meets our high quality standards.
This article has been viewed 35,552 times.
Learn more...
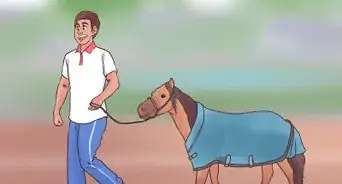
Crops are often used in horseback riding to train horses and help them learn new commands. Rather than used for discipline, riding crops are used to help encourage horses to perform specific tasks, and are meant to help reinforce the rider's commands. Leather riding crops are both classical and beautiful. They may seem complex to make at first, but with enough practice, are actually quite simple.
Steps
Weaving the Base
-
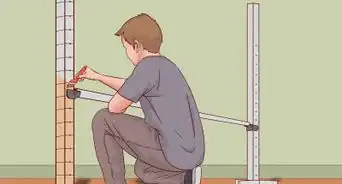
1Choose a flexible core. Find a thin, flexible rod made from brass or fiberglass. Cut it down to 2½ feet (76.2 centimeters), or have the store do it for you.[1]
-
2Cut two pieces of leather lace. Each pieces needs to be 3.5 times the length of the rod. It would be even better if you cut the lace a little bit longer than you need to. Remember, you can always cut the excess off at the end, but you can't add lace back.[2]
- Choose leather lace that is flat and wide, like ribbon. Don't use the round, tube type.
- Use thin leather lace. Do not use the thick, suede lace.
Advertisement -
3Cross the two strands in front of the rod's tip. Cross both of the leather strands at the center to make an X. Place that X right at the top of the rod, just below the tip.[3]
-
4Cross the top-right strand behind the rod. Take the top-right strand, and pull it across the back of the rod. Angle it downward so that it comes out between the top-left and bottom-left strands.
- Keep the lace flat. Don't let it twist or turn.
-
5Bring the strand across front of the rod and back to the right side. Pull the strand between the two strands on the left. Cross it in front of the rod, back towards the right side.
-
6Hold the right strand under the other right strand. The strand that used to be on the top-right is now on the bottom-right. Hold the two strands so that they are parallel to each other.
- Pull on all four strands to tighten them.
-
7Repeat the process for the top-left strand. Bring the top-left strand behind the rod. Pull it out between the two strands on the right. Cross it over the front of the rod, and back over to the left. Tug on the strands to tighten them.[4]
-
8Continue weaving your way down the length of the rod. After you wrap each side, remember to tug on the strands to tighten them. Stop weaving when you reach the bottom end of the rod.
-
9Secure the leather lace strands at the bottom of the rod with tape. Don't tape the ends directly to the rod. Instead, set the rod down on the table, and tape the strands to the table as well. You can also wrap some tape around the strands instead, just below the base of the rod.


Whip Lashing the Ends
-
1Cut a long piece of sinew or waxed thread. About 8 to 12 inches (20.32 to 30.48 centimeters) should be enough. You will be using this to whip lash the bottom of your rod.[5]
-
2Fold the thread in half and place it against the bottom of the rod. Fold the thread in half first, so that the ends match up. Place it against the bottom 2 to 3 inches (5.08 to 7.62 centimeters) of the rod. Make sure that the folded part of the string is pointing towards the rod, and the tails are pointing away.[6]
-
3Wrap one of the tails around the rod, towards the fold. Hold both of the tails against the base of the rod. Take one of the tails, and start wrapping it around the base of the rod, securing the thread to it. Keep wrapping until you are about ½ to 1 inch (1.27 to 2.54 centimeters) from the fold.[7]
- Be sure to wrap tightly.
-
4Slide the end of the thread up through the loop. Bring the thread under the folded part of the thread, then slide it up through the loop. Do not slide it down through the loop.[8]
-
5Tug on the bottom tail to pull the loop under the wrapped thread. Find the remaining thread tail hanging off of the bottom of the rod. Give it a tug until the loop disappears under the wrapped thread. Keep tugging until about half of the top tail disappears under the wrapped thread as well.[9]
-
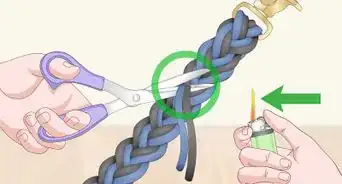
6Tug on both threads, then snip them off. Once you can't see the loop anymore, give both threads a sharp tug. Snip the excess off as close to the wrapping as you can.[10]


Creating the Handle
-
1Decide how long you want the handle, then cut four strips of leather lace. Each strip needs to be four times the length of your handle.[11] A good way to determine ho long the handle should be is to measure the width of your palm, then add 2 inches (5.08 centimeters).
- Use the same type of leather lace as you did for the rod. It can be the same color or a different one.
-
2Weave the four strips into an X in front of the rod. Place two of the strips at an angle in front of the rod, going from the top left to the bottom right. Take the third strip, and weave it over and under across the first two strips. Take the fourth strip, and weave it under and over across the first two strips.[12]
- Adjust the strips to make an X shape. You will have two strips on each arm of the X.
-
3Bring the top-right strip behind the rod, and weave it through the strands on the left. Take the top-right strip, and pull it behind the rod. Weave it under and over, under and over the strands on the left, starting from the one on the top.[13]
-
4Bring the strand across the front of the rod and back towards the right. Position it right beneath the other three right strands. This is almost like weaving the covering for the rod, but you don't want to tighten the strands just yet.[14]
-
5Repeat the process on the left. Take the top-left strand and pull it behind the rod. Weave it under and over, under and over the strands on the right, starting from the top. Pull it across the front of the rod, and back over to the left.[15]
-
6Tighten the strands. Make sure that the strands are where you want the top of the handle to start, then pull on them to tighten them. Make sure that you are pulling the left strands to the left, and the right strands to the right.[16]
-
7Repeat the process until you reach the bottom of the rod. Alternate between doing the right and left sides. After each right and left set, pull on the strands to tighten them, then continue weaving.
-
8Whip lash and trim the ends of the strands. Use the same lashing technique as you did for the base of the rod. Once you have the ends lashed together, trim off all the excess leather lace strands. Coat the bottom of the rod with leather glue, if desired, for extra strength.[17]


Adding the Tip
-
1Cut a small rectangle out of leather. Use a ruler and a chalk or pen to draw an 8 by 2-inch (20.32 by 5.08-centimeter) rectangle. It would be the easiest to do this with a rotary cutter, but you can use a sharp pair of scissors as well.[18]
- Use white chalk on dark leather and pen on light leather.
- If your leather has a finished side and an unfinished side, make sure that you are drawing on the unfinished side.
-
2Coat the narrow edges of the rectangle with glue. Turn the rectangle so that the unfinished side of the leather is facing you. Coat the top and bottom edges with glue, about 1 inch (2.54 centimeters) for each.[19]
- A leather glue would work the best, but you can try using an industrial-strength glue instead.[20]
-
3Let the glue get tacky, then set the rod on top. Make sure that only the first inch (2.54 centimeters) or so of the rod is touching the leather, and that it is centered.
-
4Fold the top edge of the leather rectangle down. You rectangle will now be 4 inches (10.16 centimeters) tall. Make sure that the top and bottom edges of the rectangle are aligned.[21]
-
5Clamp the edges shut and let them dry. Place a binder clip to each side of the rod sandwiched inside the leather. Leave them there until the glue dries. How long this takes depends on the type of glue you used; it will typically take a few hours.[22]
- Once the glue dries, you can remove the clamps.
-
6Fold and glue the bottom corners down to the middle. Coat the bottom inch (2.54 centimeters) of the leather rectangle with more glue. Fold the left and right edges towards the middle, making sure that the bottom edges are aligned. This will cause the leather rectangle to flare and taper outward towards the top.[23]
-
7Whip lash the leather corners down. Use the same method as you did for the base of the rod and the handle.


Making the Strap and Covering the Lashing
-
1Braid three strips of leather for the strap. How long you make this braid is up you you, but it should be long enough to loop over your palm. Leave a few inches/centimeters at the top and bottom of the braid un-braided so that you can secure it to the handle.[24]
-
2Whip lash the strap to the top of the handle. Fold the braid to make a loop, then position it over the top of the handle. The folded part of the strap should be pointing to the rod's tip, and the loose tail ends should be pointing to the base. Whip lash the strap down using the same technique as you did for the base of the rod, the base of the handle, and the leather tip.[25]
-
3Trim off the excess ends of the leather strap. Try to cut as close to the wrapped threads as you can. If you ant to, you can coat the wrapped threads with some leather glue for extra strength and durability.[26]
-
4Cut three, small rectangles out of leather to cover the whip lashing. The strips need to be long enough to wrap around the whip lashed parts at the tip, top of the handle, and base. They need to be at least 1 inch (2.54 centimeters) wide.[27]
- If your whip lashing is wider, then make the rectangles wider.
-
5Pierce four holes on each narrow end of the leather rectangles. Place the first leather rectangle over a wooden board, then use an awl and a mallet to pierce four, evenly-spaced holes into both of the narrow edges.
- Do this step for all of the leather rectangles.
-
6Wrap the first leather rectangle around the base of the rod. Cut a long piece of waxed thread of sinew, and string a leather needle onto each end. Pull each needle through the second hole on each side of the rectangle, starting from the inside.[28]
-
7Saddle-stitch the leather rectangle shut. Push the left needle down through the first left hole, and out the first right hole. Push the right needle down through the first right hole and out the first left hole. Repeat this step until you reach the top of the leather rectangle.[29]
- Pull on the thread often to tighten the stitching.
- Move onto the second set of holes, then the third, then the fourth.
-
8Back-stitch back down to the third or second hole, then cut the threads. This should be enough to hold your leather rectangle together. If you are worried about it coming undone, you can tie knots into the threads before cutting them.[30]
-
9Repeat the process for the remaining whip lashed areas. This includes the tip of the crop and the top of the handle.


Warnings
- Use caution when working with leather needles and leather awls. They are designed to easily pierce thick leather—your skin is no exception.⧼thumbs_response⧽
- Never use a riding crop to discipline your horse. A light tap is all your horse needs.⧼thumbs_response⧽
Things You'll Need
- Thin, flexible brass or fiberglass rod
- Leather lacing
- Leather scraps
- Leather awl
- Leather needle
- Sinew or waxed thread
- Leather glue
- Sharp scissors


References
- ↑ https://www.youtube.com/watch?v=vT0VXWwHhQU
- ↑ https://www.youtube.com/watch?v=vT0VXWwHhQU
- ↑ https://www.youtube.com/watch?v=vT0VXWwHhQU
- ↑ https://www.youtube.com/watch?v=vT0VXWwHhQU
- ↑ https://www.youtube.com/watch?v=vT0VXWwHhQU
- ↑ https://www.youtube.com/watch?v=0ib2tF-M0sg
- ↑ https://www.youtube.com/watch?v=0ib2tF-M0sg
- ↑ https://www.youtube.com/watch?v=0ib2tF-M0sg
- ↑ https://www.youtube.com/watch?v=0ib2tF-M0sg
- ↑ https://www.youtube.com/watch?v=vT0VXWwHhQU
- ↑ https://www.youtube.com/watch?v=vT0VXWwHhQU
- ↑ https://www.youtube.com/watch?v=vT0VXWwHhQU
- ↑ https://www.youtube.com/watch?v=vT0VXWwHhQU
- ↑ https://www.youtube.com/watch?v=vT0VXWwHhQU
- ↑ https://www.youtube.com/watch?v=vT0VXWwHhQU
- ↑ https://www.youtube.com/watch?v=vT0VXWwHhQU
- ↑ https://www.youtube.com/watch?v=vT0VXWwHhQU
- ↑ https://www.youtube.com/watch?v=aJrJtip9VGM
- ↑ https://www.youtube.com/watch?v=aJrJtip9VGM
- ↑ https://www.youtube.com/watch?v=aJrJtip9VGM
- ↑ https://www.youtube.com/watch?v=aJrJtip9VGM
- ↑ https://www.youtube.com/watch?v=aJrJtip9VGM
- ↑ https://www.youtube.com/watch?v=aJrJtip9VGM
- ↑ https://www.youtube.com/watch?v=vT0VXWwHhQU
- ↑ https://www.youtube.com/watch?v=vT0VXWwHhQU
- ↑ https://www.youtube.com/watch?v=vT0VXWwHhQU
- ↑ https://www.youtube.com/watch?v=vT0VXWwHhQU
- ↑ https://www.youtube.com/watch?v=vT0VXWwHhQU
- ↑ https://www.youtube.com/watch?v=vT0VXWwHhQU
- ↑ https://www.youtube.com/watch?v=vT0VXWwHhQU
- ↑ https://www.youtube.com/watch?v=vT0VXWwHhQU
About This Article

To make a leather riding crop, start by braiding some leather lace around a thin, flexible brass or fiberglass rod. When you're finished, use a long piece of sinew or waxed thread to whiplash the loose ends at the end of the rod. Then, weave some more strips of leather lace around one half of the rod to make the handle. Once you've made the handle, cut out a rectangular piece of leather, and glue it over the end of the rod. Next, whiplash the bottom corners down, and attach a leather strap to the handle. Finally, sew small rectangular pieces of leather over the whiplashing to cover it. To learn how to whiplash leather lace, read on!