wikiHow is a “wiki,” similar to Wikipedia, which means that many of our articles are co-written by multiple authors. To create this article, 33 people, some anonymous, worked to edit and improve it over time.
wikiHow marks an article as reader-approved once it receives enough positive feedback. In this case, 91% of readers who voted found the article helpful, earning it our reader-approved status.
This article has been viewed 225,611 times.
Learn more...
Building a straw bale and plaster house is a low-cost and environmentally friendly way to create a home. This guide covers the materials and methods you might use to build a straw bale house, a house that can last hundreds of years, is energy efficient and is cheap to maintain. For simplicity, this article will not include instruction on the installation of services such as natural gas, electricity or water and sewer: It covers only the details about how to build the shell.
Steps
-
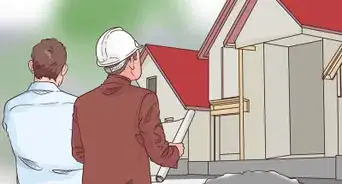
1Make a plan. How big? How many rooms? What services do you want? Where are the windows and doors going to go?[1]
- Draw up the floor plan. On your diagram, you should roughly sketch the room layouts and locate the drain lines precisely (for concrete slab) where the shower, bathtub and toilet drain connections will be (wood floors with a crawl space allows easier changes of such locations).
- Each section of the exterior wall should be a multiple of the standard bale length you plan to use. This will allow you to minimize the number of bales that you cut and will also minimize waste.
-
2Decide what type of base you will use to support the floor of the first story. Typical choices are a concrete pad or a timber base consisting of a double outside band with center beam(s) supported by columns and connected by floor joists on 16" centers. If you opt for the traditional wood frame, check your local building code for the dimensions of each frame element.Advertisement
-
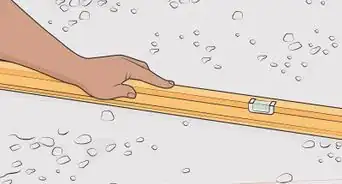
3Prepare the foundation footings to be below the frost line in cold climates, and floor to be level, on an attractive slope or level ground (easier). Check your local building codes for the size and composition of exterior wall foundation. Fresh water plumbing, electrical wiring and natural gas pipes will be added above the slab, under timber floors, in walls or above ceilings.[2]
-
4Build a frame of timber or metal. The frame transfers the load of the roof down on to the foundation and should be strong enough for this purpose. You can cut in 1X4 inch bracing "straps" (set in the thickness of the 1X4) into timber outer stud-walls (posts or pillars) diagonally from the corners near the floor into the top plate -- or 2X4 inch diagonal braces nailed or bolted between vertical elements -- to prevent lateral movement within the frame, and the base of each upright timber should be anchored well to the foundation. Cables may be stretched through the bales of the structure, if desired for stability, to share stresses of possible bulging or shifting of bales.[3]
-
5Stay dry during construction by putting the roof on before going any further. Put the roof on before adding the wall bales because you don't want your bales to get soaked with rain, snow or ice.
-
6Make straw bale walls, not using hay, but using straw. Straw is from harvested grain stalks (never use bales of grass). These need to remain dry, less than 20% moisture content, and tightly bound to prevent moist air (including fog) getting in before plastering. Both factors are important to prevent the rotting of the bales after construction. To build the wall, you start by sharpening some staves (inch thick willow stems) and then securing them vertically in the wood or concrete base (you will need to drill a hole, or perhaps poke them in when the concrete is still wet). Bales should then be further reinforced with "U" shaped willow stems that must be bent while the stems are green (or use another kind of straight staves, and bendable pipe for U shape ones).[4]
- Make U shaped staves: Select a one meter willow stave and mark the stave at 33 centimeter (13 in) from each end, take a big hammer and bash the green stave on these marks until the fibers of the wood are mashed, split and softened. These bashed areas are then bendable; bend the stave into U shape and then get to work. Each layer (or course) of bales are stacked up and pinning them until you have reached your desired height, during this process staves of willow should be driven down through alternate bails to fix it to the bail below. The U staves are use to attach between lined up blocks. This is especially important on the top course. When the desired height has been reached some kind of strap can be placed around the entire wall (top to bottom) to add further stability and strength, but not stressed extremely tightly.
-
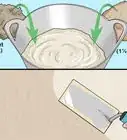
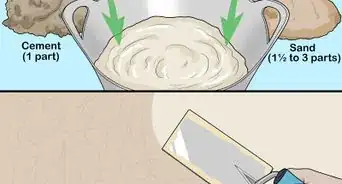
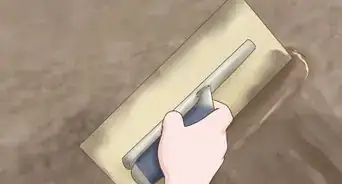
7Plaster the walls. There are many types of soft plaster that can be used, some based on formulations of locally available materials. Choose the best one by balancing availability, cost and effectiveness for your climate. Apply with traditional plastering tools for a smooth finish or with your hands for a rustic finish. Make sure, though to cover every last bit of exposed straw: None should be showing, unplastered. Otherwise fire is more easily started, and dampness or vermin can get in.[5]
-
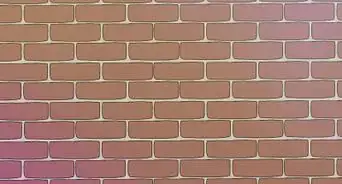
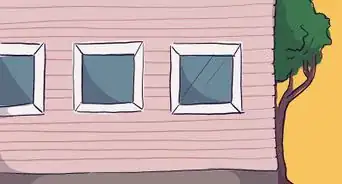
8Put in the windows and doors. You should have left holes for these, bridged with lintels (horizontal headers which support the weight above each opening for a window or door). Install the window and door casings, securing them to framing posts or to plastered walls outfitted with staves.
-
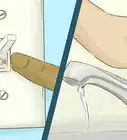
9Apply breathable paints. Look for mineral silicate paint that is free of artificial resins, petroleum solvents and biocides (poisons) but is weather and UV resistant. Applying breathable paints is no different than applying conventional paints, although you need to follow manufacturer guidance as products do vary somewhat. To prepare for painting, make sure that the walls are sound, clean, dry, and free of oils.[6]
- The exterior should be painted with breathable paint so that moisture can escape the walls. Paints are rated in Sd values: Paints with high Sd values have are detrimental to the underlying surface, as they do not allow it to breathe and dry out. Most non breathable paints will not disclose an Sd value as they can be much higher than 3. Paints with an Sd value less than 0.1 offer adequate breathability for most straw bale/plaster applications.


Community Q&A
-
QuestionWill a straw house be warm enough for New Brunswick, Canada?
 Community AnswerA good straw bale home is significantly warmer than conventional building methods, because a well-packed bale is rated at R30 - R35 minimum, or considerably more. Today, insulated homes usually have R-20 in the walls, and many old homes have R-14 for insulation or considerably less. The earliest mobile homes had R-8 or less.
 -
QuestionIs it safe for South African (Cape Town) weather?Community AnswerUse the straw as a insulator. On the outside have either wood or brick, since the rain will cause the straw to rot.
-
QuestionWhat is an average price per square foot to build a straw bale house?
 Community AnswerIt will cost, on average, between $130 and $150 per square foot. It does depend on several variables including: location, labour costs and the size of the bale house you're intending to build.
Warnings
- Make sure you follow health and safety guidelines and regulations to avoid hurting yourself, helpers or children, etc..⧼thumbs_response⧽
- This knowledge is not definitive, it is just here as guidance; always get a second opinion.⧼thumbs_response⧽
- Always make sure to choose a location with the materials (where clay and willow stems are available) and where such building is legal.⧼thumbs_response⧽
- Always consult a structural engineer where building permits are required, before building anything. Hay bale construction is often permitted in rural areas, but not in the usual towns and cities.⧼thumbs_response⧽
- Permits: Get the relevant planning and the required building permits.⧼thumbs_response⧽
Things You'll Need
- Enough straw bales
- Foundations materials, wooden floor (option)
- Lumber timbers, interior wall boards
- Nails, screws, bolts
- Willow staves (or other stakes and bendable pipe)
- Roofing materials
- Lime plaster, (clay "mud" optional where desired and permitted).
- Mineral silicate paint (no artificial resins, no petroleum solvents, no biocides (poisons) but is weather and UV resistant)
- Tools: digging tools for foundation footings, to sharpen the staves; a saw to cut timbers to length, a bow saw for trimming bails; a mallet and hammer, plastering tools

-Step-19-Version-2.webp)


References
- ↑ https://www.homebuilding.co.uk/how-to-build-with-straw-bale/
- ↑ https://www.strawbale.com/straw-bale-articles/straw-bale-building-and-the-foundation/
- ↑ https://www.youtube.com/watch?v=XQIVU0Fnis4
- ↑ https://www.machines4u.com.au/mag/how-to-build-a-straw-bale-house/
- ↑ https://www.homebuilding.co.uk/how-to-build-with-straw-bale/
- ↑ https://www.machines4u.com.au/mag/how-to-build-a-straw-bale-house/
- ↑ "Straw Bale Walls" http://www.greenbuildingadvisor.com/blogs/dept/musings/straw-bale-walls
- ↑ "New to Straw Bale" http://www.strawbale.com/new-to-straw-bale
- ↑ "Build a House from Straw Bale and Mud" http://www.treehugger.com/green-architecture/how-to-build-a-house-from-straw-bale-and-mud.html


-Step-19-Version-2.webp)