This article was co-authored by Bess Ruff, MA. Bess Ruff is a Geography PhD student at Florida State University. She received her MA in Environmental Science and Management from the University of California, Santa Barbara in 2016. She has conducted survey work for marine spatial planning projects in the Caribbean and provided research support as a graduate fellow for the Sustainable Fisheries Group.
This article has been viewed 551,997 times.
A trebuchet is a device used in the Middle Ages to launch very heavy objects at opponents during battle. Trebuchets work by using a counterweight system turning the falling energy of the back end into a high speed launch of a heavy projectile.[1] You can build a smaller versions of a trebuchet on your own to learn about the physics behind them. Power tools are involved in the creation of this device so make sure you have the proper adult supervision if necessary.
Steps
Building the Base
-
1Gather the necessary materials. To build the base, you will need the following tools: hammer, electric drill, 1 inch (2.5 cm) drill bit, 10 nails, 12 wood screws, and a saw. Remember, power tools are dangerous; always use caution and have adult supervision when necessary. The supplies for the actual base include:[2]
- 2 2 in × 4 in (5.1 cm × 10.2 cm) wood pieces, 36 inches (91 cm) long
- 2 2 in × 4 in (5.1 cm × 10.2 cm) wood pieces, 12 inches (30 cm) long
- 2 2 in × 4 in (5.1 cm × 10.2 cm) wood pieces, 23 inches (58 cm) long
- 1⁄4 inch (0.64 cm)plywood that is between 20–24 inches (51–61 cm) square
- 1 piece of flat wood (can be plywood) that is 10–12 inches (25–30 cm) wide and 36 inches (91 cm)long to serve as baseboard
- 1 inch (2.5 cm) diameter dowel rod, 15 inches (38 cm) long
- 2 eye hooks
-
2Cut the square plywood in half diagonally. The plywood needs to be cut into triangles. These triangles will serve as supports to stabilize the trebuchet when it is in use. Using a jigsaw or table saw (whichever is available) cut the square from corner to corner through the center.[3]
- If you don’t have a table saw or jigsaw, many home improvement stores will cut wood for you before you take it home.
Advertisement -
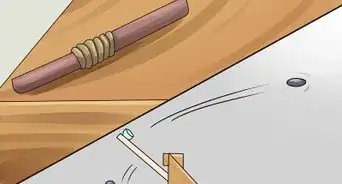
3Construct the first side support. Measure 13 inches (33 cm) from the left end of one of the 36 in (91 cm) long pieces of wood and make a mark. Place the center of the 23 in (58 cm) long piece of wood perpendicular to the 36 in (91 cm) long piece of wood at the mark that you made.[4]
- Lay one of the triangle-shaped pieces on top of these supports so that the base of the triangle is aligned horizontally with the bottom of the 36 in (91 cm) piece of wood.
- Attach 1 screw to each corner and 2-3 screws along each side of the triangle.
-
4Make the second side support with the same process. Use the same process detailed above, but make it in a mirror image. This will ensure that when you build the base, both supports will face the same direction and the wooden triangles will face out.[5]
- When both sides are constructed, line them up and make sure they are identical mirror images of each other.
-
5Attach the 12 in (30 cm) pieces of wood between the supports. Stand the side supports up, making sure the triangle wood pieces face out. Place a 12 in (30 cm) long piece of wood between each side of the ends of the supports. Using the drill, attach the pieces together with 2 screws on each side.[6]
- At this point, the base is almost finished. You should have a rectangular base with 2 vertical supports.
-
6Drill 1 inch (2.5 cm) holes into the top of the support arms. Measure about 2 inches (5.1 cm) from the top of each arm and drill a hole about 1 inch (2.5 cm) in diameter. Make sure the dowel rod fits through the holes. If it doesn’t, make the holes larger.[7]
- You don’t want the hole to be too large because you want the dowel rod to be secure.
-
7Screw the baseboard to the trebuchet. Place the baseboard on top of the bottom of the base. Evenly space nails nails along the edges and hammer them in to secure it in place. You can also screw the baseboard into place if you prefer.[8]
- Screw 2 eye hooks into the front end of the trebuchet baseboard about 8 inches (20 cm) apart.
-Step-1-Version-3.jpg)
-Step-2-Version-3.jpg)
-Step-3-Version-3.jpg)
-Step-4-Version-3.jpg)
-Step-5-Version-3.jpg)
-Step-6-Version-3.jpg)
-Step-7-Version-3.jpg)
Constructing the Arm
-
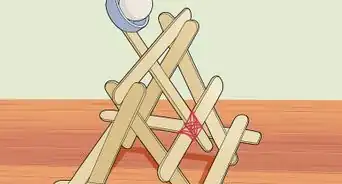
1Gather the necessary materials. A trebuchet works with a counterweight system. In addition to the materials listed, you will need something heavy to serve as a counterweight. You can use some hand weights, a brick, or a small bucket that you can fill as needed to vary the weight. To build the launching arm of the trebuchet, you will need the following supplies:[9]
- Hammer
- 2 in × 4 in (5.1 cm × 10.2 cm) piece of wood, 40 inches (100 cm) long
- 5 feet (1.5 m) of string
- 10 in × 6 in (25 cm × 15 cm) piece of cloth to make a pouch
- 2 eye hooks
- 1 long thin nail with the head removed
-
2Drill a hole 10 inches (25 cm) down from the top of the 2 in × 4 in (5.1 cm × 10.2 cm) piece of wood. This hole needs to be large enough for the dowel rod to fit through and rotate without friction. Measure 10 inches (25 cm) from the top of the 40 in (100 cm) long piece of wood and make a mark. Make the hole at this 10 in (25 cm) mark slightly larger than the diameter of the dowel rod (1 inch (2.5 cm)).[10]
- Test the rotation by putting the rod through the 2 in × 4 in (5.1 cm × 10.2 cm) piece of wood. If the 2 in × 4 in (5.1 cm × 10.2 cm) piece of wood rotates without resistance, the hole is large enough.
- The end closest to the hold is the back end of the swing arm.
-
3Attach eye hooks to the front of swing arm. One eye hook will serve as the attachment point for the string and pouch while the other eye hook will be part of the trigger. Screw the first eye hook into the very end of the swing arm, on the bottom. Screw the second eye hook into the bottom of the swing arm about 1 inch (2.5 cm) from the end.[11]
- Hammer the first eye hook into the end until just the loop of the hook is sticking out.
-
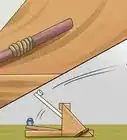
4Put the nail into the middle of the front end of the swing arm. Make sure that the head of the nail has been completely removed. When the trebuchet launches, the string on the nail needs to be able to fly off the nail and it won’t be able to do that if it gets caught on the head. The head can be removed with a Dremel tool.[12]
- Hammer the nail into the flat end of the swing arm, approximately in the middle.
- Bend it slightly forward so that the string will stay on until the trebuchet is launched. The angle of the bend will need to be optimized using trial and error launches.
-
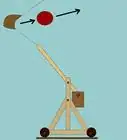
5Attach a counterweight to the back end of the swing arm.[13] The easiest counterweight to attach is a small bucket. You can vary the weight on the back easily by putting more or fewer rocks inside. Drill a small hole into the back end of the swing arm about 1 inch (2.5 cm) from the end. Feed some string through the hole and tie the bucket in place.
- You want the bucket to hang vertically down but still be close to the arm. Tie it so that it hangs about 1–2 inches (2.5–5.1 cm) from the top of the arm.
- Fill the bucket with rocks or heavy pieces of metal.
- Alternatively, you can attach a heavy weight such as a 20 pounds (9.1 kg) hand weight directly to the end of the arm.
-
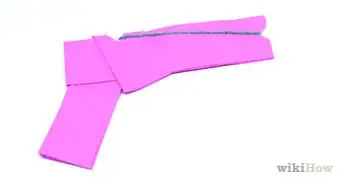
6Attach the sling pouch to the arm. Trim the corners of the 10 in × 6 in (25 cm × 15 cm) piece of cloth so that the shorter edges of the pouch are slightly tapered. This well help contain the object and let it release properly during launch. Make small holes in the middle of the shorter edges.[14]
- Tie a 27 in (69 cm) piece of string to one end of the pouch and make a small loop at the other end of the string. Hook the loop on the nail at the end of the arm. This piece is longer to account for the loop.
- Tie a 24 in (61 cm) piece of string to the other end of the pouch. Tie the other end of the string to the second eye hook (the one still sticking out of the wood). The pouch should hang evenly off the back end of the arm when you are done.
-Step-8-Version-3.jpg)
-Step-9-Version-3.jpg)
-Step-10-Version-2.jpg)
-Step-11-Version-2.jpg)
-Step-12-Version-2.jpg)
-Step-13-Version-2.jpg)
Assembling and Using the Trebuchet
-
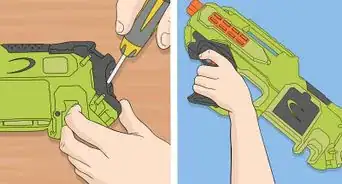
1Gather the necessary materials. To finish the trebuchet and assemble it together, you will need a coat hanger, wire cutters, and some string. These are the final materials necessary to complete the trebuchet.[15]
- The coat hanger must be made of wire so you can manipulate it for the trigger.
- If you don’t have wire cutters, find another tool that will cut through the hanger.
- You can use as much or as little string as you like for the trigger.
-
2Attach the swing arm to the base. Position the swing arm between the two supports of the base and slide the dowel rod in place. This will secure the swing arm in place. Without the trigger in place, the counterweight on the back end will cause the arm to stick up.[16]
- Again, make sure the swing arm can rotate freely around the dowel rod.
-
3Make a coat hanger trigger. Straighten out a coat hanger and cut a length about 15 inches (38 cm) long. Make a small loop on one end of the wire and attach some string to the loop. Bring the swing arm of the trebuchet down so that the counterweight is in the air. Feed the straight end of the hanger through the first hook on the base, then through the front hook on the swing arm, then through the second hook on the base.[17]
- Pulling the string releases the swing arm and launches whatever is in the pouch.
-
4Adjust the lengths of the pouch strings as needed. With everything set up and ready for launch, you can adjust the lengths of the strings attached to the pouch. Loop the end around the nail at the end of the swing arm and straighten the pouch so that it lies directly on top of the baseboard.[18]
- You want both sets of strings to be approximately the same length and for the pouch to sit close to the end of the baseboard.
-
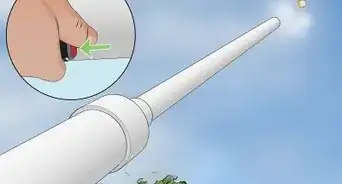
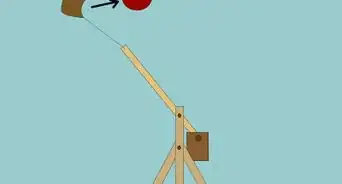
5Pull the trigger to launch the trebuchet. Load the pouch with something round like a tennis ball or baseball. When the cargo is securely in place, stand back and pull the trigger. If the nail is positioned at the correct angle, you should see the ball sail through the air.[19]
- Alter the angle of the nail as needed to get the best launch distance. Trial and error is the best way to accomplish this.
- Adding heavier items to the counterweight will allow you launch heavier things and/or launch things a further distance.
- Don't stand in front of the throwing arm when releasing. It might hit you in the face and cause injury.
- In early tests, the throwing can be unpredictable; stay clear of all moving parts.
-Step-14.jpg)
-Step-15.jpg)
-Step-16.jpg)
-Step-17.jpg)
-Step-18.jpg)
Community Q&A
-
QuestionWhat are the dimensions of the final product?
 Community Answer14" x 36" x 27". Well, that's an approximation without counting the lever arm's extra piece that sticks off. The added 2" to the 12" piece is counting the width of the wood it's attached to, which would come out as 14", while the 4" added to the 23" piece of wood would make its measurements 27".
 -
QuestionHow much weight can it throw?
 Community AnswerIt depends on the weights on the other end. Usually you want the counter weight to be 3 to 4 lb more than the projectile. My suggestion is to test different *P-weight to *C-weight ratios. The dowel rod will break if over loaded so if you test it make sure to have extras.
 -
QuestionWhere can I find the wood pieces?
 Community AnswerMost hardware stores have wood that is 2" by 4" but longer than you need so you buy that and cut it down to the correct length. If you don't have a hardware store near by try and see if you have a free to scavenge wood dump near by.
Things You’ll Need
- Hammer
- Electric drill
- 1 inch (2.5 cm) drill bit
- ~10 nails
- ~12 wood screws
- Saw
- 2 2 in × 4 in (5.1 cm × 10.2 cm) wood pieces, 36 inches (91 cm) long
- 2 2 in × 4 in (5.1 cm × 10.2 cm) wood pieces, 12 inches (30 cm) long
- 2 2 in × 4 in (5.1 cm × 10.2 cm) wood pieces, 23 inches (58 cm) long
- 1⁄4 inch (0.64 cm)plywood that is between 20–24 inches (51–61 cm) square
- 1 piece of flat wood (can be plywood) that is 10–12 inches (25–30 cm) wide and 36 inches (91 cm)long to serve as baseboard
- 1 inch (2.5 cm) diameter dowel rod, 15 inches (38 cm) long
- 2 eye hooks
- Small bucket (or small, heavy object to serve as a counterweight)
- 2 in × 4 in (5.1 cm × 10.2 cm) piece of wood, 40 inches (100 cm) long
- 5 feet (1.5 m) of string
- 10 in × 6 in (25 cm × 15 cm) piece of cloth to make a pouch
- 1 long thin nail with the head removed
- A coat hanger
- Wire clippers
- 1 foot (0.30 m) long piece of string
Warnings
- The best location to launch the trebuchet, especially one of this size, is outdoors. Launching indoors can result in property damage.⧼thumbs_response⧽
- Use caution when working with tools: saws, hammers, drills, etc. Wear protective eyewear to prevent accidental injury to the eyes.⧼thumbs_response⧽
- Make sure no one is standing in front of the trebuchet during launch.⧼thumbs_response⧽

References
- ↑ http://www.real-world-physics-problems.com/trebuchet-physics.html
- ↑ http://www.stormthecastle.com/trebuchet/Fast-easy-tennis-ball-trebuchet-part-1.htm
- ↑ http://www.stormthecastle.com/trebuchet/Fast-easy-tennis-ball-trebuchet-part-1.htm
- ↑ http://www.stormthecastle.com/trebuchet/Fast-easy-tennis-ball-trebuchet-part-1.htm
- ↑ http://www.stormthecastle.com/trebuchet/Fast-easy-tennis-ball-trebuchet-part-1.htm
- ↑ http://www.stormthecastle.com/trebuchet/Fast-easy-tennis-ball-trebuchet-part-1.htm
- ↑ http://www.stormthecastle.com/trebuchet/Fast-easy-tennis-ball-trebuchet-part-1.htm
- ↑ http://www.stormthecastle.com/trebuchet/Fast-easy-tennis-ball-trebuchet-part-1.htm
- ↑ http://www.stormthecastle.com/trebuchet/Fast-easy-tennis-ball-trebuchet-part-2.htm
- ↑ http://www.stormthecastle.com/trebuchet/Fast-easy-tennis-ball-trebuchet-part-2.htm
- ↑ http://www.stormthecastle.com/trebuchet/Fast-easy-tennis-ball-trebuchet-part-2.htm
- ↑ http://www.stormthecastle.com/trebuchet/Fast-easy-tennis-ball-trebuchet-part-2.htm
- ↑ http://www.stormthecastle.com/trebuchet/Fast-easy-tennis-ball-trebuchet-part-2.htm
- ↑ http://www.stormthecastle.com/trebuchet/Fast-easy-tennis-ball-trebuchet-part-2.htm
- ↑ http://www.stormthecastle.com/trebuchet/Fast-easy-tennis-ball-trebuchet-part-2.htm
- ↑ http://www.stormthecastle.com/trebuchet/Fast-easy-tennis-ball-trebuchet-part-2.htm
- ↑ http://www.stormthecastle.com/trebuchet/Fast-easy-tennis-ball-trebuchet-part-2.htm
- ↑ http://www.stormthecastle.com/trebuchet/Fast-easy-tennis-ball-trebuchet-part-2.htm
- ↑ http://www.stormthecastle.com/trebuchet/Fast-easy-tennis-ball-trebuchet-part-2.htm
About This Article