This article was co-authored by wikiHow staff writer, Eric McClure. Eric McClure is an editing fellow at wikiHow where he has been editing, researching, and creating content since 2019. A former educator and poet, his work has appeared in Carcinogenic Poetry, Shot Glass Journal, Prairie Margins, and The Rusty Nail. His digital chapbook, The Internet, was also published in TL;DR Magazine. He was the winner of the Paul Carroll award for outstanding achievement in creative writing in 2014, and he was a featured reader at the Poetry Foundation’s Open Door Reading Series in 2015. Eric holds a BA in English from the University of Illinois at Chicago, and an MEd in secondary education from DePaul University.
There are 8 references cited in this article, which can be found at the bottom of the page.
This article has been viewed 25,427 times.
Learn more...
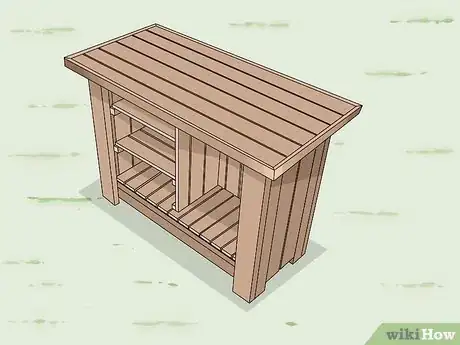
Nothing brings a garden party or barbeque to life like a beautiful outdoor bar. To build a wooden outdoor bar, choose a pressure-treated hardwood that will stand up to spills, bad weather, and extreme temperatures. Order more lumber than you need to ensure that you have replacement wood if you mess up a cut or measure a dimension incorrectly. This is not an amateur DIY project since it relies heavily on a power saw to make a variety of cuts, so you should only attempt to build an outdoor bar if you’ve worked with wood and power tools before. Expect to spend 2-5 days building you bar based on how much effort you put in each day and how quickly you cut your lumber to size.
Steps
Planning and Buying Your Lumber
-
1Determine the size of your bar based on how big you want it to be. You can build an outdoor bar to be a small stand for storing simple drinks, or a large centerpiece that will be the center of attention at large parties. A good average size for an outdoor bar is 48 inches (120 cm) in length, 15 inches (38 cm) in width, and 50 inches (130 cm) in height.[1]
- All of the measurements in this process will be based on the dimensions listed in this step. You can adjust the measurements as needed to make a bigger or smaller bar if you’d like—the overall process is the same regardless of how big your bar is going to be.
- These steps will result in a sturdy bar that can still be moved around your yard. It will be water-resistant, but you will still be able to save the bar from wear and tear by bringing it indoors during periods of intense weather.
-
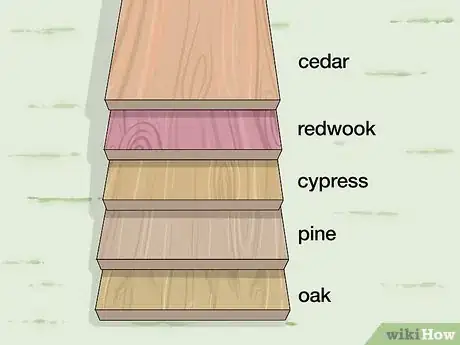
2Choose a strong, pressure-treated wood for your bar. Choose a beautiful hardwood variety for your outdoor bar based on your personal taste. Cedar, redwood, cypress, pine, and oak are all excellent choices. Choose a pressure-treated wood to ensure that your bar holds strong over time. Pressure-treated wood has been tested and reinforced for tough environments, which makes it ideal for an outdoor bar.[2]
- If you plan on serving food on the bar at any point, do not buy chemically-treated wood. Chemically-treated wood will be fine for a drinks-only bar, though.
- You can choose multiple varieties if you want a different look for your tabletop, sides, or frame.
Advertisement -
3Purchase your lumber from a construction store or lumber yard. The amount of wood you need depends entirely on how big you want your bar to be. You do, however, need 2 by 4 in (5.1 by 10.2 cm) boards, 2 by 6 in (5.1 by 15.2 cm) boards, and 1 by 4 in (2.5 by 10.2 cm) slats. However much lumber you think you’ll need, add half of your total amount on top of it. Lumber isn’t too expensive and this process requires a lot of unique pieces, so it’s a good idea to have extra wood laying around in case you misjudge a few cuts.[3]
- For the average-sized bar, you will need roughly 20 feet (6.1 m) of 2 by 4 in (5.1 by 10.2 cm) boards, 40 feet (12 m) of 1 by 4 in (2.5 by 10.2 cm) boards, and 12 feet (3.7 m) of 2 by 6 in (5.1 by 15.2 cm) boards.
- The price of the lumber will vary depending on the species of wood you choose. It may cost $50-200, but it could run up to $1,000 depending on your preferences. This is still relatively cheap for an outdoor bar, though!
-
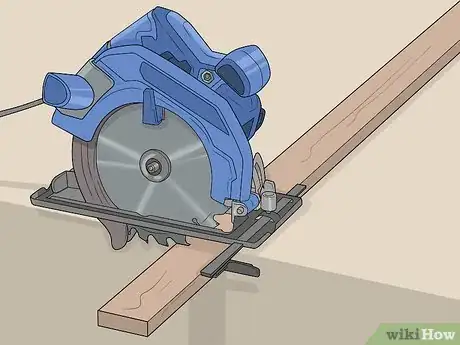
4Use a circular saw to cut your lumber to size as you work. Cut your lumber to size for each step to avoid ruining large amounts of lumber through miscalculations. To use circular saw, measure each cut twice and mark the cut with a carpentry pencil. Then, set your lumber up on 2 sawhorses. Turn the saw on, wait 3-5 seconds for the blade to reach full speed. Slowly drive the blade through your cuts. Remember to always wear protective eyewear, gloves, a dust mask, and long sleeve clothing to avoid shards of flying sawdust.[4]
- You can use a table or miter saw instead of a circular saw if you prefer.
Warning: This is not a good project if you are unfamiliar with power tools. There are a lot of cuts involved here, and you must be proficient with a power saw to complete them accurately.
Constructing Your Frame
-
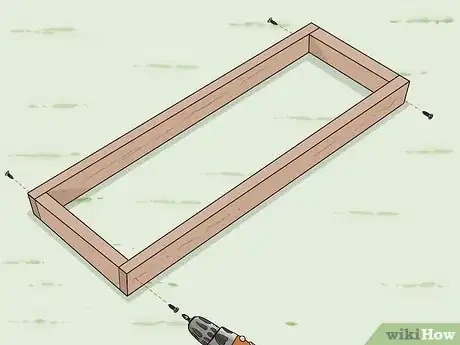
1Drill 4 lengths of lumber together to create a rectangular frame for the base. Lay 4 lengths of 2 by 4 in (5.1 by 10.2 cm) lumber on the floor for your base. Put 2 longer lengths of wood parallel on the ground. At each opening at the end, lay a shorter length on the inside of the longer pieces to create a rectangle. Drill 2 wood screws, at least 2.5 in (6.4 cm) in length, through each longer piece of wood and into the middle of each shorter piece to secure your frame. These are your frame boards.[5]
- For an average-sized table, the long lengths are 48 in (120 cm) long, and the shorter pieces must be 15 in (38 cm) long.
- Use a speed square to ensure that each of the corners is 90 degrees. Hold the speed square against each of the 4 interior corners and check to make sure that each side is flush.
-
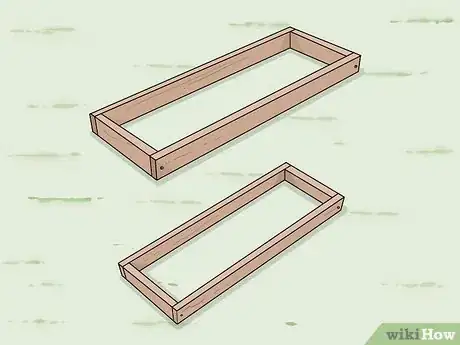
2Create a second rectangular base to make the top of the bar. On top of your first set of frame boards, lay 4 identical lengths of wood. Line the pieces up so that the base you’ve already made matches the shape of the pieces on top. Drill the second set of pieces into place the same way you made your first frame. These are the frame boards for the top of your bar.[6]
- These 2 rectangular frames will serve as the base for the tabletop and the base for the bottom of the bar. They must be identical in shape for the bar to remain stable.
-
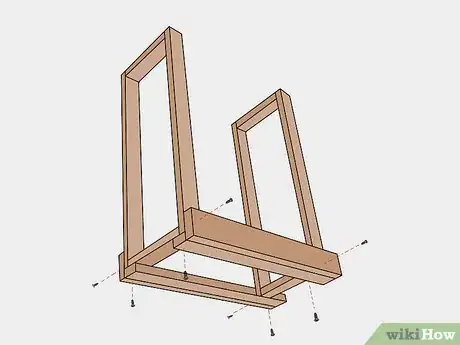
3Stand your frames up lengthwise and line up 2 legs against the ground. Turn each set of frame boards up on its side so that the shorter sides are perpendicular to the ground. Clamp each piece in place or set it between 2 heavy objects to keep the bases from falling down. Lay a 2 by 4 in (5.1 by 10.2 cm) panel on the ground running from the corner of one set of frame boards to the other. Adjust the frame boards and leg panels so that each end of the panel is flush with the exterior edge of each set of frame boards.[7]
- For an average table, these panels are 40 in (100 cm) in length.
- You must work on a perfectly flat surface for this to work.
-
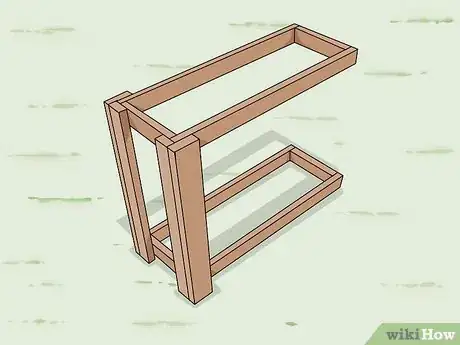
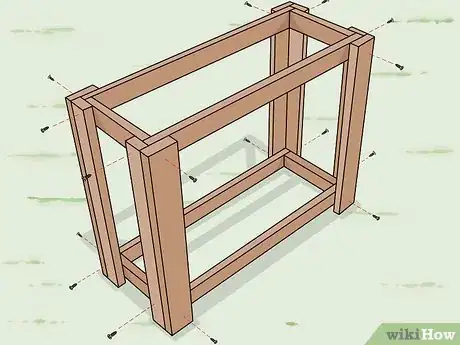
4Drill the leg panels into both frames and repeat the process. Use 2.5 in (6.4 cm) wood screws to secure each end of the leg panel to each base at the top and bottom by drilling through the center where the wood overlaps. Repeat this process on the opposite side with your second leg panel. Then, gently rotate your frame boards so that the 2 leg panels you’ve drilled into place are up in the air, parallel to the ground. Drill a new pair of leg panels into each base where it meets the floor on each side.[8]
- You now have 4 exterior legs attached to your frame boards and it should clearly resemble a table! If your frame looks even and square, the rest of these steps should be easy. Check your angles again with a speed square before moving on.
-
5Stand the table up and drill 4 larger panels into the longer sides to finish your legs. Carefully stand the frame up so that the side you want to be your tabletop is facing up. Grab a 2 by 6 in (5.1 by 15.2 cm) panel and hold it vertically next to a leg panel on the open side of the frame boards; it should now look like your first leg board and this vertical panel are forming a 90-degree angle around the corner of the frame boards. Use 2.5 in (6.4 cm) wood screws to secure the second leg board to the long side of the base at the top and the bottom. Repeat this process 3 more times on each of your remaining legs.[9]
- These panels are 40 in (100 cm) in length for an average table.
- This should look each corner is now surrounded by a 90-degree angle leg, with each leg made of 2 panels.
Adding Your Slats and Sides
-
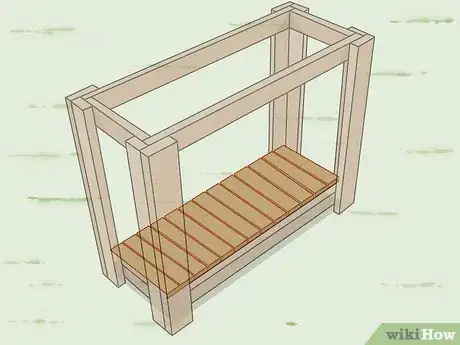
1Install your floor slats using multiple boards to make a bottom for the bar. With your table standing, slide your first 1 by 4 in (2.5 by 10.2 cm) slat into the far left of the base at the bottom. Drop it on top of the bottom base and line it up so that it’s parallel to the short side of the frame it’s resting on. Then, slide a second slat in next to it. Continue adding parallel slats until you completely cover the base of your bar. Use 1.25 in (3.2 cm) wood screws to drill each slat into the base at the top and the bottom where the slats meet the frame. This is the bottom of your bar.[10]
- For an average-sized bar, these slats are 18 inches (46 cm) in length.
Tip: If there’s a little bit of space left over, use spacers to spread your slats out or cut a slat to size so that it fits in the narrower opening.
-
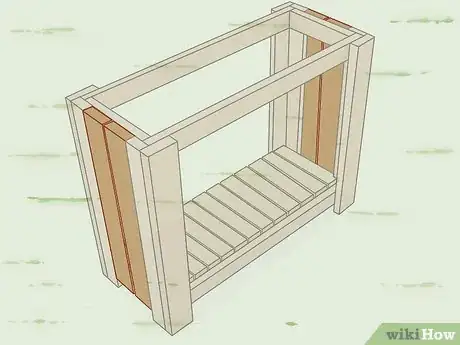
2Attach tall slats to your 2 thinner sides of the bar to make the sides. Grab a longer 1 by 4 in (2.5 by 10.2 cm) slat and stand it up vertically. Hold it against the shorter side of your bar on either side and line up the left edges. Check to ensure that the edges of the slat are flush with the frame of your bar. Drill 1.25 in (3.2 cm) wood screws through the top and bottom of the slat where the wood overlaps in the middle to secure it to the frame. Add parallel slats next to your first side slat and repeat the process until you cover the side entirely. Repeat this process on the opposite side of your bar. These are the sides of your bar.[11]
- For your standard bar, use 40 in (100 cm) lengths of lumber for your vertical slats.
-
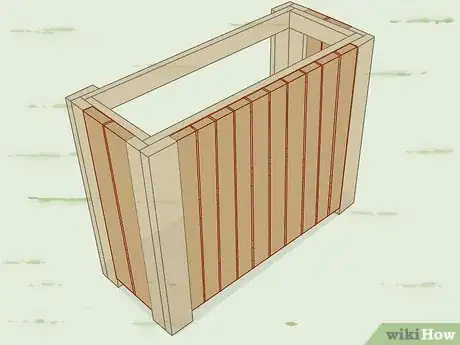
3Drill a longer set of slats into 1 of the longer sides to make the front. Use the same size and style of lumber that you used for the 2 sides of your bar. Choose 1 long side of the bar to be the front. Put your first slat against the far left side of the frame so that the edges are flush. Drill 1.25 inches (3.2 cm) wood screws into the top and bottom the same way you did on the sides. Continue adding parallel slats until you cover the face of the bar. This is the front of your bar.[12]
- You will leave the other side of the bar open so that you can easily access your shelves when you’re serving drinks.
Installing Your Shelves
-
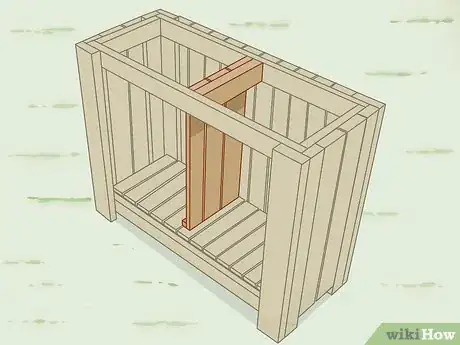
1Install a partition wall in the center of the bar. Grab a 2 by 4 in (5.1 by 10.2 cm) length of wood that is 2–3 inches (5.1–7.6 cm) shorter than the length of the slats at the bottom of the base. Place it against the inside of your bar at the top so that it is parallel with the slat in the middle of the base. Drill a few 2.5 in (6.4 cm) wood screws through this bar to attach it to the top of the frame. Then, attach a sequence of vertical slats to 1 side of the bar using 1.25 inches (3.2 cm) wood screws. Drill 1 screw through each slat at an angle to attach it to the bottom of your bar.[13]
- Built-in shelves are not mandatory. You can always purchase a simple standalone shelving unit that is smaller than the interior of your bar and leave it inside for storage.
- For your standard shelf, the support bar is 16 inches (41 cm) in length and the slats are 35.75 inches (90.8 cm) long.
- This will create a partition to separate the inside of the bar into 2 vertical columns. You can skip this step if you’d like.
- Fill in any gaps at the corners with wood glue if you’d like.
-
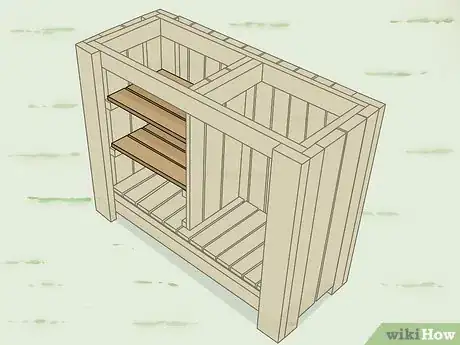
2Drill small panels into the inside of the bar to create platforms for shelves. You can install however many shelves you’d like in any locations inside of the bar. Take thin pieces of wood and drill them into the slats on the partition wall and interior sides of the bar to create platforms for slats or sheets of plywood. Use a spirit level to test each slat before drilling it in to ensure that your shelves will rest evenly.[14]
- For your standard bar, these platform panels must be 18 inches (46 cm) in length. The thicker the wood, the more stable your shelves will be.
Tip: A good number of shelves for a home bar is 4. Make 1 shelf your supplies shelf for a cocktail mixer, napkins, mortar and pestle, and ice bin. Reserve a second shelf for alcoholic mixers, like vermouth or Cointreau. Make the third shelf your non-alcoholic mixer shelf for water, soda, and simple syrup. Leave the last shelf for liquor storage.
-
3Lay your slats or plywood on top of each platform to make shelves. Measure the distance from the interior edge of the bar to the partition wall to determine how long your slats need to be to make shelves. Cut your shelf slats to size or cut a rectangle out of plywood to create a simple board for each shelf. Lay your shelf slats or plywood on top of the panels you drilled into the sides and let gravity hold them in place.[15]
- You can drill the slats or plywood in place if you’d like, but it’s nice to be able to remove the shelves in the event that you want to take them out.
Adding Your Top and Finishing
-
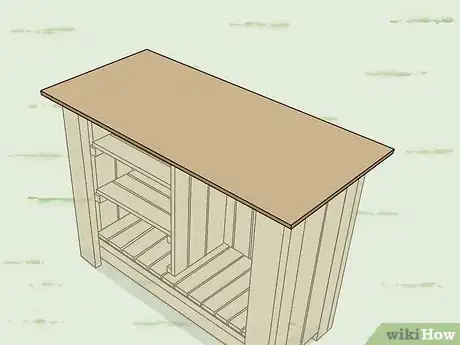
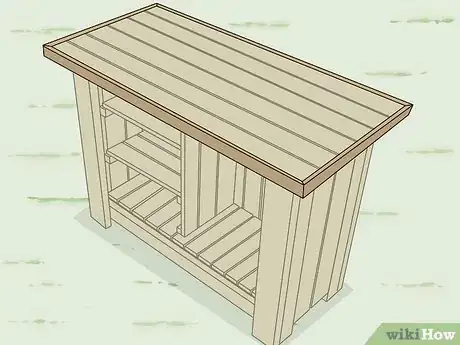
1Use a single sheet of nice wood for a flat tabletop. You can use a single sheet of beautiful wood as your tabletop. Measure the dimensions of the top of the table frame and cut a sheet of wood that matches it. Lay the sheet of wood on top of your bar and use 2.5 in (6.4 cm) wood screws to secure it to the frame at each corner. Add additional screws every 4–8 inches (10–20 cm) for even more stability.[16]
- This is a great choice if you want an incredibly stable surface that is easy to install.
-
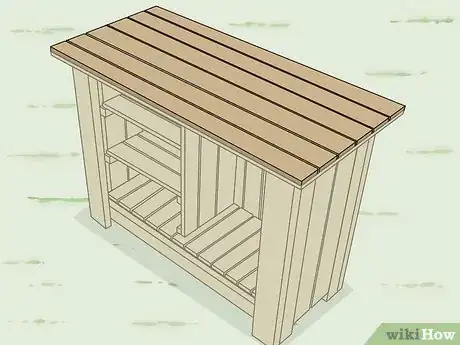
2Install long boards on top of the bar for a more uniform tabletop. To make the top of the bar match the sides and the front, use a sequence of parallel slats to line the top of your bar. You can use horizontal or vertical slats. Make sure that your first slat is flush with the sides and drill it into place using 2.5 in (6.4 cm) wood screws. Add additional screws over the center to attach the tabletop to the partition wall.[17]
- This is a great choice if you want your bar to look professionally made and have a unique surface.
- If you want an overhanging tabletop, add 1–3 inches (2.5–7.6 cm) to each side of your measurement before you cut the wood out.
- If you have an older table that you aren’t using anymore, this is a great way to reclaim the wood and reuse it somewhere else!
-
3Add a border if you want to hide the nails at the top and bottom. If you want to hide the screws on the front and sides of your bar. Install a large single length of wood directly on top of the screw lines at the top and bottom. This will make it look like there’s a border running around your bar’s edges. You can screw these border pieces into place from behind or use wood glue to secure them to the frame.[18]
- For a standard outdoor bar, the long panels must be 54 inches (140 cm) while the side rails are 24 inches (61 cm).
Tip: This is completely optional; some people appreciate the DIY look of visible screws.
-
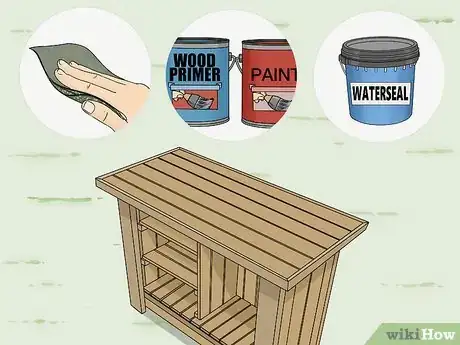
4Finish your bar by waterproofing it and painting if you’d like. If you want to paint the bar, sand every external surface with 120- to 220-grit sandpaper. Then, use a paint designed for porches to paint your bar. Add multiple coats as needed to achieve the color and look that you want. Waterproof your bar using a waterproofing sealant. Load a paint tray with your waterproofing agent and use a natural brush to cover every portion of the wood.[19]
- Prime the wood before painting it for a more opaque finish.
- Use an exterior wood paint designed for homes or porches to paint your outdoor bar.
Warnings
- Always keep your free hand at least 8–12 inches (20–30 cm) away from the blade of the saw when you’re using it.⧼thumbs_response⧽
- Never operate a power saw without protective eyewear, gloves, and a dust mask.⧼thumbs_response⧽
Things You’ll Need
- Lumber (2 by 4 in (5.1 by 10.2 cm) boards, 2 by 6 in (5.1 by 15.2 cm) boards, and 1 by 4 in (2.5 by 10.2 cm) slats)
- Circular saw
- Carpentry pencil
- Sawhorses
- Protective eyewear
- Dust mask
- Gloves
- Wood screws
- Wood glue
- Sealant
- Natural brush
- Paint tray
- Paint
References
- ↑ https://www.bobvila.com/articles/building-an-outdoor-bar/
- ↑ https://www.woodmagazine.com/materials-guide/lumber/outdoor-lumber
- ↑ https://www.finewoodworking.com/2007/02/06/tips-for-buying-lumber-at-the-lumberyard
- ↑ https://www.popularmechanics.com/home/tools/a9183/circular-saw-tips/
- ↑ http://myoutdoorplans.com/furniture/outdoor-bar-plans/
- ↑ http://myoutdoorplans.com/furniture/outdoor-bar-plans/
- ↑ http://myoutdoorplans.com/furniture/outdoor-bar-plans/
- ↑ http://myoutdoorplans.com/furniture/outdoor-bar-plans/
- ↑ http://myoutdoorplans.com/furniture/outdoor-bar-plans/
- ↑ http://myoutdoorplans.com/furniture/outdoor-bar-plans/
- ↑ http://myoutdoorplans.com/furniture/outdoor-bar-plans/
- ↑ http://myoutdoorplans.com/furniture/outdoor-bar-plans/
- ↑ http://myoutdoorplans.com/furniture/outdoor-bar-plans/
- ↑ http://myoutdoorplans.com/furniture/outdoor-bar-plans/
- ↑ https://www.thrillist.com/lifestyle/nation/10-easy-shelves-you-can-install-in-30-minutes-easy-wood-shelf-ideas-and-solutions
- ↑ https://www.bobvila.com/slideshow/12-unique-designs-for-diy-kitchen-islands-46738#pallet-island
- ↑ http://myoutdoorplans.com/furniture/outdoor-bar-plans/
- ↑ http://myoutdoorplans.com/furniture/outdoor-bar-plans/
- ↑ https://www.bobvila.com/articles/how-to-waterproof-wood/
