This article was written by Katie Double. Katie Double is a Technology Writer and Editor for wikiHow. She has over five years of experience in technical support, IT process analysis, and quantitative research. Katie loves exploring the application of various technological tools, from data analysis and visualization to music production and performance. Though originally from Denver, Colorado, she currently resides in New Zealand. She has a BA in Psychology from the University of Colorado Boulder.
This article has been viewed 61,500 times.
This wikiHow teaches you how to change the email address associated with your iCloud account. You can do this by changing your Apple ID, or updating a secondary email address. If you have an Apple email address (ending in @icloud.com, @me.com, or @mac.com), you can only change it to another Apple email.
Steps
Changing Your Apple ID on an iPhone or iPad
-
1
-
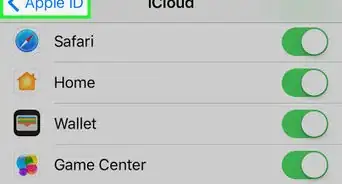
2Tap your name. It's the section at the top of the screen.Advertisement
-
3Tap Name, Phone Numbers, Email. It's the first option under your name.
-
4Tap Edit. It's to the right of "Reachable At".
-
5
-
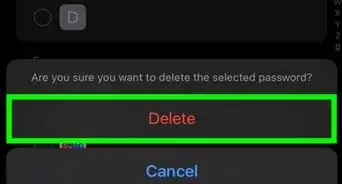
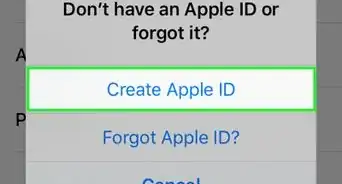
6Tap Delete. This will delete your current Apple ID.
-
7Tap Continue. You will be prompted to enter your passcode if you have one.
-
8Enter the new email address and tap Next. This address will be used for your Apple ID.
- If your Apple ID is an Apple email address (ending in @icloud.com, @me.com, or @mac.com), it can only be replaced by another Apple email address. Check if another Apple email address is listed under Reachable At.
- If one is not listed, add one. Click Add More…, and enter another Apple email address ending in @icloud.com, @me.com, or @mac.com.
-
9Check the inbox belonging to your new email. Look for a verification email from Apple. Follow the instructions to verify your email.
- If you are changing the email to one that you already listed as a secondary contact email (seen under "Reachable At"), you will not need to verify it, as you already verified the email when adding it.
-
10Tap Next. Your new Apple ID will show under your name.


Changing Your Apple ID on a Computer
-
1Sign out of your Apple ID on all devices. Do the following on all your iOS devices:
- Tap the Settings app on your home screen.
- Tap Apple ID.
- Tap Sign Out at the bottom.
-
2Go to https://icloud.com in your web browser. You can use any browser, such as Safari or Chrome, to access this site.
-
3Enter your Apple ID and password to log in. Once you click the arrow or hit ↵ Enter, you'll be signed in to the website.
- Your Apple ID is the email address that you used to set up your Apple account.
-
4Click Account Settings. It's a blue link beneath the greeting at the top.
-
5Click Manage. It's a blue link at the top under Apple ID.
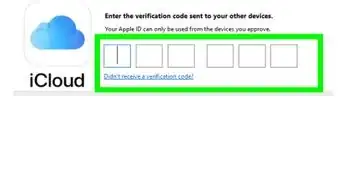
- You may be asked to sign in again, and a verification code may be sent to your phone if you have Two-Factor Authentication set up.
-
6Click Edit on the right of the Account section at the top. This will bring you to a page to edit your details.
-
7Click Change Apple ID…. It's a blue link at the top, below your Apple ID.
-
8Enter the new email address to use as your Apple ID. Click into the text bar and type the new email.
- If your Apple ID is an Apple email address (ending in @icloud.com, @me.com, or @mac.com), it can only be replaced by another Apple email address. Check if another Apple email address is listed under Reachable At.
- If one is not listed, add one. Click Add More…, and enter another Apple email address ending in @icloud.com, @me.com, or @mac.com.
- If there is one, hover over the question mark (?) icon. It should say "This is an alias of your Apple ID". If it does, you can use this email address.
-
9Click Continue. Your new email will be added, but you may need to verify it before the changes are finalized.
-
10Check the inbox belonging to your new email. Look for a verification email from Apple. Follow the instructions to verify your email.
- If you are changing the email to one that you already listed as a secondary contact email (seen under "Reachable At"), you will not need to verify it, as you already verified the email when adding it.
-
11Click Done in the top right. You should see your new ID at the top of the page under your name.


Changing Your Secondary Email Address
-
1Go to https://icloud.com in your web browser. You can use any web browser, such as Safari or Chrome, to log in to iCloud on the web.
- This method adds a new email to your account to help contacts find you on Apple service, including Facetime and iMessage. Your Apple ID will remain as your primary email address.
-
2Enter your Apple ID and password. Once you click the arrow or hit ↵ Enter, you'll be logged in to your account.
- Your Apple ID is the email address that you used to set up your Apple account.
-
3Click Account Settings. It's a blue link beneath the greeting at the top.
-
4Click Manage. It's a blue link at the top under Apple ID.
- You may be asked to sign in again, and a verification code may be sent to your phone if you have Two-Factor Authentication set up.
-
5Click Add More… to add a secondary email address. It's a blue link in the "Reachable At" section near the middle of the page.
-
6Enter the new email address to use as your Apple ID. Click into the text bar and type the new email.
-
7Click Continue. You will need to verify the email before it is added to your account.
-
8Check the inbox belonging to your new email. Look for a verification email from Apple. Follow the instructions to verify your email.
-
9Click Done in the top right. Your new email address will be added under Reachable At.
- Click the gray X to the right of a secondary email address if you wish to remove it.


About This Article
1. Open the Settings app on your iPhone or iPad.
2. Tap your name, then Name, Phone Numbers, Email.
3. Tap Edit next to "Reachable At". Delete your current Apple ID and replace with a new email address.
4. Tap Continue. Enter the new email address to use for your Apple ID.
5. Verify the new email address.