This article was co-authored by wikiHow Staff. Our trained team of editors and researchers validate articles for accuracy and comprehensiveness. wikiHow's Content Management Team carefully monitors the work from our editorial staff to ensure that each article is backed by trusted research and meets our high quality standards.
This article has been viewed 23,358 times.
Learn more...
Arlo is a company that manufactures and sells home security cameras. The batteries on their devices are simple to recharge. The easiest way is connecting the camera to a wall outlet with an Arlo USB adapter. If you want to charge multiple batteries at once, use an Arlo power station. If you go through all the necessary steps but your battery won’t charge, there are a few troubleshooting options you can try to successfully charge your camera.
Steps
Charging the Battery In-Camera
-
1Move the camera inside if you’re using it outside. Even if you have a power outlet outside, don’t charge the battery outdoors. Bring it inside before plugging it in to charge.[1]
- Choose a safe spot to charge the camera where it won’t be disturbed or stepped on. A countertop or table works best. Don’t charge the camera on the floor unless it’s an out of the way spot.
-
2Plug the USB charging cable into the camera and wall power adapter. The charging cable has 2 sides. The smaller side plugs into the back of the camera. Flip the camera around and find the slot for the plug. Then plug the larger side of the cable into the wall adapter.[2]
- Only use Arlo products to charge the battery. Other power units and cables won’t work and could damage the camera or battery.
Advertisement -
3Plug the wall power adapter into a wall socket. When the battery is connected properly, the LED light on the camera blinks blue. Look for this blinking. Then leave the camera to charge.[3]
- If the blinking annoys you, turn the camera around or cover it with a towel while it charges.
- If the light doesn’t blink, check your connection. Make sure all the plugs are fully inserted.
-
4Unplug the camera when the LED light turns solid blue. When the battery is fully charged, the blue light stops blinking and turns solid. Monitor the camera and unplug it when you see the solid blue light. Then reinstall the camera where it was originally.[4]
- Arlo camera batteries take 2-4 hours to charge, depending on how low the battery was. Don’t unplug it before the light turns solid or you’ll have an incomplete charge.


Using the Arlo Power Station
-
1Plug in the Arlo charging station. The charging station comes with a USB cable and a wall adapter. Plug the small side of the cable into the charging station and the large side into the adapter. Then plug the wall adapter into an outlet.[5]
- An Arlo power station comes separately from the cameras and base stations. You can get one from an electronics store or online. Remember that batteries aren't included with the power station. You only get the charging port, cable, and wall power adapter.
- Make sure the power station is in a safe place where it won’t get knocked over or stepped on.
- Only use Arlo products to charge the power station. Other USB cables won’t work properly.
-
2Open the battery compartment on the camera. Look for a small latch on the top of the camera. Press the latch down with your finger to unlock the battery compartment. While holding the latch, use your other hand to lift up the top part of the camera and reveal the battery.[6]
- Hold onto the camera firmly while opening the compartment. It could slip out of your hands and break.
-
3Press down the latch holding the battery in place and slide it out. The battery is held in place with a small latch. Press it down to free the battery. Then slide the battery out of the compartment.[7]
-
4Slide the battery into the charging bay until it clicks. The power station has 2 charging bays, 1 on each side. Take the battery and line it up with the grooves on the charger. Insert its back side (the black part) into the bay. Press until you hear a click, meaning the battery is locked in place. [8]
- Make sure the Arlo symbol is facing up on the battery. That’s how you know the battery is facing the right direction.
- Insert another battery into the other side if you want to charge 2 at the same time.
-
5Leave the battery in until the LED light turns solid green. While the battery is charging, the LED light will be solid yellow. When it turns solid green, the battery is charged and you can remove it.[9]
- The power station has a light for each battery. Look at the light closest to the battery to make sure you’re checking the right one.
- The battery will take 2-4 hours to charge, depending on how low the charge was.
- If the LED blinks yellow, it means the battery is inserted but isn’t charging. Try removing the battery and reinserting it, making sure the grooves are all lined up properly.
-
6Remove the battery by pressing it until it clicks. The click means the battery is free. Then slide it out carefully and insert it back into the camera.[10]
- Don’t lift the power station when you remove the battery. It could fall out and break.


Troubleshooting Your Battery
-
1Check that your attachments are tight. All the plugs you insert should be snug. If your battery won’t charge, check each attachment. Make sure the wall adapter is in the outlet, and the USB cable is connected to the adapter and charging unit.[11]
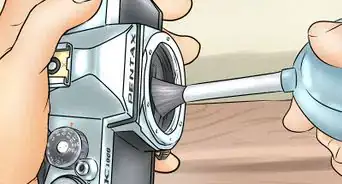
- Try removing the cables and wiping off all the connection points with a dry rag. Sometimes dust prevents a good connection. Then plug everything back in.
-
2Make sure you’re using Arlo equipment. The batteries and power station won’t work without Arlo cables and adapters. Your best bet is using the equipment that came with your camera or power station. These were manufactured and packaged by Arlo. If you bought pieces separately, look for the Arlo logo on them.[12]
- If you buy replacement cables and adapters from another seller, check for the Arlo logo on them. Also look for a lightning bolt logo, which is the QC 2.0 icon, and an output listed at 9V===1.1A. These are all indications of Arlo-approved adapters.
- If you’re using the same cables and adapters that came with your product, then the equipment may be defective. Contact Arlo for further help or a replacement. Their 24-hour technical help number is (408) 638-3750, or you can visit the Contact section on their website at https://www.arlo.com/en-us/online-store/contact-us.aspx##targetText=For%20technical%20support%20or%20warranty,day%2C%207%20days%20a%20week.
-
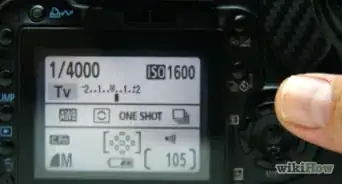
3Log into your Arlo account and see if the charging icon is there. If you’re trying to charge the battery and the LED isn’t lighting up, the light may be defective. Confirm if the camera is charging by logging into your Arlo account. If you see the charge icon on the homepage, the camera is charging. If not, then something is wrong with the connection.[13]
- This option only works if you’re charging your battery while it’s still in the camera. It won’t work if you’re using the power station.
-
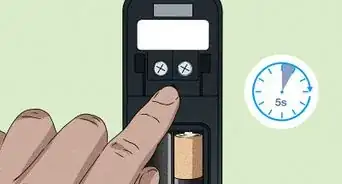
4Reset your camera to its factory settings. Sometimes a software issue prevents the camera from charging. Take your Arlo base station and find the Reset button on the back. Press that button in with a pen or paperclip and hold it for 10 seconds. The LED will then flash yellow, and the system reboots. This resets the system to its default settings. When the LED turns solid green, set up your camera again.[14]
- After the base station reboots, select New System Setup from your online Arlo account. Follow the steps to reconnect the camera to your WiFi.
- If your battery still won’t charge, contact Arlo for further support.


References
- ↑ https://kb.arlo.com/000062048/How-do-I-charge-the-battery-that-came-with-my-Arlo-Security-Light-system
- ↑ https://kb.arlo.com/000062048/How-do-I-charge-the-battery-that-came-with-my-Arlo-Security-Light-system
- ↑ https://kb.arlo.com/000062048/How-do-I-charge-the-battery-that-came-with-my-Arlo-Security-Light-system
- ↑ https://www.arlo.com/en-us/images/Documents/ArloPro/arlo_pro_rechargeable_battery_installguide.pdf
- ↑ https://www.arlo.com/en-us/images/Documents/ArloPro/arlo_pro_rechargeable_battery_installguide.pdf
- ↑ https://www.arlo.com/en-us/images/Documents/ArloPro/arlo_pro_rechargeable_battery_installguide.pdf
- ↑ https://www.arlo.com/en-us/images/Documents/ArloPro/arlo_pro_rechargeable_battery_installguide.pdf
- ↑ https://www.arlo.com/en-us/images/Documents/ArloPro/arlo_pro_rechargeable_battery_installguide.pdf
- ↑ https://www.arlo.com/en-us/images/Documents/ArloPro/arlo_pro_rechargeable_battery_installguide.pdf
- ↑ https://www.arlo.com/en-us/images/Documents/ArloPro/arlo_pro_rechargeable_battery_installguide.pdf
- ↑ https://kb.arlo.com/000059145/My-Arlo-Pro-or-Arlo-Pro-2-camera-battery-isn-t-charging-what-do-I-do
- ↑ https://kb.arlo.com/000059145/My-Arlo-Pro-or-Arlo-Pro-2-camera-battery-isn-t-charging-what-do-I-do
- ↑ https://kb.arlo.com/000059145/My-Arlo-Pro-or-Arlo-Pro-2-camera-battery-isn-t-charging-what-do-I-do
- ↑ https://kb.arlo.com/1057976/How-can-I-reset-my-Arlo-SmartHub-or-base-station-to-the-default-values
About This Article