This article was co-authored by Vikas Agrawal. Vikas Agrawal is a Visual Content Marketing Expert & Entrepreneur, as well as the Founder of Full Service Creative Agency Infobrandz. With over 10 years of experience, he specializes in designing visually engaging content, such as infographics, videos, and e-books. He’s an expert in Making content marketing strategies and has contributed to and been featured in many publications including Forbes, Entrepreneur.com, and INC.com.
This article has been viewed 194,971 times.
Flyers can be useful to disseminate information, call attention to special offers or sales, alert people to fundraisers or other events, or just to make special announcements. Microsoft Publisher lets you create flyers for any of these purposes, using either its built-in templates or from scratch, and you can customize your flyer with special tear-offs to generate a response from prospective customers. Following are instructions for how to create a flyer using Microsoft Publisher 2003, 2007, and 2010.
Steps
-
1Choose a flyer design. Microsoft Publisher organizes its flyer designs and templates according to the purpose you plan to use your flyer for.
- In Publisher 2003, select "New" from a design in the New Publication task pane, then select "Flyers" from Publications for Print and click the arrow to the left of "Flyers" to see a list of available flyer types. Select the design you want from the Preview Gallery at the right.
- In Publisher 2007, select "Flyers" from Popular Publication Types, then select 1 of the designs from Newer Designs, Classic Designs, or Blank Sizes. You can click on any design to see a larger version of it in the upper right of the Flyer Options task pane at the right of the screen.
- In Publisher 2010, select "Flyers" from Available Templates, then select a design from the display of flyer templates. You can click on any design to see a larger version of it in the upper right of the Flyer Options task pane at the right of the screen.
- If you don't see the design you want and you have an Internet connection, you can download additional templates from Microsoft.
-
2Decide whether your flyer is a handout or a self-mailer. Most flyers are handed out directly to customers (handbills) or placed at locations where people can take them with them as reminders of the event they promote. However, sale, fundraiser, and special offer events are often sent as direct mail to targeted customers to elicit a greater response than would be achieved by handing out or placing flyers. Adding an address to a flyer in Publisher creates a second (back) page, the top third of which includes spaces for a mailing and return address. (You supply the mailing addresses from a mail merge from a Microsoft Excel spreadsheet or a Microsoft Access database.) To make the flyer a self-mailer, do the following:
- In Publisher 2003, select "Include" under Customer Address to include a mailing address or select "None" to exclude it.
- In Publisher 2007 and 2010, check the "Include customer address" box to include a mailing address and uncheck the box to leave it off.
- The option to include a mailing section on the back of the flyer is not available if you choose to make your flyer from a blank template.
Advertisement -
3Decide if your flyer should include a graphic. Some of the available templates include a sunset graphic as a placeholder image and offer you the option of including or excluding the graphic in your flyer. Including a graphic can add visual appeal to your flyer, particularly if the graphic is relevant to the specific event, announcement, or offer it is promoting. If you keep the placeholder graphic in when creating your flyer, you can later change it for your own graphic image.
- To include the graphic placeholder in Publisher 2003, select "Include" under Graphic to include it or select "None" to exclude it.
- To include your own graphic in Publisher 2007 or 2010, check the "Include graphic" box to include the graphic and uncheck the box to exclude it.
- This option is not available if you choose to make your flyer from a blank template. You can, however, insert a picture or other graphic object with the Insert Picture feature in your version of Publisher.
-
4Include any necessary tear-offs. If you're using your flyer to get information from the people who see it, or to promote a sale or special offer, you'll likely want to add tear-offs to get that information from them or to put a coupon in their hands to encourage them to come. The Tear-offs dropdown offers several options:
- None. Choose this option if your flyer is designed solely to present information to the reader without offering him or her any incentives or soliciting information from the reader in return.
- Contact information. Choose this option if your flyer is designed to solicit customers and have people tear off your contact information while the flyer remains posted to attract other customers. (Some templates are already designed to feature this kind of tear-off and so do not support the Tear-offs dropdown options.)
- Coupon. Choose this option if your flyer is promoting a sale or special offer and you wish to offer a discount to people who respond to your advertisement.
- Order form. Choose this option if your flyer is promoting a special offer on a product or service and you are soliciting orders from customers with it.
- Response form. Choose this option if your flyer is promoting a product, service, or event and you are trying to find out if someone is interested in it to follow up with more information. (Some templates are already designed to solicit this information and so do not support the Tear-offs dropdown options.)
- Sign-up form. Choose this option if, as for the response form, your flyer is promoting an event and you are trying to find out if someone is interested in it and, more importantly, willing to take part in or assist with it. Sign-up forms are more likely to be used with posted flyers, while response forms are more suited to self-mailers. (Some templates are already designed to solicit this information and so do not support the Tear-offs dropdown options.)
- Tear-off options are also unavailable if you are creating your flyer from scratch.
-
5Choose the color and font scheme for your flyer. Each flyer template comes with a default color and font scheme, but if you wish to use a different color or font scheme, you can do so by selecting the appropriate new scheme. Choose a new color scheme from one of the named color schemes in the Color Scheme dropdown and a new font from the Font Scheme dropdown.
- You can also create your own custom color or font scheme by selecting the "Create new" option from either the Color Scheme or the Font Scheme dropdown.
- If you are producing other marketing materials in Publisher, such as brochures, gift certificates, or special stationery, you should choose the same color and font scheme for all these materials to present a consistent brand identity for your business.
-
6Insert your company information. If you're using Publisher 2003, the program prompts you for this information the first time you use it. Afterwards, you select this information from Personal Information in the Edit menu to insert it in your flyer. In Publisher 2007 and 2010, you can select your company information set from the Business Information dropdown or select "Create new" to create a new information set. This information will be inserted into your flyer.
-
7Create the flyer. In Publisher 2007 and 2010, click the "Create" button at the bottom of the task pane to create your flyer. (Publisher 2003 automatically assumes at this point that you are creating a flyer and does not feature a Create button on its task pane.)
- At this point, you may want to either print out the brochure or create a PDF of it to email to others to get their input on the design.
-
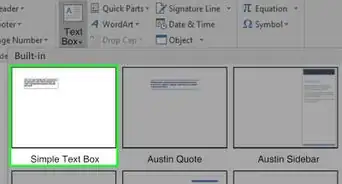
8Replace any placeholder text with your own text. Click on the text you want to replace and type your new text in the text field.
- Text will automatically resize to fit the box in most cases. If you need to set the text to a certain size, either select "AutoFit Text" from the Format menu and then select "Do Not Autofit" (Publisher 2003 and 2007) or select "Text Fit" in the Text group of the Text Box Tools Format ribbon and then select "Do Not Autofit" (Publisher 2010). You can then manually select a new text size.
- Repeat this step for any other text you wish to replace, on both sides of the brochure.
-
9Replace any placeholder pictures with your own pictures. Right-click the picture you want to replace, then select "Change Picture" from the popup menu and choose where the new picture will come from. Repeat this step for any other pictures you wish to replace if your flyer has more than 1 placeholder picture.
-
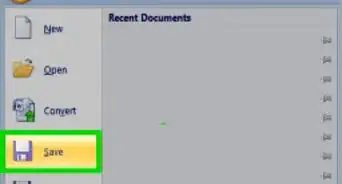
10Save the flyer. Choose "Save" or "Save As" from the File menu (Publisher 2003 or 2007) or from the menu at the left edge of the File tab page (Publisher 2010). Give your flyer a descriptive name.
-
11Print copies of your flyer as needed. Before printing your flyer the first time, make sure everything is exactly how you want it to be.
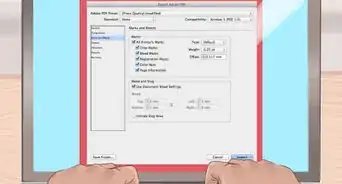
- If you plan to have your flyer printed professionally, you'll want to save or convert it to PDF format, as most printers prefer to receive documents in that format.


Community Q&A
-
QuestionWhat if I create the flyer and want to change the text in the tear-off. How do I update?
 Community AnswerYou have to update it in Publisher by formatting the text to what you want. Then print it out.
 -
QuestionHow long will it take to create one?Community AnswerNot very long at all! Since you can use templates, the most difficult and time-consuming part of the process (designing) is already done for you. You just have to fill in your information and make any tweaks that you'd like.
-
QuestionHow do I save my work on this flyer?
 Gamer_GalaxiesCommunity AnswerGo to "file," then "save as," and choose where and what you want it to be saved as.
Warnings
- Use only single spacing after periods. Two spaces after a period can produce large gaps between sentences when the text is reformatted to a small point size.⧼thumbs_response⧽
- If you're making your flyer as a self-mailer, don't use printed lines on the address side to mark where to fold the paper, as it can be difficult to fold exactly on a line.⧼thumbs_response⧽
- Don't use block capitals for more than titles, as they can be hard to read in a paragraph. Also avoid all-uppercase displays of script and other decorative fonts.⧼thumbs_response⧽


References
- http://office.microsoft.com/en-us/publisher-help/entice-customers-and-increase-sales-with-publisher-flyers-HA010214389.aspx
- Rodney Ruff, Omaha, NE; Microsoft Publisher user
About This Article