This article was co-authored by wikiHow staff writer, Travis Boylls. Travis Boylls is a Technology Writer and Editor for wikiHow. Travis has experience writing technology-related articles, providing software customer service, and in graphic design. He specializes in Windows, macOS, Android, iOS, and Linux platforms. He studied graphic design at Pikes Peak Community College.
The wikiHow Tech Team also followed the article's instructions and verified that they work.
This article has been viewed 733,319 times.
Learn more...
This wikiHow teaches you how to create your own font using an online service called "Calligraphr". The service is free to use, and will allow you to create a font of up to 75 characters. With a free account, you can only create one font at a time.
Things You Should Know
- Download a font template from Calligraphr. You'll need to make an account and choose a language before downloading.
- In Windows, unzip the template. Click Home > Open and choose an image editing program. Draw your letters and numbers in the designated boxes.
- In Mac, highlight the template file and go to File > Open With. Choose an image editing software, and draw your characters in the designated boxes.

Steps
Downloading the Template
-
1Go to https://www.calligraphr.com/ in your browser. This is the website for Calligraphr. Here you will need to create an account.
-
2Create a free account. You don't need to pay to use Calligraphr, but you do need to create an account using your email address and a password. To do so:
- Click Get started free at the top of the page.
- Enter your email address in the "Email" field.
- Enter a password in the "Password" field.
- Re-enter the password in the "Password confirmation" field.
- Check the "I agree to the Terms and Conditions" box.
- Click SUBMIT
Advertisement -
3Confirm your email address. Open the inbox for the email address that you used to create your account, then open the email from "Calligraphr" and click the link in the email's body. This will take you back to the Calligraphr main page.
- If you don't see the email marked "Confirm your account" from Calligraphr, check the Spam or Junk folder in your email.
-
4Click START APP. It's a purple button in the upper-right side of the page.
-
5Click TEMPLATES. This heading is in the upper-left side of the page.
-
6Select a language preset. Click one of the options on the left side of the page, then make sure that you like the preset by reviewing it in the middle of the page.
- The free version of Calligraphr allows for up to 75 characters. If you choose Minimal English, you'll be able to create the whole alphabet and some special characters.
-
7Click Download Template. It's in the upper-right corner of the page.
-
8Click the checkboxes next to "PNG" and "Characters as background" boxes. These options will both ensure that your template is downloaded in the correct format.
-
9Click DOWNLOAD. It's in the bottom-right corner of the window.
-
10Click the download link. This link is to the right of the "Download your template" line at the top of the window. The template will download onto your computer; when it finishes downloading, you can proceed with editing it.
- If clicking the download link opens the template in a new window or tab, open the window or tab and right-click the template image. Click Save as. Then select a folder on your computer, and click Save.
- If you don't want to edit your font using your computer's software, you can print the template, draw the font by hand using a Sharpie, and then scan the font back into your computer as a PNG file later.


Editing the Template on Windows
-
1Unzip the template's folder. Skip this step if your template downloaded as a single PNG file. To unzip the folder, double-click it, then do the following:
- Click the Extract tab.
- Click Extract all
- Click Extract
-
2Select the template. Click the template that you want to edit to do so.
- If you downloaded a folder with multiple templates, you might want to open the selected template to make sure that it's the right one before you proceed.
- The "Template 1" option is usually the A-Z, 0-9 template.
-
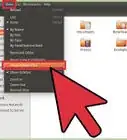
3Click the Home tab. It's in the upper-left side of the window. A toolbar will appear near the top of the window.
-
4
-
5Click an image editing program and click Ok. Select any image editing program you have installed on your computer and click Ok to open the template in an image editing program of your choice. You can use MS Paint, Paint 3D, Photoshop, GIMP, Adobe Illustrator, Inkscape, Coral Draw, or another program.
-
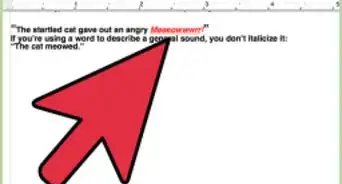
6Draw each character within the labeled boxes. Use the pen, pencil, or brush tool of your image editing software to draw your own characters over the characters in the template. Try to make each character about the same size as the characters in the template.
- If you have a stylus and a pad, use them instead of the mouse. You may have to open your template in a different program to do so.
- In most image editing programs, you can undo a mistake by pressing Ctrl+Z.
- If you are using a program that supports multiple layers, it is recommended that you draw your characters on a separate layer from the template.
-
7Save the character sheet as a PNG image. Use the following steps to save the character sheet in PNG format:
- Click File.
- Click Save As (Export in some image editing programs).
- Select PNG next to "Format" or "Save as type".
- Type a file name for the character sheet next to "File name".
- Click Save.


Editing the Template on Mac
-
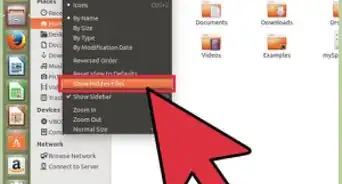
1Select the template file. Open the template file's download folder, then click the template file that you want to edit to select it.
-
2Click File. It's a menu item at the top of the screen. A drop-down menu will appear.
-
3Select Open With. This option is near the top of the drop-down menu. Selecting it prompts a pop-out menu to appear next to your mouse cursor.
-
4Click an image editing program. You can use any image editing program installed on your Mac. This includes Preview, Photoshop, GIMP, Adobe Illustrator, Inkscape, Coral Draw, or any other option.
-
5Draw each character within the labeled boxes. Use the pen, pencil, or brush tool of your image editing software to draw your own characters over the characters in the template. Try to make each character about the same size as the characters in the template.
- If you are using Preview, click the icon that resembles a marker tip at the top of the image and then click the icon that resembles a pencil drawing a line. This will allow you to draw over the image.
- If you have a stylus and a pad, use them instead of the mouse. You may have to open your template in a different program to do so.
- If you are using a program that supports layers, it's recommended that you draw your characters on a separate layer than the template.
-
6Save the character sheet as a PNG image. Use the following steps to save the character sheet as a PNG image:
- Click File.
- Click "Save as ('Export in some image editing programs).
- Select PNG in the drop-down menu below "Format" or "Select File type".
- Type a name for the character sheet next to "Name".
- Click Save.


Creating Your Font
-
1Go to https://www.calligraphr.com/ in your browser. This is the same site you downloaded the template from.
- If you are not automatically logged in, log in with the username and password you used to set up your account in Method 1.
-
2Click START APP. It's in the top-right side of the page.
-
3Click MY FONTS. You'll find this option in the upper-left side of the page.
-
4Click Upload Template. It's at the top of the page. A new window will open.
-
5Click Choose File. This option is in the middle of the window.
-
6Select the character sheet you made from the template. Locate the character sheet file containing your font characters.
-
7Click Open. It's in the bottom-right side of the window. Doing so uploads the file.
-
8Click UPLOAD TEMPLATE. This option is at the bottom of the window. Your file will be added to your Calligraphr page.
-
9Scroll down and click ADD CHARACTERS TO YOUR FONT. It's in the bottom-right side of the page. This displays a preview of what your font will look like.
-
10Click Build Font. This tab is at the top of the page. Another window will appear.
-
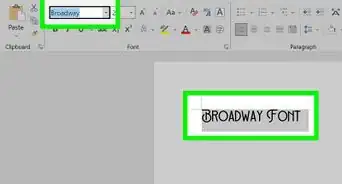
11Enter a name for your font. In the "Font name" text field, replace "MyFont" with whatever you want to name your font.
- The name that you choose here will be the name that shows up when you use the font in places like Microsoft Word.
-
12Click BUILD. It's in the lower-right corner of the window. Doing so creates your font.
-
13Click one of the "Font files" download links. You'll see a link ending in ".ttf" and a link ending in ".otf" below the "Font files" heading; if you don't know the difference, click the .ttf file. The font file will download onto your computer, from which point you can install the font on your computer by doing the following:
- Windows - Double-click the font file, then click Install at the top of the resulting window.
- Mac - Double-click the font file, then click Install at the bottom of the window.


Community Q&A
-
QuestionCan you sell the font file afterwards?
 Community AnswerYes, if the font you have made is completely your own work, that means it has not been copied off another licensed font, then you can potentially sell you custom font.
 -
QuestionIf I'm making a font traditionally, how do I scan it into my computer?
 Community AnswerYou'll need a photo scanner. Once you've scanned your font into the computer, you can follow the article's editing steps from there.
 -
QuestionHow do I add my font to a program like Word or OpenOffice?
 Community AnswerYou need to install the font onto your computer system. There should be a system folder on your computer called "Fonts". Drag the font file into the folder, and it'll be usable on any program on that computer.
Warnings
- Not all characters in your font will work for every platform on which you attempt to use them. For example, editing some special characters (e.g., the comma character) may result in a broken character on social media.⧼thumbs_response⧽


About This Article

1. Go to https://www.calligraphr.com.
2. Click Start App.
3. Download a template.
4. Open the template in an image editing program such as Paint, Preview, or Photoshop.
5. Draw your own characters using the template as a guide.
6. Save the character sheet in PNG image format.
7. Return to Calligraphr and click My Fonts.
8. Upload the character sheet PNG image.
9. Click Add Characters to Your Font.
10. Click Build Font.
11. Save and download the font.