X
wikiHow is a “wiki,” similar to Wikipedia, which means that many of our articles are co-written by multiple authors. To create this article, volunteer authors worked to edit and improve it over time.
This article has been viewed 23,931 times.
Learn more...
Moments are collections of stories showcasing the best of what’s happening on Twitter. It's easy to create a Twitter Moment. Once you create a Moment, other Twitter users can see it on your profile.
Steps
Part 1
Part 1 of 8:
Getting Started
-
1Login to Twitter. Open twitter.com in your web browser and sign in with your account.
- If you don't have an account, you can sign up for free.
-
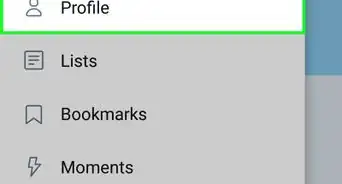
2Open your Moments tab. Click on your profile picture which is on the top of the page. Select Moments from the drop-down list.Advertisement
-
3Click on the Create new Moment button. This option located at the right side of the page.


Advertisement
Part 2
Part 2 of 8:
Adding Basic Information


Part 3
Part 3 of 8:
Adding Tweets to Your Moment
-
1Scroll down to “Add Tweets to your Moment” section. You can quickly access Tweets from Tweets I’ve liked, Tweets by account, Tweet link, and Tweet search options. Click on each one to access it.
- Click on the Tweets by account option to view your own Tweets.
-
2Add Tweets to your Moment. Click on the checkmark icon (✓) from a Tweet to add it to your moment. Click on the Load more Tweets button to view more.
-
3Arrange your selected Tweets. Click on the up or down arrow buttons to move a Tweet to up or down.
-
4Remove a Tweet from your Moment. Click on the X button and confirm your action.


Advertisement
Part 4
Part 4 of 8:
Adding a Cover
-
1Click on the Set cover button to use photos or videos from Tweets in the Moment, or upload an image. You can also use an image from your selected Tweets.
-
2Upload a video or picture. Click on the + button and select a picture from your computer.
-
3Crop your picture. Click on the crop button in the bottom right corner.
-
4Crop for desktop view. Crop your image perfectly and hit the Next button.
-
5Crop for mobile view. Now make your image perfect for mobile users. Click on the Save button to save your changes.


Advertisement
Part 5
Part 5 of 8:
Choosing a Mobile Theme Color


Part 6
Part 6 of 8:
Changing Location Information


Part 7
Part 7 of 8:
Publishing Your Moment
-
1Mark that the Moment contains sensitive material, if needed. If your moment contains sensitive contents, select “Mark that Moment contains sensitive material” from the More options and mark the box in the pop-up screen. Hit the Done button.
-
2Share the Moment privately. If you want to share your Moment privately with others, select “Make Moment link only” from the More option and copy the link. Confirm your changes.
-
3Save your Moment as a draft. Click on the Finish later button at the top bar to save your draft as a draft.
-
4Publish your Moment. When you are ready to make your Moment live to others, click on the Publish button from the top bar.
-
5Confirm your action. Click on the Publish button from the dialog box. If you didn't crop all Tweets you will see the Proceed anyway button instead of the Publish button.
-
6Share your Moment. Hit the Tweet button to share your Moment with your followers.
- Also read how to use Moments on Twitter.


Advertisement
Part 8
Part 8 of 8:
Taking it Further
-
1Moment from a Tweet. Click on the V icon from a Tweet and select an option from there. You can create a new Moment and add the Tweet to your published Moment from there.
-
2Edit a Moment. Go to “Moments” tab from your profile page. Click on the V icon of your moment and select Edit Moment.
-
3Change your cover media. Click on the Change cover media button and upload a new one, if desired.
-
4Unpublish a Moment. Click on the ••• More from top bar and select Unpublish Moment to hide your previously published Moment from others.
-
5Delete a Moment. Click on the ••• More and select Delete Moment. Also, confirm the deletion from the pop-up message.


Advertisement
Warnings
- A private Moment will only be visible to people who have the URL; it will not be visible on your profile page to others.⧼thumbs_response⧽
- Don't use inappropriate contents on your Moment. It's may be reported.⧼thumbs_response⧽
- If your Moment violates the Twitter rules, your account may be locked by Twitter, even if you did not author the Tweet.⧼thumbs_response⧽
Advertisement


About This Article
Advertisement