A guide to creating an inventory list from scratch or a template in Microsoft Excel
X
This article was co-authored by wikiHow staff writer, Jack Lloyd. Jack Lloyd is a Technology Writer and Editor for wikiHow. He has over two years of experience writing and editing technology-related articles. He is technology enthusiast and an English teacher.
The wikiHow Tech Team also followed the article's instructions and verified that they work.
This article has been viewed 766,564 times.
Learn more...
This wikiHow teaches you how to manage your business' inventory using an Excel spreadsheet on a Windows or Mac computer. You can use a pre-formatted inventory list template to do this, or you can manually create your sheet.
Steps
Method 1
Method 1 of 2:
Using a Template
-
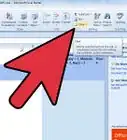
1Open Microsoft Excel. It's a dark-green app with a white "X" on it.
-
2Click the search bar. It's at the top of the Excel window.
- On Mac, first click File in the upper-left corner, then click New from Template… in the drop-down menu.
Advertisement -
3Search for inventory list templates. Type inventory list into the search bar at the top of the page, then press ↵ Enter. This will bring up a list of templates for inventory management.
-
4Select a template. Click on the inventory list template that best suits your needs. Its preview page will open.
- Each inventory list template offers different features. If you don't like the template you've selected, press Esc to return to the templates page.
-
5Click Create. It's to the right of the template's preview window.
-
6Wait for your template to load. This may take a few seconds. Once the template is open, you can proceed.
-
7Enter your inventory information. To change a pre-filled cell, double-click it, delete the number or word there, and enter your item's information. While your selected template may have slightly different options, every inventory list should include the following options:
- Item Number - An item's inventory (SKU) number.
- Item Name - An item's descriptive name.
- Item Cost - The cost of one item.
- Number in Stock - The number of an item.
- Net Value - The total value of an item's stock.
-
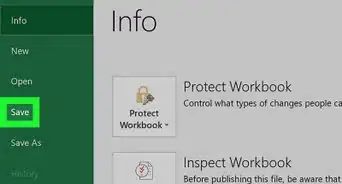
8Save your work. To do so:
- Windows - Click File, click Save As, double-click This PC, click a save location on the left side of the window, type the document's name (e.g., "Inventory List") into the "File name" text box, and click Save.
- Mac - Click File, click Save As..., enter the document's name (e.g., "Inventory List") in the "Save As" field, select a save location by clicking the "Where" box and clicking a folder, and click Save.


Advertisement
Method 2
Method 2 of 2:
Creating from Scratch
-
1Open Microsoft Excel. It's a green box with a white "X" in it.
-
2Click Blank workbook. This box is in the upper-left side of the window.
- Skip this step on Mac.
-
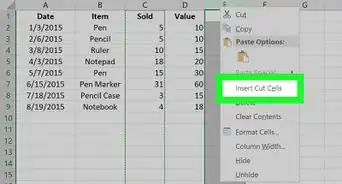
3Create your inventory list headers. In the following cells, enter the following headers:
- A1 - Item Number
- B1 - Item Name
- C1 - Item Cost
- D1 - Number of Items
- E1 - Net Value
-
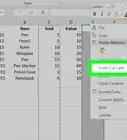
4Adjust the column widths. Click the space between two column letters (e.g., A and B) at the top of the sheet, then drag the mouse to the right to widen the column.
-
5Enter an item's inventory number. Click cell A2, then type in your item's inventory number (e.g, 123456) and press ↵ Enter.
-
6Add an item's name. Click cell B2, then enter the item's official name (e.g., Cable ties).
-
7Determine the item's cost per unit. Click cell C2, then enter the item's individual cost (e.g., 4.99).
-
8Add the total number of that item that you have on-hand. Click cell D2, then enter the number of items that you have in stock (for example, if you have 80 cable ties on-hand, you'd enter 80).
-
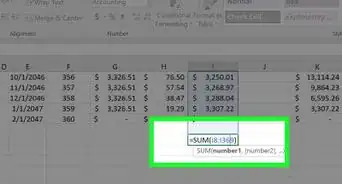
9Enter the net value formula. Click cell E2, then type
=C2*D2into the cell and press ↵ Enter. You should immediately see the calculated net value appear in the cell.- You can repeat this general formula for every cell in the "Net Value" column—just make sure that you replace C2 and D2 with the correct cells (for example, if you're multiplying values in cells C10 and D10, you'd use those cells instead of C2 and D2).
-
10Add the rest of your items to the inventory list. Repeat the above process for each item in your inventory. You'll assign one item to each row until your list is full.
-
11Save your work. To do so:
- Windows - Click File, click Save As, double-click This PC, click a save location on the left side of the window, type the document's name (e.g., "Inventory List") into the "File name" text box, and click Save.
- Mac - Click File, click Save As..., enter the document's name (e.g., "Inventory List") in the "Save As" field, select a save location by clicking the "Where" box and clicking a folder, and click Save.


Advertisement
Community Q&A
-
QuestionWhy should I format my text to wrap in Excel?
 Community AnswerBy formatting text to wrap on your headers, Excel will automatically extend the text into the cell below if you have a title that does not fit in the box. This allows you to create headers with longer titles without having to widen your columns, which can get disorganized if they grow too wide.
 -
QuestionHow do I freeze panes in Excel?
 Sulaman MubarakCommunity AnswerGo on the "view" option and right under the view tab you will see the freeze pane option.
Advertisement


About This Article
Jack Lloyd
wikiHow Technology Writer
This article was co-authored by wikiHow staff writer, Jack Lloyd. Jack Lloyd is a Technology Writer and Editor for wikiHow. He has over two years of experience writing and editing technology-related articles. He is technology enthusiast and an English teacher. This article has been viewed 766,564 times.
How helpful is this?
Co-authors: 16
Updated: March 6, 2023
Views: 766,564
Categories: Microsoft Excel
Advertisement