This article was co-authored by wikiHow Staff. Our trained team of editors and researchers validate articles for accuracy and comprehensiveness. wikiHow's Content Management Team carefully monitors the work from our editorial staff to ensure that each article is backed by trusted research and meets our high quality standards.
This article has been viewed 16,477 times.
Learn more...
Glass tile mosaics look great as a backsplash accent to a room or as the tiling for a bathroom. Although mosaic glass is generally durable, if it’s not cut correctly, it can crack or shatter before you get a chance to install it. You can nip the tiles with a nipper, score and snap thinner tiles, or use a wet saw to cut large pieces of tile. Regardless of which method you use, you'll need to learn the right techniques in order to cut your glass mosaic tiles correctly.
Steps
Nipping the Glass Tiles
-
1Use mosaic nippers to cut small pieces from thin glass tiles. Mosaic nippers are a great tool to use if you want your mosaic to consist of small, irregularly shaped pieces of glass tile. They look like pliers with a sharp clamp tip. For glass tiles, use nippers that have carbide wheels attached to the ends– these allow you to apply enough pressure to cut the glass without cracking or damaging it.[1]
- Use nippers on glass tiles 1⁄8 inch (3.2 mm) thick. Anything thicker may be too difficult to cut through.
- Nippers can be purchased from home improvement stores or online for around $15.
-
2Draw guidelines using a straightedge and a washable marker. Even though nippers aren’t as precise as other glass cutting methods, you still want to give yourself some guidelines that you can follow as you nip pieces off of the larger tile. Use a straightedge to guide your washable marker to form an even and straight line on the glass tile.[2]
- Use washable marker so you can wipe the markings away easily when you’re done cutting.
Advertisement -
3Put on safety goggles and clear your workspace of pets and people. Nipping glass tile can send sharp pieces of glass flying through the air, so before you work, you'll need to put on well-fitting safety goggles. It's also important to clear the area of other people so they aren’t at risk for getting hit with a glass shard.[3]
- That includes pets, too! You don’t want a furry friend to get hit with a piece of glass either.
-
4Hold the nippers like you would hold a pair of pliers. You will need to apply a fair amount of force to get the nippers to cut through the glass tile, so you’ll want to have a strong grip on the handles of the nippers. Use your dominant hand to grip the handles just like you would grip the handles of a pair of pliers, with the top handle in the middle of your palm and the bottom handle cradled by your fingers.[4]
Tip: You can wear a pair of thick gloves to make your grip more comfortable.
-
5Squeeze and break the glass tile according to your pre-drawn guidelines. Place the carbide wheels where the each guideline meets the edge of the glass tile. Squeeze the handles until the nippers cut through the tile and break the glass, keeping the nippers aligned with the marks you've drawn. Readjust after each nip so you continue following the lines as you proceed. Use repeated, small clipping motions and take your time, collecting the nipped glass pieces as you cut them off.[5]
- If the glass is stubborn, you may need to use two hands to cut through it. If this is the case, hold both of the handles with your dominant hand and wrap your non-dominant hand around it to add extra strength to your grip. [6]
-
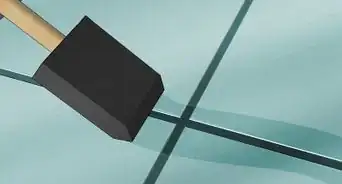
6Smooth the edges with a rubbing stone and wipe away the marker. The nipped pieces of glass tile will be uneven, jagged, and rough so you’ll need to smooth the edges out with a rubbing stone. Hold the piece of glass tile in one hand and the stone in the other hand and run the stone over the edge of the glass to round and smooth the edges.[7]
- The edges of nipped tile can be extremely sharp, and if you plan to install them around places like shower drains or the edge of a wall, you need to smooth the edges out.


Scoring and Snapping Thin Glass
-
1Use a glass scoring tool to make straight lines. If you plan to make longer, straight cuts on tile 1⁄8 inch (3.2 mm) thick or less, use a glass scoring tool. Scoring refers to cutting small cuts in the surface of the glass that will allow you to break the piece off with a clean edge.. Choose a scoring tool with a carbide or diamond cutting wheel to score the glass.
- Scoring and snapping allows you to cut larger squares of tile into smaller squares and isn’t ideal for cutting irregular shapes or patterns.
- The cuts need to be at least an 1 inch (2.5 cm) wide in order for you to snap it off, so scoring is not a good method to cut thin slivers of glass tile.
- You can find glass scoring tools at hardware stores or online for about $15.
-
2Lay the glass tile face up on a flat surface. When you score and snap, you want to make your cuts on the front facing side of the tile so the visible part of the tile has the straightest line. Place the glass tile on a workstation or table with the side that will be facing out when you install the tile facing up.[8]
- Be sure to lay the glass tile down gently to avoid chipping or cracking it.
Tip: Consider laying a towel or cardboard down beneath the glass tile to keep it from knocking against the surface.
-
3Use a straightedge and washable marker to draw guidelines. Scoring and snapping is ideal for breaking glass tiles across their entire surface, rather than cutting sections out of a larger piece of glass tile. To give yourself a guideline, place a straightedge on the tile, and use it to guide your washable marker as you make a straight line across the tile.[9]
- Washable marker will wipe off easily after you snap off your glass tile.
-
4Place the scoring wheel at the farthest end of your drawn-on guideline. To be better able to see and follow your guideline and to be able to apply even pressure, you need to start scoring at the far end of the tile. Reach across the tile to the edge that's farthest away from you and set the wheel of the scoring tool on the end of the guideline.[10]
- If the glass tile is too large for you to reach over to the edge, stand alongside it instead while placing your scoring wheel.
-
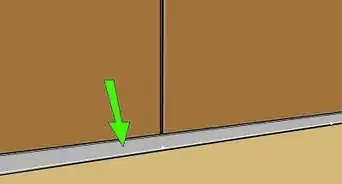
5Pull the scoring wheel toward you using the straightedge as a guide. Press firmly down on the glass with the scoring tool as you pull it towards you. It should make a distinctive crackling sound as the tool scratches the surface of the glass tile if you are applying enough pressure. Look to see a faint but definite line cut into the glass.[11]
-
6Grip the section of glass you want to cut with grozing or running pliers. Grozing and running pliers have a flat, serrated jaws that are perfect for gripping and breaking scored glass. Keep the tile face up on the workstation or table and grip the edge of the glass with the pliers positioned parallel to the cut you made with the scoring tool.[12]
- If your pliers do not have a rubberized grip on the jaws, apply masking tape to get a better grip on the glass.
-
7Snap downward to break off the tile. Position the scored glass tile so the edge of the tile that you want to snap off is hanging over the edge of the table or workbench. This will give you room to snap the piece off. In one swift motion, snap the glass downwards using the pliers to grip it. The glass should break cleanly along the line you scored.
- Don’t press down slowly or the edge of the glass may break off unevenly.
-
8Wipe away the marker and use a rubbing stone to smooth the edges tile. Use a clean, damp cloth to wipe away the washable marker. The glass tile piece will be sharp and possibly a little rough, so take a rubbing stone, hold it at a 45 degree angle to the front of the tile, and rub it in a parallel motion over the edge to round and smooth it out. Rub the rubbing stone down the whole length of the edge.
- A rubbing stone can also be used to buff out any small irregularities in the break.


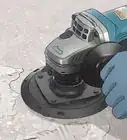
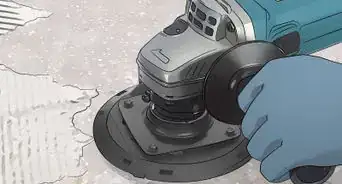
Using a Wet Saw
-
1Choose a wet saw if you need to cut larger or thicker pieces of tile. Large tiles can be difficult to score deep enough to be snapped or nipped, but a wet saw can effectively cut through the thickest glass tile. Wet saws release a steady stream of water as the blade cuts to decrease friction and are more time-effective and have less of a chance of damaging glass tiles.
- Wet saws allow you to cut squares out of larger pieces of tile quickly and evenly, but isn’t great for cutting curved or irregular shapes.
- You can rent wet saws from home improvement stores like Home Depot and Lowe’s for about $50 a day.
-
2Use a glass tile blade on the wet saw to cut your tile. A glass diamond blade will create a smoother cut in the tile and ensure an even edge. Glass tile blades have a finer and softer blade, which means it will take longer to pass through the saw, but will result in a better edge on the glass tile pieces you cut.
-
3Use a straightedge and washable marker to draw cutting guidelines. Washable markers are easy to clean up later, but will still draw clear lines for you to follow with your wet saw. Use a straight edge as a guide and form straight lines with your marker where you want to cut the glass tile.
- Make sure the lines are straight and even. You can always just wipe the marker away and form the lines again.
-
4Put on rubber gloves for extra grip. Because the wet saw uses water to reduce friction and cool the blade, the glass tile could become slippery to hold with your hands. Use a pair of rubber gloves to increase your grip on the glass. Don’t use leather or fabric gloves because they’ll become soaked in water.[13]
- Latex gloves work fine, too.
-
5Turn on the saw and let it run for 15 seconds. Give the saw a chance to warm up and get going by turning it on and allowing the water to flow freely over the blade of the saw. Wait about 15 seconds before you begin cutting so you can be sure the saw is functioning properly and the water is flowing smoothly.[14]
Warning: If the water isn’t flowing, don’t cut with the saw! The friction could cause the glass to shatter and the blade could heat up and damage the saw.
-
6Line up the cutting guide on the wet saw and the guidelines on the tile. The wet saw will have measuring or cutting guides that will lock the glass tile in place. Use the guide on the wet saw and match it up to the lines you drew on the tile with the washable marker, then slide the guide to lock the tile and keep it from moving. Align the saw carefully, because you won't be able to undo a cut once you make it!
-
7Push the tile through the saw and away from you. Feed the tile slowly through the saw with a light but consistent pressure as the blade cuts through it. Push with your hands on the edge of the glass away from the blade, keeping your movement continuous. Push the tile through the saw until it cuts all the way through for an even cut and a smoother edge.[15]
-
8Turn off the saw and wipe away the washable marker. When you have finished cutting your glass tile, use a clean cloth to wipe away the washable marker guidelines. Power down the saw and wait for the blade to stop spinning completely before you pick up or handle the saw.
- Wipe up and dust or glass pieces that may be on your saw or workstation.
-
9Smooth the edges of the cut tile glass with a rubbing stone. The wet saw produces clean and even lines, but it’s still a good idea to smooth the edges of the tile so they are less likely to cut you. Hold the stone at 45 degree angle on the front of the tile and run it over the edge to round it out. Smooth the entire edge of the glass tile.


Expert Q&A
-
QuestionHow can I know how many tiles I have to buy?
 Emma OberlanderEmma Oberlander is an Interior Designer and the Owner of Otis Street Design in Boston, Massachusetts. She specializes in residential remodels, boutique hospitality design, project management, and budget design. Emma holds a BA in Communication and Media Studies from Northeastern University and an MA in Interior Architecture from The New England School of Art and Design. She has a combined ten years of project management experience in the design, marketing, and non-profit industries, both nationally and internationally.
Interior DesignerYou can find the overall footage by multiplying the width and length of the space. Then add 10% extra to the measurement for porcelain or ceramic tiles. Add 20% for marble or travertine tiles because they are more prone to breakage.
Things You’ll Need
Nipping the Glass Tiles
- Tile nippers
- Straightedge
- Washable marker
- Safety goggles
- Rubbing stone
Scoring and Snapping Thin Glass
- Glass scoring tool
- Straightedge
- Washable marker
- Rubbing stone
- Grozing or running pliers
Using a Wet Saw
- Wet saw with glass cutting blade
- Straightedge
- Washable marker
- Rubber gloves
- Rubbing stone


References
- ↑ https://aboutglasstile.com/cutting-glass-tiles/
- ↑ https://www.bobvila.com/articles/how-to-cut-glass-tile/
- ↑ https://www.bobvila.com/articles/how-to-cut-glass-tile/
- ↑ https://www.bobvila.com/articles/how-to-cut-glass-tile/
- ↑ https://www.bobvila.com/articles/how-to-cut-glass-tile/
- ↑ https://www.bobvila.com/articles/how-to-cut-glass-tile/
- ↑ https://www.bobvila.com/articles/how-to-cut-glass-tile/
- ↑ https://www.bobvila.com/articles/how-to-cut-glass-tile/
- ↑ https://www.bobvila.com/articles/how-to-cut-glass-tile/
About This Article