This article was co-authored by wikiHow Staff. Our trained team of editors and researchers validate articles for accuracy and comprehensiveness. wikiHow's Content Management Team carefully monitors the work from our editorial staff to ensure that each article is backed by trusted research and meets our high quality standards.
The wikiHow Video Team also followed the article's instructions and verified that they work.
This article has been viewed 35,504 times.
Learn more...
A peplum top is a shirt with a skirt attached to the bottom edge. The design is flattering on many different body types because it tapers in at the natural waist and flares out at the hips. You’ll need to choose or make a shirt to use, and then measure and cut the fabric to create the peplum skirt. Then, simply attach the skirt to the shirt and hem the edges of your shirt to finish the garment.
Steps
Creating the Shirt
-
1Fold a T-shirt in half lengthwise and tuck in the sleeves. You can use a shirt that fits you well as a template for creating a new shirt. Fold the shirt in half lengthwise and tuck in the sleeves so that they are out of the way. Push them into the shirt so that the seams along the armholes are visible.[1]
Tip: You can also add a skirt onto the bottom of a pre-made T-shirt to turn it into a peplum shirt. If you do this, you’ll only need about 0.5 yd (0.46 m) of fabric to make the shirt’s bottom.
-
2Place the folded shirt over folded fabric. Fold your fabric in half and smooth it out so there are no lumps or bumps in it. Then, place the shirt on top of the folded fabric. Line up the folded edges of the shirt with the folded edges of the fabric.[2]Advertisement
-
3Cut around the edges of the shirt except for along the fold. Use a sharp pair of fabric scissors to cut around the outside of the shirt, except for along the folded edge. Cut carefully and slowly to avoid creating any jagged edges in the fabric. When you’re done, lift the shirt off of the fabric, fold the fabric again, and cut a second piece in the same manner. These 2 pieces will be the front and back of your shirt.[3]
- You can also use a pattern to create the shirt part of the peplum top. There are many free ones available online.[4]
-
4Pin the shirt pieces together with the right sides facing in. Layer the 2 shirt pieces so that the raw edges are even and the right (front or outer) sides are facing each other. Insert 2 to 3 evenly spaced pins along each of the shoulders and 6 to 8 evenly spaced pins along each of the sides.[5]
- Make sure to remove the pins one at a time before you sew across a pinned area. Sewing across the pins may damage your sewing machine.
-
5Sew a straight stitch along the shoulders and sides of the shirt. Sew a straight line along the top edge of each of the shoulders about 0.5 in (1.3 cm) from the raw edges. Then, sew down each of the shirt’s sides in the same manner. This will create a simple top that you can sew the peplum skirt onto.[6]
- Cut the excess threads when you are finished sewing.
- Be careful not to sew across the neckline or armholes of the shirt.
Cutting the Skirt Piece
-
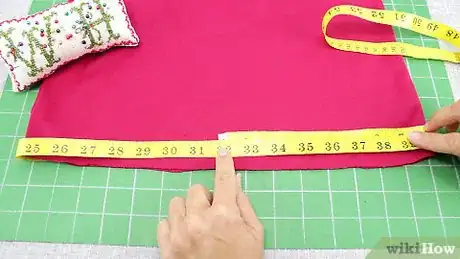
1Measure the shirt all the way around the bottom. Use a soft measuring tape to get the total length of the bottom of your shirt. Hold 1 end of the measuring tape against the bottom edge of the shirt and then wrap it all the way around the bottom edge. Record this measurement on a piece of paper.[7]
Tip: If the shirt is fitted around your waist, then you can take your waist measurement for this part instead.
-
2Divide the measurement by 3.14 and subtract 0.5 in (1.3 cm). This will give you the ideal radius of the peplum, which you will need to cut the skirt piece. The extra 0.5 in (1.3 cm) will serve as seam allowance.[8]
- For example, if the shirt measurement was 36 in (91 cm), then dividing by 3.14 gives you a result of 11.5 in (29 cm). Subtracting 0.5 in (1.3 cm) gives you a result of 11 in (28 cm).
- Use a calculator to make this easier and make sure to write down your result.
-
3Mark the radius on the folded fabric by measuring from the corner. Fold the fabric in half and hold the end of the measuring tape at the corner. Then, measure from the corner to the radius. Mark the fabric in several places extending from the corner to form a curved, dotted line. Then, connect the dots to fill out the curve.[9]
- This technique is similar to using a protractor. The end of the measuring tape stays in the same spot while you move the other end to find your desired radius.
-
4Choose the desired length of your peplum skirt. You can make the peplum skirt as long or as short as you’d like it to be. Measure from the bottom of the shirt to the point on your body where you’d like the skirt to end to determine how long to make the skirt. Go with a longer length for something that will cover your hips and waist completely, or go with a shorter length for a cropped peplum shirt.[10]
- For example, if you want a short peplum top, you might measure only 5 in (13 cm) from the radius line.[11]
- If you want a long top that falls down around your hips, measure 10 in (25 cm) from the radius line.
-
5Add 1 in (2.5 cm) for the seam allowance. Once you have determined how long you want the skirt to be, add 1 in (2.5 cm) for the seam allowance. This will ensure that you have enough fabric to hem the bottom edge of the skirt and to attach it to the top.[12]
- For example, if your desired skirt length was 10 in (25 cm), adding 1 in (2.5 cm) for the seam allowance gives you a total of 11 in (28 cm).
-
6Mark the fabric with the total length of the peplum skirt. Move the end of the measuring tape to the curved edge you drew to indicate the skirt’s radius. Measure from the edge of the radius to the desired length of the skirt plus seam allowance. Mark the fabric with a piece of chalk or fabric marker in 7-10 places to form a curved, dotted line just as you did before. Then, connect the dots to form a solid, curved line.
- For example, if you determined that your skirt will be 11 in (28 cm), then measure down to this length starting from the radius.
-
7Cut along the lines you have drawn onto the fabric. Use a sharp pair of fabric scissors to cut along the 2 curved lines you have drawn onto the fabric. Go slowly to avoid creating any jagged edges in the fabric. Cutting along these lines will give you a long, curved strip of fabric that looks like a donut when you connect the ends.[13]
- The piece that you cut out is what you will sew onto the bottom of the shirt piece.
Putting the Pieces Together
-
1Pin the short edges of the peplum skirt with the right sides together. The right side of the fabric is the front or outer side. Fold the donut strip of fabric that you created so that the ends are lining up and the right sides are facing each other. It will look like a half-circle. Then, insert 2 to 3 pins through the fabric to keep the short edges lined up.[14]
- Insert the pins going perpendicular to the edge of the fabric. This will make it easier to remove them when you sew.
-
2Sew a straight stitch 0.5 in (1.3 cm) from the short edge of the skirt. Place the edge of the strip under the presser foot and lower it. Then, set your sewing machine to the straight stitch setting. Sew a straight line along the pinned edge to secure the ends of the strip in a circle.[15]
- Cut the thread once you reach the end of the edge.
Warning: Remove the pins as you sew. Do not sew over them or you may damage your sewing machine.
-
3Pin the peplum skirt to the bottom edge of the shirt. Turn the shirt right side out and the skirt wrong side out. Then, slip the skirt up around the bottom edge of the skirt so that the bottom edge of the skirt is closer the shirt’s collar than the shirt’s bottom. Align the edges of the shirt bottom and the skirt waistline so that they are even. Insert 1 pin every 2–3 in (5.1–7.6 cm) going all the way around the edge of the shirt and skirt.[16]
-
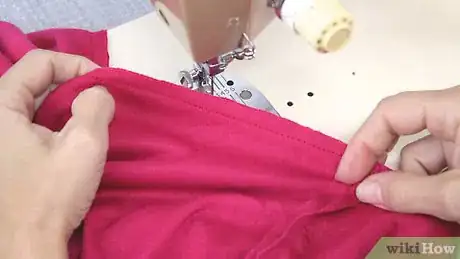
4Sew a straight stitch along the edges of the skirt and shirt. Take the pieces to your sewing machine and place the edge of the skirt and shirt under the presser foot. Lower it and begin sewing a straight stitch all the way along the edge of the 2 pieces to connect them. Position the stitch so that it is about 0.5 in (1.3 cm) from the raw edges of the pieces.[17]
- Cut the thread after you finish sewing the 2 pieces together.
-
5Hem the raw edges of the skirt and shirt. Once you finish sewing the peplum skirt onto the shirt, there will still be 4 raw edges to finish. Fold over and pin 0.5 in (1.3 cm) of fabric along the skirt’s bottom edge, the neckline, and the sleeves. Make sure to fold the fabric so that the raw edges are on the inside of the garment. Then, sew a straight stitch around each of these edges to secure them.
- Cut the excess thread after you finish hemming each of the raw edges.
Things You’ll Need
- 1.5 yd (1.4 m) of a light to medium weight fabric, such as cotton, jersey, or linen
- Pre-made shirt (optional)
- Tape measure
- Chalk or fabric marker
- Pins
- Thread
- Sewing machine
References
- ↑ https://www.youtube.com/watch?v=KMay3fhUD3Y&feature=youtu.be&t=61
- ↑ https://www.youtube.com/watch?v=KMay3fhUD3Y&feature=youtu.be&t=140
- ↑ https://www.youtube.com/watch?v=KMay3fhUD3Y&feature=youtu.be&t=140
- ↑ https://www.itsalwaysautumn.com/the-easy-tee-the-anthropology-lace-front-version-free-raglan.html
- ↑ https://www.youtube.com/watch?v=KMay3fhUD3Y&feature=youtu.be&t=161
- ↑ https://www.youtube.com/watch?v=KMay3fhUD3Y&feature=youtu.be&t=161
- ↑ https://www.itsalwaysautumn.com/how-to-sew-a-peplum-shirt.html
- ↑ https://www.itsalwaysautumn.com/how-to-sew-a-peplum-shirt.html
- ↑ https://www.itsalwaysautumn.com/how-to-sew-a-peplum-shirt.html
- ↑ https://www.itsalwaysautumn.com/how-to-sew-a-peplum-shirt.html
- ↑ http://www.simplysewingmag.com/free-projects/transform-tee-make-peplum-top/
- ↑ http://www.simplysewingmag.com/free-projects/transform-tee-make-peplum-top/
- ↑ http://www.simplysewingmag.com/free-projects/transform-tee-make-peplum-top/
- ↑ http://www.simplysewingmag.com/free-projects/transform-tee-make-peplum-top/
- ↑ https://www.itsalwaysautumn.com/how-to-sew-a-peplum-shirt.html
- ↑ https://www.itsalwaysautumn.com/how-to-sew-a-peplum-shirt.html
- ↑ https://www.itsalwaysautumn.com/how-to-sew-a-peplum-shirt.html
