This article was co-authored by wikiHow Staff. Our trained team of editors and researchers validate articles for accuracy and comprehensiveness. wikiHow's Content Management Team carefully monitors the work from our editorial staff to ensure that each article is backed by trusted research and meets our high quality standards.
There are 16 references cited in this article, which can be found at the bottom of the page.
This article has been viewed 112,437 times.
Learn more...
The elbow stand is a great posture to learn for beginners of yoga and gymnastics, and a prerequisite for harder movements like handstands. While they may appear difficult if you’ve never done one before, they’re actually much easier than they look—the most important components are getting comfortable in an inverted position and learning to balance using the whole forearm.
Steps
Performing an Elbow Stand
-
1Find an open space on flat ground. To get into an elbow stand comfortably, you’re going to need some space. Find an open, flat section of floor that’s big enough to accommodate the length of your body. That way if you lose your balance while holding the elbow stand, you won’t have to worry about colliding with any obstacles nearby.
- Start learning the elbow stand on a carpeted floor, or outside on grass. This will give you a softer surface to work with until your forearms are conditioned to the strain of the technique, and it will hurt less if you fall.
-
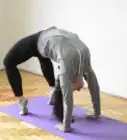
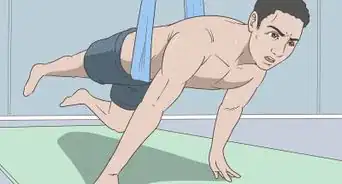
2Get into position to initiate the lift. Start in a standard downward dog position, or in quarter dog, kneeling with both knees on the ground and your weight over your hips. Place both forearms out in front of you with palms flat on the floor (this is known as "dolphin pose"). Your forearms should be parallel or in a slight “V” shape, tapering toward the hands.[1]
- The forearms are used as the base for the elbow stand. They should be roughly 10-12 inches apart to provide maximum stability and put them in the best position to make balance adjustments.[2]
- It’s important to be low enough in your starting position to be able to get both forearms on the ground in front of you without the need to contort uncomfortably.
Advertisement -
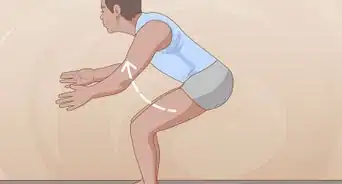
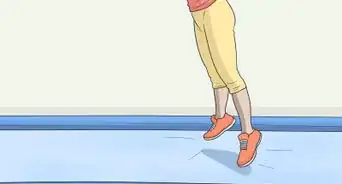
3Kick one leg up behind you, followed by the other. Walk your feet up as close to your elbows as you can can and get up on the balls of your feet to prepare to push off the floor. Swing your first leg up behind you to begin lifting your body into a vertical position. Allow your other leg to come up behind the first. Once inverted, your head should be in alignment with the rest of the body, positioned between the forearms with your gaze fixed down on the hands rather than to the rear of the body. Extend both legs toward the ceiling so that the body is completely upright. Straighten your knees and point your toes for proper alignment.[3]
- Learn to get a feel for how hard to kick up with your first leg. Not kicking hard enough will cause you to fall right back down into your starting position, while kicking up with too much force might make you to overshoot your balance point and can potentially lead to shoulder injuries if the arms are wrenched behind you.[4]
- Keeping the body perfectly aligned from head to toe will make balancing easier by preventing any awkward displacements of weight from pulling you down.
-
4Maintain your balance using your forearms. After you’re inverted and upright, you’ve completed the hardest part of the movement! Now all you need to do is hold the position by maintaining your balance. Keep your body tight and use small adjustments of your forearms to keep the body from falling off its axis. Take advantage of your base by using the entire forearm to keep balance. This will feel unusual at first, but is a very stable position as long as the body is kept in line.[5]
- If your body is leaning too far forward, press with the palms to counter the movement; If you find yourself falling backwards, tense the core by squeezing the abdominal muscles and thrust your elbows into the floor while extending your shoulders.
- The straighter you can keep your body, the more effortless balancing will be.


Building the Necessary Strength and Stability
-
1Practice headstands. It’s recommended that you master the basic headstand before moving on to the elbow stand, which removes the crown as a balance point. Try doing a few headstands a day during your training sessions and work up in short intervals until you can hold the position for a minute or longer. The headstand makes use of the same muscle groups as the elbow stand and also serves as good inversion practice.[6]
- Bridge the gap between the headstand and elbow stand by doing yoga headstands, in which the forearms are also used for base stability and balance.[7]
-
2Get used to being upside down. If you’re scared of getting inverted or becoming disoriented once you’re in position, you may need do some conditioning to get yourself used to being upside down. This can be accomplished by simply spending more time with the head below the body. Inch your way up into a steep dolphin pose, practice basic headstands against the wall with a pillow support or hang off the edge of your bed until inversion is no longer intimidating or uncomfortable.[8]
- You can also perform elbow stands against the wall to build up the amount of time you’re able to spend inverted under tension. This will take the balance aspect out of the movement and allow you to focus on building up the shoulder and core strength necessary to hold the elbow stand for longer.[9]
-
3Stretch your neck and shoulders. You should always warm up and stretch lightly before any type of physical activity, but this goes double for complex and challenging postures like the elbow stand. Stretching the neck and shoulders thoroughly prior to practicing elbow stands will ensure that you have full mobility of the muscles, making it easier to get into and hold the position. Stretching also reduces your risk of injury by making the joints more supple.[10]
- Stretch the shoulders and neck independently by putting them through their maximal range of motion, or by transitioning through a sequence of other yoga postures.
-
4Perform push ups to increase shoulder strength. Shoulder strength is an essential function to the stability of the elbow stand. To build strength in the shoulders, perform standard push ups and push up variations that target the muscles of the shoulders specifically. While doing these exercises, concentrate on moving your weight in a slow, controlled manner.[11]
- Pike and Hindu push ups approximate the positioning of the body during the elbow stand particularly well.[12]
- Holding handstands against a wall will also be useful for building the necessary supporting strength in the arms and shoulders.
-
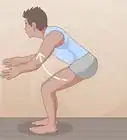
5Hold static positions to condition the core muscles. The shoulders support your body, but the core does most of the work in keeping your body in a straight line and maintaining balance. For this reason, core exercises like crunches, V-sits, and leg lifts should be utilized. When performed statically, the core muscles will spend more time in a contracted state, which translates directly to the constant tension of an elbow stand.[13]
- To perform static core exercises, begin the exercise normally and then hold it in the hardest portion of the movement (for crunches, this will be in a full crunch; for V-sits and leg lifts, the legs should be kept at about a 45 degree angle to the body, etc.)
- Incorporate core strength exercises into your weekly training following your regular workouts.


Adding More Challenging Variations
-
1Pike into the elbow stand. To add another degree of difficulty to the elbow stand once you’ve got it down, try entering the posture from a pike. Rather than kicking up one leg at a time, keep both feet together and bring them as close to the forearms as you can. Then, lean forward to place your center of gravity over your forearm base, engage the core and lift both legs off floor, keeping them together as you extend into the inversion. The piked entry is an intensified technique that requires loads of upper body and core strength to pull off correctly.[14]
- The pike shifts emphasis to the frontal abdominals, meaning that your core muscles need to be quite well-developed.
-
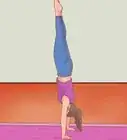
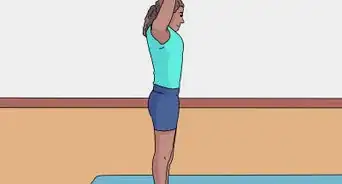
2Enter the elbow stand from a standing position. The simplest positions for entering into an elbow stand demand that you be close to the floor, so doing an elbow stand from a standing position means that your technique, stability and balance must be spot-on. Start in a walking stance, with one foot slightly in front of the other (the leg you intend to kick up with should be in the back). Bend at the hips, reaching down to place the forearms on the ground as you lift with the back leg in one continuous movement. The technical complexity of this variation makes it ideal for beginning to learn handstands.
- It may be helpful to “catch” your weight with your hands before resting the forearms on the ground in order to compensate for the added distance between your body and the floor.
-
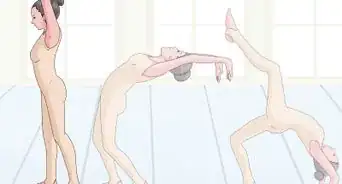
3Practice separating your legs. When you feel like your ability to balance in an elbow stand is coming along, you can gradually relax and separate the legs until they’re flared. Bring the toes of one leg horizontally toward the floor with the knee straightened while letting the other fall behind the body so that the sole of the foot is pointed ahead of you. Split leg inversions are typically reserved for high-level yoga practitioners and demonstrate superb understanding and control of the body’s balancing mechanics.[15]
- Staying upright will be made much more complicated, as the legs now must move independently to offset one another’s weight.
-
4Perform a scorpion elbow stand. One of the most advanced techniques in yoga, dance and gymnastics, pulling off a scorpion requires that the practitioner arch their back to bring the feet as close as possible to the back of the head. This will be especially hard while maintaining an elbow stand. Scorpion inversion demand great flexibility, agility and strength. Once you’re able to achieve this posture you can consider yourself as having mastered the elbow stand.[16]
- To successfully perform a scorpion, the neck, back, hip flexors and quadriceps must be warmed up and limber. Make sure you’re on an intensive stretching regimen to build up flexibility before attempting the scorpion.[17]
- This technique places the neck and back in an awkward position, making falls potentially dangerous. If you find yourself falling, always come out of the posture by gradually straightening the back and bringing the hips down until your feet rest on the ground beneath you.


Expert Q&A
-
QuestionHow do you loosen a stiff elbow?
 Eric Christensen, DPTEric Christensen is a Physical Therapist based in Chandler, Arizona. With over a decade of experience, Eric works in both orthopedic and neurological fields and specializes in custom orthotic prescription and casting, vestibular reprogramming, and manual therapy. He holds a Bachelor’s degree in Exercise Science with a focus in Sports Medicine from Colorado State University and a Doctor of Physical Therapy from Regis University. In practice, Eric takes a developmental approach to rehabilitation utilizing the Selective Functional Movement Assessment. He uses functional movement patterning and manual therapy to return patients to prior levels of function.
Physical TherapistStretching out your biceps and triceps can help with that! A biceps stretch is easy enough to do--put the palm of your hand in an open door jam. Then, step forward past the doorway with the corresponding leg, all while keeping your elbow straight. For a triceps stretch, bend your elbow and rest it on top of a tennis or lacrosse ball that's placed on a table. Then, roll the ball up the triceps much like you might roll out your thigh or glutes. -
QuestionHow can I get more strength in my arms?
 Community AnswerYou just need to work out and eat well and keep practicing.
 -
QuestionWhat's the best way to keep my balance.
 Community AnswerIf you feel that you are going to fall forward, towards your head, press hard against the floor with the palms to redirect the alignment of your body. If you're falling backwards, toward your stomach, dig in with the elbows and extend the shoulders. Keep the body tense and straight and try to reach up to the ceiling with your toes.
Warnings
- Inversion movements put a lot of strain on the shoulders and spine, and because of the positioning of the neck and back, falling can result in injury. Make sure that you have practiced techniques for safely exiting an inversion should you find yourself losing your balance.⧼thumbs_response⧽
- Do not attempt an elbow stand or any of is variations if you experience chronic joint pain or have suffered from a previous shoulder, back or neck injury that might be aggravated by strenuous training.⧼thumbs_response⧽
You Might Also Like

This is a modal window.
This is a modal window.
This is a modal window.
This is a modal window.
This is a modal window.

This is a modal window.
-Step-6-Version-4.webp)
References
- ↑ http://www.mindbodygreen.com/0-17803/how-to-build-strength-for-a-forearm-stand-practice.html
- ↑ https://www.youtube.com/watch?v=5K1jh60X2aE
- ↑ https://www.verywell.com/forearm-stand-pincha-mayurasana-3567078
- ↑ http://www.twofitmoms.com/2014/02/03/handstands-101-part-2-the-kick-up/
- ↑ http://www.doyouyoga.com/forearm-stand/
- ↑ https://www.youtube.com/watch?v=ma8i8z6sTOg
- ↑ http://yoganonymous.com/5-surefire-ways-to-nail-your-headstand-a-yoga-sequence-to-get-you-there
- ↑ http://www.yogajournal.com/article/beginners/strike-a-royal-pose/
- ↑ https://www.youtube.com/watch?v=yZW7AMSqL48
- ↑ Brendon Rearick. Personal Trainer & Strength Coach. Expert Interview. 30 July 2020.
- ↑ https://www.t-nation.com/training/best-damn-push-ups-article-period
- ↑ http://www.globalbodyweighttraining.com/pike-push-u/
- ↑ http://www.brianmac.co.uk/corestabex.htm
- ↑ https://www.youtube.com/watch?v=Rd7ewAMXtgc
- ↑ http://www.yogajournal.com/advanced/hanumanasnana-in-pincha-mayurasana/
- ↑ http://www.yogajournal.com/advanced/vrischika-in-pincha-mayurasana/
- ↑ http://www.refinery29.com/2013/11/57351/yoga-scorpion-pose-tips
About This Article