Explore this Article
X
wikiHow is a “wiki,” similar to Wikipedia, which means that many of our articles are co-written by multiple authors. To create this article, volunteer authors worked to edit and improve it over time.
This article has been viewed 43,485 times.
Learn more...
This article will show you an easy way to draw a Celtic knot on squared paper. You can pick whether you want to draw a simple knot and expand to a more advanced with "holes".
Steps
Method 1
Method 1 of 1:
Simple Knot
Drawing the Base
-
1Choose how long you want to make the knot by drawing small diagonals at every other intersection of the squared paper. 5 lines is recommended for beginners.
-
2Choose how wide you want to make the knot by drawing small diagonals at every other intersection of the squared paper. 4 lines is recommended for beginners.Advertisement
-
3Do the same with the bottom and the left side so that you have a rectangle.
-
4Make a smaller rectangle the same way but one square in.
-
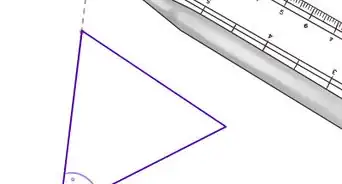
5Draw a second diagonal next to the ones existing to make arrows pointing towards the centre of the rectangle. Do not draw a second diagonal in the corners!
-
6Draw small squares.
- It's often easiest to start by drawing all of the left facing sides first and then draw the right facing sides.


Advertisement
Drawing the Lines
-
1Start by drawing in the lower right corner by connecting the diagonal in the inner corner with the left side of the arrow closest to the lower left corner (not the corner itself).
-
2Draw a line parallel to the line you just drew on the right side of the small square + arrow.
-
3Follow the line you just drew along the diagonal alternating between drawing on the left and right side of the small square.
-
4Look for a line drawn on the left side of the small square and draw a parallel line to the right of the small squares.
- You have to go from the side of the small square or arrow.
- Repeat step 3.
-
5Repeat step 4 until you have reached the upper left corner.
-
6Do step 1 again but this time start from the upper right corner.
-
7Use the same technique as before until you reach the lower left corner.


Advertisement
Finishing the Knot
-
1Draw curved edges starting from one side of an outer arrow and connecting it with the arrow next to it.
-
2Fill in the lines to make them bolder.
- When you're drawing the edge curves, draw them as a continuous line to make it more smooth.
- Do this until all lines have been filled in.
-
3Fill in the small squares.
-
4Draw curved edges on the inner arrows making them look like pizza slices.
-
5Fill in the arrows/pizza slices.
-
6Draw curves on the edges making them look like half circles.
-
7Fill in the half circles in the corners.


Advertisement
Adding Optional Finishing Touches


===Advanced Knot with Holes===
Creating the Base
-
1Draw the outline like before. Since it has holes, it needs to be a bit bigger.
-
2Choose the size and position of the holes by drawing small squares with one side missing. If you have holes that are bigger than the ones on the picture, draw outward facing arrows between the corner.
-
3Draw arrows pointing outward from the holes.
-
4Draw the small squares.


Advertisement
Drawing the Lines
-
1Start in the lower right corner.
-
2Continue till you've reached the upper left corner.
- Near the holes it gets a bit tricky. Just remember that you can only draw a line from the side of a small square or arrow.
-
3Follow step 1 and 2 again but this time start from the upper right corner and stop when you reach the lower left corner.


Advertisement
Finishing the Knot
-
1Draw the edges like before.
-
2Draw the edges inside the holes.
-
3Fill in the lines. This is a great step because it makes it look nicer and it helps you discover any mistakes you might have made.
-
4Draw curves on the arrows making them into pizza slices and curves on the corners making them half circles.
- Remember to draw the curves on the arrows near the holes.
-
5Fill in the small squares, pizza slices, and half circles.
-
6Shade if desired.
- Another optional step is to colour the spaces between the curves on the edges or to make a black border but remember that you have to do the same in the holes (if you make a black border, fill in the entire hole instead of just along the edges).


Advertisement

You Might Also Like
How to
Draw a Hexagon
How to
Draw in 3D
How to
Draw a Star
How to
Draw a Circle
How to
Hand Draw an Ellipse
How to
Draw Curved Lines in Photoshop
How to
Draw an Equilateral Triangle

How to
Draw an Octagon
 3 Ways to Make Photoshop Arrows: Vectors, Line Tool, & Brush
How to
Draw a Sphere
 Creating Patterns in Photoshop: Basic or Seamless
How to
Draw an Impossible Triangle
How to
Draw a Regular Hexagon with Only a Ruler
How to
Draw 3D Shapes
Advertisement
About This Article
wikiHow is a “wiki,” similar to Wikipedia, which means that many of our articles are co-written by multiple authors. To create this article, volunteer authors worked to edit and improve it over time. This article has been viewed 43,485 times.
114 votes - 90%
Co-authors: 6
Updated: April 3, 2021
Views: 43,485
Categories: Drawing Shapes
Advertisement