This article was co-authored by James Schuelke. James Schuelke, along with his twin brother David, is the co-owner of the Twin Home Experts, a licensed plumbing, leak detection, and mold inspection company based in Los Angeles, California. James has over 32 years of home service and business plumbing experience and has expanded the Twin Home Experts to Phoenix, Arizona and the Pacific Northwest.
There are 10 references cited in this article, which can be found at the bottom of the page.
This article has been viewed 65,992 times.
Usually, flushing a toilet is simple matter of pressing a handle or button. However, things can get complicated if nothing happens when you jiggle or push the flusher. Fortunately, many flushing fixes are quick and easy. Plunge away any clogs, and check the flush chain, flapper, and water level.[1] While standard toilets are fairly straightforward, dual flush toilets are more complicated. If you run into trouble, call a professional plumber.
Steps
Fixing the Flapper
-
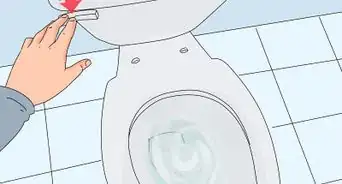
1Remove the tank cover and check for connection problems.[2] If you’re having trouble flushing the toilet, start by checking the connections between the handle, flush chain, and flapper. Sometimes the chain can get disconnected from the handle or flapper, which prevents the toilet from flushing.[3]
- If the chain is disconnected, grab the loose end and slide a link onto the hook at the end of the handle arm. The tank water is fresh, not toilet water, so don’t worry about reaching into it.
- When you flush the toilet, the handle arm pulls the flush chain and lifts the flapper, which allows water to flow into the bowl from the tank.
-
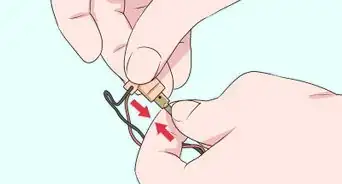
2Ensure the flapper chain is taught. Make sure the chain has no more than 2 links of slack. If the chain isn’t taught, it won’t lift the flapper when you jiggle the handle.[4]
- With the tank cover off, jiggle the handle and see if handle arm inside the tank pulls the chain enough to lift the flapper.
- If the chain is loose, detach it from the hook at the end of the handle arm. Hook a chain link onto the arm so there’s less than 2 links of slack on the chain when the flapper is down.
- The chain shouldn’t be so taught that it pulls the flapper up when the handle is in the normal position.
Advertisement -
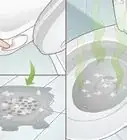
3Test the flapper seal. Try reaching into the tank and shifting around the flapper, or the rubber part at the base of the tank that’s connected to the chain. When the flapper is down, it should make a tight seal, which keeps water from entering the bowl. If the toilet runs constantly, the flush will be weak, and the flapper seal is most likely to blame.[5]
- The flapper might need a quick adjustment. If shifting it fixes the seal, the toilet will stop running and it’ll flush normally.
- If the chain came loose, it might have gotten stuck under the flapper and prevented it from sealing properly.
- If the flapper is worn, it won’t fit into its seating properly, and you’ll need to replace it.
-
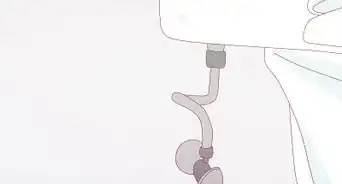
4Turn off the water supply before troubleshooting the flapper. Find the valve behind the toilet, then turn it clockwise to turn off the water supply.[6] With the water supply turned off, you’ll be able to drain the tank. It’ll be easier to work without water in the tank.[7]
- If lifting the flapper doesn’t drain all of the water from the tank, remove as much as you can with a cup, then absorb the rest with towels.
-
5Scrub off any mineral deposits on the rim of the flapper’s seat. With the water drained from the tank, you’ll be able to get a better look at the flapper and its seat. Lift the flapper and wipe your finger around the rim of its seat. If you feel any buildup, scrub the rim with a mineral deposit cleaner and nylon scrubbing pad.[8]
- Don’t use steel wool or any other material that’s more abrasive than nylon.
- Mineral deposits or other buildup could prevent the flapper from sealing. If the flapper isn’t worn, turn the water back on, flush the toilet, and see cleaning the rim solved your problem.
-
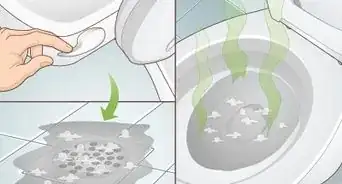
6Replace the flapper if it’s worn. If the bottom of the flapper is worn out, find where it’s attached to the long overflow tube that comes out of the tank’s bottom. Slide the flapper’s rubber hooks off of the ear on the tube, then detach the chain that connects the flapper to the handle arm.[9]
- Take the flapper to your local hardware store to find a match. If you can’t find a match, a universal flapper should do the trick.
- Slide the new flapper’s rubber hooks onto the tube’s ear, then attach the flush chain. Turn the water back on, and see if your toilet flushes normally.
- If your toilet still won’t flush or flushes weakly, you might have a clog, need to adjust the water level, or have a problem that requires a professional plumber.


Plunging Like a Pro
-
1Give a clogged toilet 10 minutes to drain. Find the supply valve behind the toilet, and turn it clockwise to shut off the water as soon as you can. If you’re dealing with a clogged toilet, the bowl might have filled to a dangerously high level. After about 10 minutes, some of the water in the bowl should drain, and you’ll be able to plunge without splashing toilet water everywhere.[10]
- To stay on the safe side, it’s wise to spread old towels on the floor around the toilet.
-
2Make your first thrust gentle to release air from the plunger. The plunger’s bell is filled with air, and a hard first plunge will just splash toilet water out of the bowl. Thrust gently to release the air from the bell and form a tight seal with the drain.[11]
- For best results, use a plunger with a flange extension, or an extra ring of rubber that extends from the bell. Flange plungers make a better seal and are more effective than simple bell plungers.
-
3Maintain the seal as you plunge with quick, repetitive thrusts. After a gentle first thrust, plunge vigorously and quickly around 15 to 20 times. Do your best not to lift the plunger off of the bottom of the toilet bowl. That way, you’ll preserve the seal and force water in and out of the clogged drain.[12]
-
4Add hot water to the bowl if the plunger isn’t submerged. Since you’ve turned off the water, the bowl might become empty even though the drain is still clogged. The plunger will only work if it’s submerged, so you might need to fill a bucket with hot water and add it to the bowl.[13]
- Hot water will also help loosen up the clog.
-
5Snake the toilet if plunging wasn’t successful.[14] Usually, 15 to 20 vigorous thrusts with a flange plunger is enough to clear a toilet clog. Listen for a gurgle and look for the water in the bowl to suddenly drain. If plunging doesn’t do the trick, get a household plumbing snake at the hardware store, and try using it to clear the clog.[15]
- To use a simple snake, insert the hooked end into the toilet drain, and turn it clockwise down the drain pipe until you encounter resistance. Keep turning it clockwise to clear and hook the obstruction, then pull the snake out of the drain.
- Have a trash container handy so you can easily dispose of any waste you pull out of the drain.


Adjusting the Water Level
-
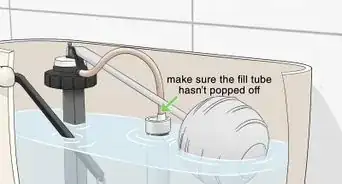
1Remove the tank lid and check the water level.[16] There should be a line engraved into the porcelain on the inside of the tank. If you don’t see one, look around the pipes and valves that stick up from the bottom of the tank.[17]
- There’s a plastic tube that sticks out from where the flapper is seated. This is the overflow pipe, and the waterline might be marked there if it’s not engraved inside the tank.
- If you can’t find a line anywhere, measure 1 inch (2.5 cm) from the top of the overflow pipe. Mark the pipe, and use this as your water level line.
- When the tank is full and stops running, the water level should be around the line. If the level is too low, the toilet won’t flush or the flush will be weak. If it’s too high, water will spill into the overflow pipe and the toilet will keep running.
-
2Adjust a ball-and-arm float by gently bending the rod. Look inside the tank for a rubber ball that floats on the end of a rod. If you see one, carefully bend the rod up or down to adjust the water level.[18]
- For instance, if the water level is around 3 inches (7.6 cm) below the line, carefully bend the rod up so the rubber ball to same height as the line. Lifting the ball should engage the fill valve and cause water to run into the tank.
-
3Raise the float cup if your model doesn’t have a ball-and-arm float. If you don’t see a rubber ball, check for a tube sticking out from the bottom of the tank with a wide cylinder part. This wide cylinder part is called a float cup. If the water level is off, you’ll need adjust it by moving the float cup up or down.[19]
- For some models, you’ll need to rotate a small knob or rod to move the float cup up or down.[20]
- There might be a clip that you need to pull out in order to adjust the cup, or a screw that needs to be loosened.[21]
- If you’re not sure how to adjust your cup, find your toilet’s brand and look online for specific instructions.
- You might also see a manufacturer’s mark on the float cup or on tube it’s attached to, which is called the fill valve. Check the manufacturer's website for instructions or troubleshooting tips.
-
4Flush the toilet to see if you’ve solved the problem. After adjusting the water level, press the handle and see if the toilet flushes. If it still won’t flush after troubleshooting the flapper, addressing any clogs, and adjusting the water level, you might have an issue that requires a professional plumber.[22]


Dealing with a Dual Flush Toilet
-
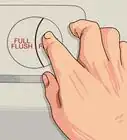
1Try adjusting the water level first. Check the water level and adjust the water level as you would for a standard toilet. Remove the tank cover and find the tube with the wide cylindrical float cup. Depending on your model, rotate a small knob, pull a clip, or unfasten a screw to adjust the float cup higher or lower.[23]
- After adjusting the float cup, see if the toilet will flush. If it doesn’t, try repairing or replacing the flush and fill valves.
- While they conserve energy, dual flush toilets are more complicated than standard toilets. If you’re not sure about attempting repairs on your own, call a plumber.
-
2Turn off the water supply before inspecting the valves. Before attempting to repair a dual-flush toilet, you’ll need to find the valve behind the toilet and turn off the water supply. After turning off the supply, pressing one of the flush buttons might drain water from the tank. If it doesn’t, use a cup and towels to remove water from the tank.[24]
- It’ll be easier to work without water in the tank. The water also needs to be off when you remove the flush and fill valves.
-
3Remove the fill valve cap and flush away any debris. When you remove the tank lid, you’ll see 2 tube-shaped canisters sticking out from the bottom of the tank. The tube with 2 flush buttons at the top is the flush valve, and the other is the fill valve. Rotate the top of the fill valve counterclockwise, then gently pull up to remove it.[25]
- For some models, you’ll also have to unhook a flexible refill tube or arm that connects the flush and fill valves.[26]
- Once the cap is removed, rinse it in the sink under warm water. Then place your hand over the fill valve (inside the tank), and slowly turn on the toilet water supply. Turn on the supply just enough that water flows through the valve without spraying all over the place.
- Buildup in the fill valve could be causing the issue. If you still see any deposits after flushing the fill cap and valve, scrub them away with a toothbrush designated for cleaning.
-
4Inspect the fill valve’s washer, and replace it if necessary. Turn the toilet water supply back off after flushing the valve. Look under the top part of the fill valve that you’ve removed from the tank. Inside is a washer; make sure it isn’t cracked or worn.[27]
- If it’s in bad shape, you’ll need to replace it or get a new fill valve. Carefully pry the washer out with a flat-head screwdriver, then slide the new washer into place.
- If you know you’re toilet’s manufacturer and model, you might be able to order the right washer from them. Otherwise, it might be tough to track down the right part, and you’re better off replacing the entire valve.
-
5Replace the fill valve, if necessary. Be sure the water supply is off before you start. The fill valve is connected to the supply line by locking nuts and washers above and below the bottom of the tank. Use an adjustable wrench and locking pliers to loosen the thick coupling nut underneath the tank.[28]
- Place old towels around the floor under the toilet, as a bit of water will drain from the supply line when you remove it.
- Hold the base of the fill valve with the locking pliers to prevent it from turning as you rotate the coupling nut counterclockwise. After removing the nut, pull away the supply line and lift the fill valve out of the tank.
- Bring the fill valve to the hardware store to find a match, or order new one from your toilet’s manufacturer.
- Place the new fill valve inside the tank, align its base with the hole in the bottom of the tank, and secure it to the supply line with the coupling nut. If necessary, reattach the flexible refill tube or arm that runs between the fill and flush valves.
-
6Remove the flush valve if the fill valve was problem-free. If you cleaned and inspected the fill valve and found no problems, the flush valve might be the issue. You should be able to remove the flush valve by rotating it counterclockwise (usually just a quarter turn) as you lightly apply downward pressure. Lift the valve upward when you hear a click or feel it disengage from the base.[29]
- Look under the flush valve and find the silicone seal. The silicone seal does the same job as a standard toilet’s rubber flapper. Ensure it’s seated tightly in the underside of the flush valve, and check it for damage.
-
7Replace the flush valve seal if it’s worn. If the seal is damaged, purchase a matching replacement online or at the hardware store. Peel the old seal out of the flush valve, slide the new one into place, then twist the flush valve clockwise back into its housing.
- Be sure to line up the color-coded partial and full flush buttons correctly. The buttons on the valve line up with pegs attached to buttons on the tank lid. Match the colors or symbols so you don’t install the flush valve backwards.
- If you can’t find a seal that matches your flush valve, or if the valve itself is damaged, replace the entire unit. Find the correct part for your toilet at a hardware store or order one from the manufacturer.


Dealing with an Electronic Toilet
-
1Check to see if the toilet has power. An electronic toilet such as those manufactured by Toto or Moen requires constant electrical power in order to operate normally. Depending on the toilet there may not even be a serviceable tank that you can access.
- Some toilets operate on battery power, while others operate on power from the grid. Others may use a battery backup in case grid power is lost.
- If your toilet is not functioning, check to see if the GFCI receptacle or the circuit breaker is not tripped. If it is, that means that either the outlet was wired incorrectly or the circuit on your bathroom is drawing too much power. In other cases, there could be a short circuit between live and earth. In any case, try resetting the circuit breaker.
-
2Try flushing the toilet manually. Even electronic toilets may have a manual override. If there is no power to the toilet, look for a manual override on the toilet. This may require removing one of the toilet's panels. In other cases, the toilet's flush button may mechanically flush the toilet properly.
- Some toilets utilize a multi-stage process for the manual flush. For example, the valve may need to be turned to the "1" position to start the flush, and the "2" position to drain the water. Or, the valve may need to be turned to the "1" position to flush the toilet, and the "2" position to drain the water. Usually, this is present when dual-flush is handled electronically.
-
3Add water to the bowl. If there is no way to flush the toilet manually, then you may still be able to add water to flush it. Using a spare bucket, carefully pour water into the toilet until the water starts going down. The water may go down partly or all the way. After, use the same bucket to refill the bowl.
-
4Refer to the instruction manual for other care instructions and service. If the toilet still is not working, it may be an issue with the actual toilet model. Check the toilet's user manual to see if there is anything else that can be done before calling a plumber.
Expert Q&A
-
QuestionHow do you flush a toilet fast?
 James SchuelkeJames Schuelke, along with his twin brother David, is the co-owner of the Twin Home Experts, a licensed plumbing, leak detection, and mold inspection company based in Los Angeles, California. James has over 32 years of home service and business plumbing experience and has expanded the Twin Home Experts to Phoenix, Arizona and the Pacific Northwest.
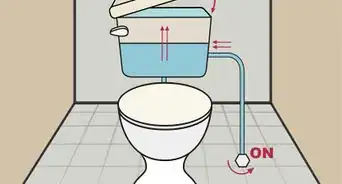
Professional PlumberThe more water you can get in the tank, the better the flush will be. It's important to keep the level of water at its highest setting for it to flush quickly.


References
- ↑ James Schuelke. Professional Plumber. Expert Interview. 1 October 2019.
- ↑ James Schuelke. Professional Plumber. Expert Interview. 1 October 2019.
- ↑ https://www.familyhandyman.com/plumbing/toilet-repair/parts-of-a-toilet/view-all/
- ↑ https://www.popularmechanics.com/home/how-to/a4117/4303948/
- ↑ https://www.familyhandyman.com/plumbing/toilet-repair/parts-of-a-toilet/view-all/
- ↑ James Schuelke. Professional Plumber. Expert Interview. 1 October 2019.
- ↑ https://www.familyhandyman.com/plumbing/toilet-repair/parts-of-a-toilet/view-all/
- ↑ https://www.familyhandyman.com/plumbing/toilet-repair/parts-of-a-toilet/view-all/
- ↑ https://www.familyhandyman.com/plumbing/toilet-repair/how-to-stop-a-running-toilet/view-all/
- ↑ https://www.familyhandyman.com/plumbing/toilet-repair/how-to-fix-a-clogged-toilet/view-all/
- ↑ https://www.familyhandyman.com/plumbing/toilet-repair/how-to-fix-a-clogged-toilet/view-all/
- ↑ https://www.today.com/home/don-t-panic-here-s-what-do-when-you-ve-t62126
- ↑ https://www.familyhandyman.com/plumbing/toilet-repair/how-to-fix-a-clogged-toilet/view-all/
- ↑ James Schuelke. Professional Plumber. Expert Interview. 1 October 2019.
- ↑ https://www.familyhandyman.com/plumbing/toilet-repair/how-to-fix-a-clogged-toilet/view-all/
- ↑ James Schuelke. Professional Plumber. Expert Interview. 1 October 2019.
- ↑ https://www.familyhandyman.com/plumbing/toilet-repair/parts-of-a-toilet/view-all/
- ↑ https://www.familyhandyman.com/plumbing/toilet-repair/parts-of-a-toilet/view-all/
- ↑ https://www.familyhandyman.com/plumbing/toilet-repair/parts-of-a-toilet/view-all/
- ↑ http://www.americanstandardpro.com/assets/documents/amstd/install/Install_2744.pdf
- ↑ https://support.kohler.com/hc/en-us/articles/360002394974-300A-Series-Fill-Valve-Adjustment
- ↑ https://www.familyhandyman.com/plumbing/toilet-repair/parts-of-a-toilet/view-all/
- ↑ https://www.familyhandyman.com/plumbing/toilet-repair/parts-of-a-toilet/view-all/
- ↑ https://www.ebay.com/gds/How-to-Repair-a-Kohler-Toilet-/10000000177770919/g.html
- ↑ https://www.familyhandyman.com/plumbing/toilet-repair/parts-of-a-toilet/view-all/
- ↑ http://www.americanstandardpro.com/assets/documents/amstd/install/Install_2744.pdf
- ↑ https://www.familyhandyman.com/plumbing/toilet-repair/parts-of-a-toilet/view-all/
- ↑ https://www.familyhandyman.com/plumbing/toilet-repair/parts-of-a-toilet/view-all/
- ↑ https://www.youtube.com/watch?v=FlJ3UQlkEdU&feature=youtu.be&t=36
- ↑ https://www.popularmechanics.com/home/how-to/a4117/4303948/
About This Article

Usually, to flush a toilet all you have to do is push down on a handle or button. If nothing happens, remove the tank cover and check to see if the chain is disconnected from the handle or flapper. If it is, reattach the chain so it is taut. If the chain is already in place, reach down and adjust the flapper, or the rubber part at the base of the tank, to see if it’s working correctly. If everything in the tank is working, you may need to turn off the water and plunge the toilet. If that doesn't work, you may need to call a plumber. If you want to learn how to adjust the water level inside your toilet to help flush it, keep reading the article!