This article was co-authored by wikiHow Staff. Our trained team of editors and researchers validate articles for accuracy and comprehensiveness. wikiHow's Content Management Team carefully monitors the work from our editorial staff to ensure that each article is backed by trusted research and meets our high quality standards.
There are 17 references cited in this article, which can be found at the bottom of the page.
The wikiHow Video Team also followed the article's instructions and verified that they work.
This article has been viewed 351,654 times.
Learn more...
When you're adding bills to a money tree, you may want to make your bill more decorative by folding it origami-style. A heart is a great choice for a wedding or birthday, and it's simple to do. You can also try a leaf, which is very appropriate for a money tree! For a wedding, try a dress, which will add pizzazz to any tree.
Steps
Creating a Simple Money Heart
-
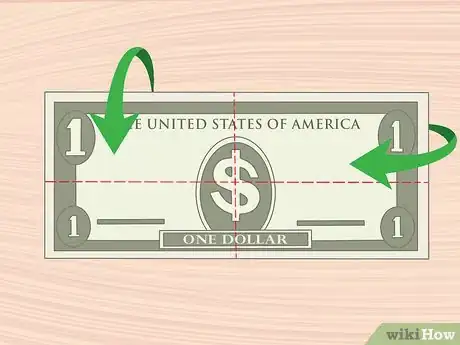
1Fold the bill in half horizontally and vertically. Turn the bill so the back is facing up. You can fold it either way you want first. Match up the ends so they meet nicely and then make a crease down the middle where the bill is folded. Unfold the bill and then fold it the other way. Make a crease and unfold it again.[1]
- At this point, you should have 2 creases in the bill that form a cross and divide the bill into 4 equal rectangles.
-
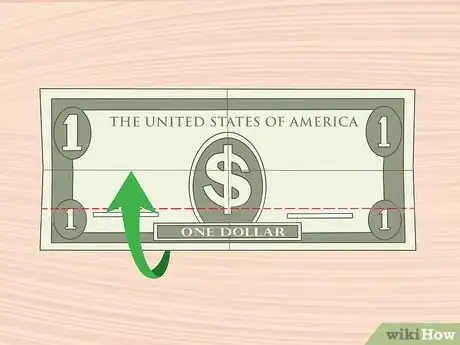
2Pull the bottom edge up to meet the middle line. Place the bill so the back is face up and the bottom edge is facing you. Fold the bottom edge up and match the edge with the center crease you made in the first step. Use your fingernail to crease the fold along the bottom.[2]
- Do not unfold this crease.
Advertisement -
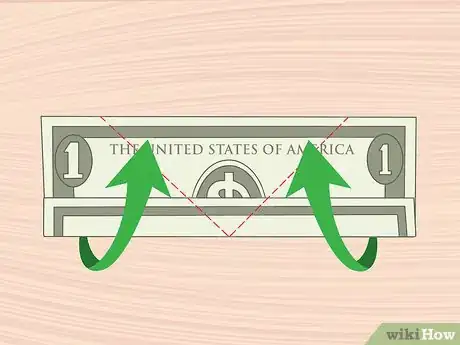
3Create a point at the bottom by folding the sides up. Grab the right side of the bill. Fold it upward so that the bottom crease you just made meets the middle vertical line you made in the first step. Crease the fold you've just created, making half of the point at the bottom.[3]
- Repeat the process on the left side, bringing the bottom crease over to meet the right side you just brought to the middle.
- You should now have a point at the bottom and 2 flat edges at the top.
-
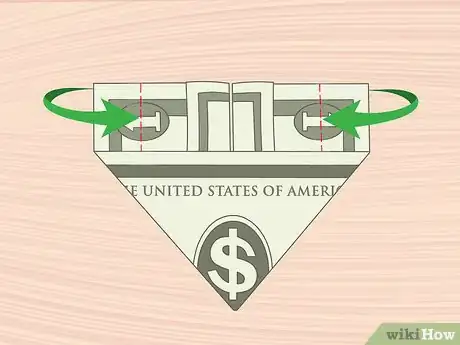
4Flip the heart over and fold in the sides. When you flip it over, you should have a flat edge at the top. Fold in the right side a third of the way to the middle. Make a crease. Fold over the left side a third of the way to the middle.[4]
-
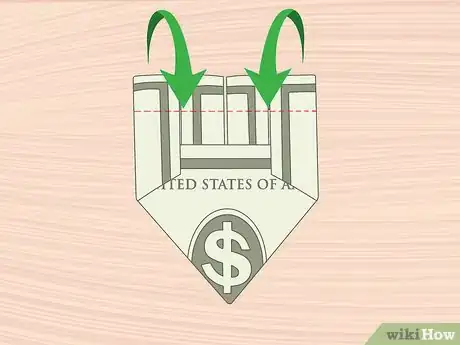
5Bring the top edges down. You should have 2 flat edges at the top. Below that, you should see a fold going all the way across the top. Fold each flat edge down, maintaining a flat line across the top on each side. Each side should meet the edge below when it's folded down.[5]
-
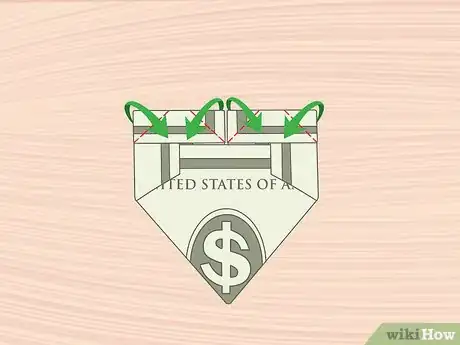
6Fold in the corners of the flat tops to finish the heart shape. On the right side at the top, fold the corner down on each side of the flat edge. Fold it down just enough to meet the top edge of the flat part you just folded down.[6]
- Do the same on the other side to complete your heart shape.
Creating a Leaf from a Bill
-
1Turn the bill back-side up and fold the corners up to the top edge. Pull the left bottom corner up so that side edge is perfectly even with the top of the bill. It will make a diagonal crease along the bottom left of the bill. Do the same with the right side.[7]
- Your bill should now have a flat edge along the top. On the bottom, it should be a diagonal fold going down towards the middle, a short straight edge in the middle, and a diagonal fold going back up to the right side.
-
2Begin folding the bill accordion-style, starting from the bottom edge. Fold the bottom edge up just a little bit, less than 0.25 inches (6.4 mm). Flip it over and fold the edge up the same amount as you did on the other side. You're basically creating a fan-style fold, moving from the bottom of the bill to the top.[8]
- Continue folding until you've done the whole bill. You should have a thin strip of bill that you've folded back and forth.
-
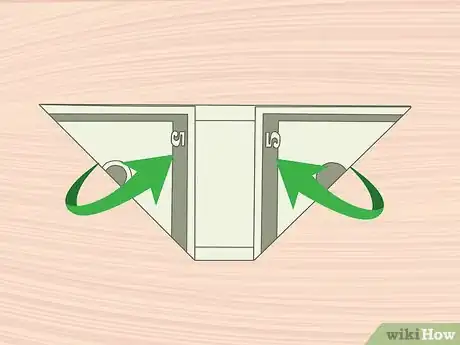
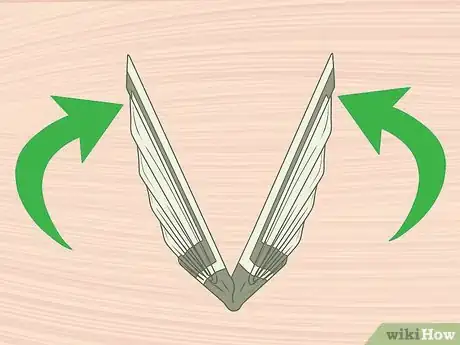
3Fold the ends of the bill together. Because you started with a short side and moved to the longer side when doing your accordion fold, one side will be longer than the other. Place the longest side of the accordion fold face up. Bring the 2 ends of the fold up to meet each other, creasing the bill in the middle as you do.[9]
- As you fold this step, the bottom of the bill should start to fan out like a leaf. When you bring the 2 ends together, you're creating the middle of the leaf.
-
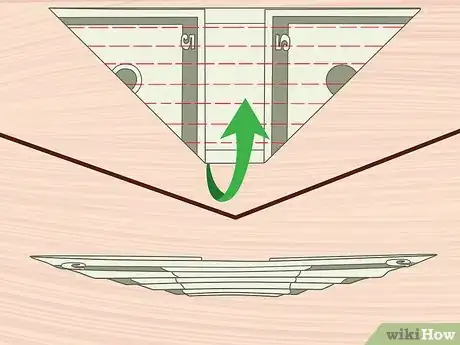
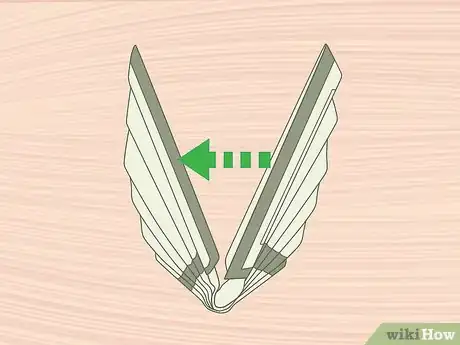
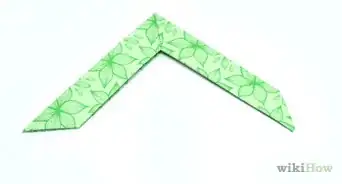
4Close the leaf by bringing one edge over the other. When you look at the 2 edges at the center of the leaf, both should be 2 layers thick. Pick the side that's slightly longer than the other, and open the layers with your finger. Slip the other edge between those 2 layers. The longer edge should go over the first crease in the smaller edge, holding it in place.[10]
- Your leaf is complete and ready to stick on a money tree!
Folding an Origami Dress from Money
-
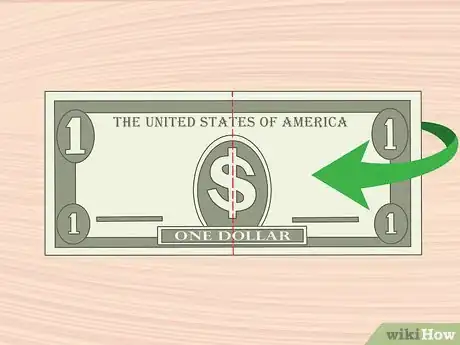
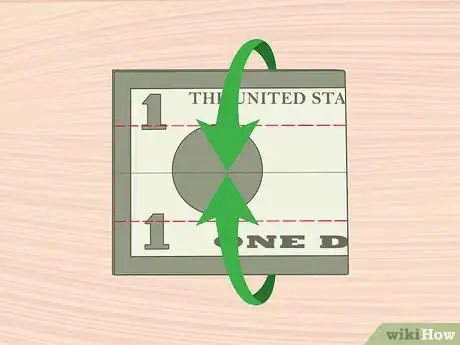
1Make a smaller rectangle by folding the bill in half. Match the short ends up together, cutting the longer side in half. The front part of the bill should be on the outside. Crease along the fold you've just made to make a smaller rectangle. You'll treat this double rectangle like a single layer of paper throughout the folding process.[11]
- Folding it this way will make the final shape better.
-
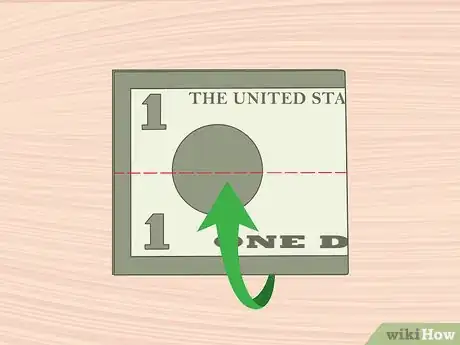
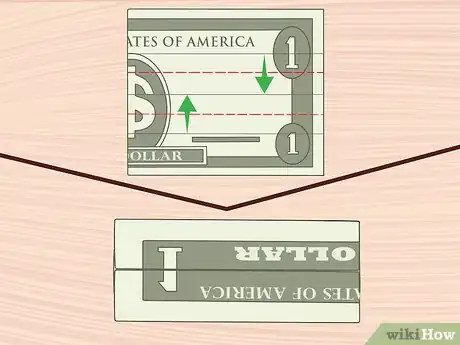
2Fold the bill in half lengthwise. Bring the long edges together so they meet perfectly and then make a crease along the fold with your fingernail. The long edges won't be as obvious since you made a smaller rectangle in the first step, but the sides that were longest before you folded the bill will still be a bit longer than the other sides.[12]
- Unfold the fold you just made. You should now have a crease running down the middle of the bill lengthwise.
-
3Fold the long edges to the middle. Fold each long side to the middle crease you just made. The edges should meet in the middle. Make a crease along the fold on each side using your fingernail.[13]
- Unfold the 2 sides you just folded in. You should now have a bill folded in half width-wise with 3 long creases in it, equally dividing the bill into 4 long rectangles.
-
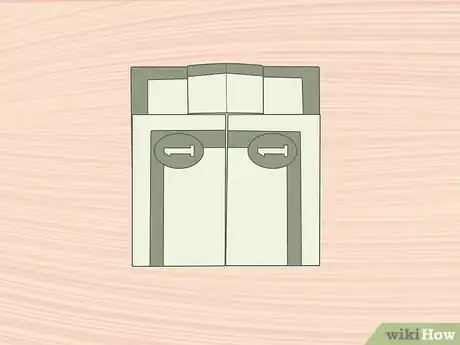
4Flip the bill over and fold the creased edges to the middle. When you flip the bill over, you should be able to see the creases you made making little "mountains" in the bills. There should be one in the middle and one running down each side. Take one of the side creases and bring the folded edge over to meet the middle crease. Press down to make a crease in the bill below it. Do the same on the other side so that the side crease meets the other one in the middle and push down on the bill below to make another crease.[14]
- At this point, you should have a little trough in the center. The ends of the bill will hang out over the edge of the center part.
-
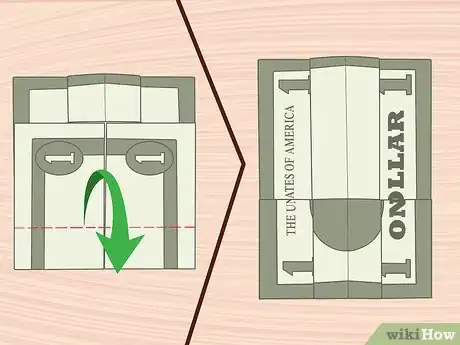
5Turn the bill over and fold it almost to the top edge. Leave the paper folded like it was in the last step except turn it over to the other side. Place one of the short edges facing you and turn it up to meet the top edge. However, don't fold it all the way to the top edge. Leave about 1⁄3 inch (0.85 cm) at the top so the edges don't quite meet. Make a crease at the bottom.[15]
-
6Pull the same edge back down but hold the crease you made in place. Basically, you're making a second crease just above the one you made in the last step. However, this fold will be going the other direction as you bring the edge back down to the bottom.[16]
- Use your fingernail to make the crease.
-
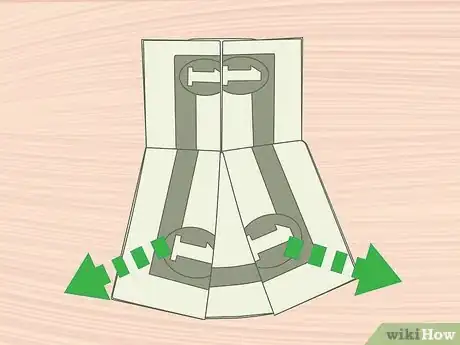
7Turn the bill over and fold out the skirt. When you turn the bill over and flip it end-to-end, you should have a short section at the top above the folds you just made and a longer section at the bottom below the folds you just made. Use your finger to open up the skirt at the bottom by pushing between the 2 folds. As you bring out each side, make a crease along the diagonal, creating a fuller skirt.[17]
- Basically, you're pulling apart the "trough" you made earlier in the folding process. As you pull it apart, it naturally creates space to make a diagonal fold from the "waist" of the dress down to the "hem."
-
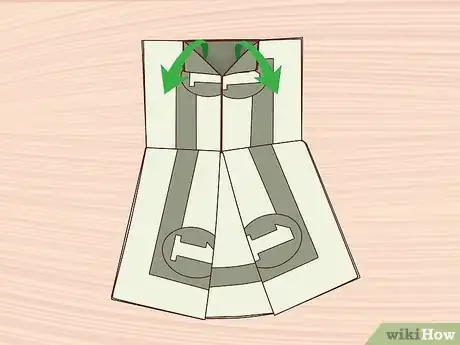
8Make the neckline by folding 2 triangles in the center part at the top. You should see a middle line at the top. Fold a triangle from the middle on each side, only going about halfway out to the edge and halfway down to the waist.[18]
- Unfold these triangles when you're done making the crease.
-
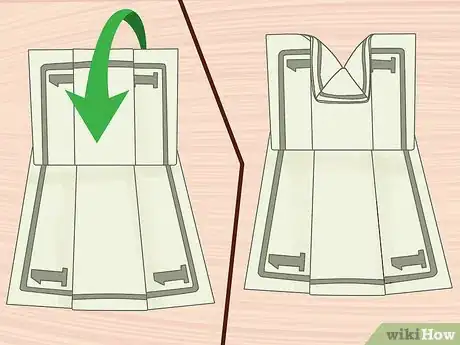
9Flip the bill and finish the neckline by pulling the top edge down in the center. As you pull the center down, the creases you made in the last step will come down to make a v-neck in the front. On the back, where you're looking at the dress, you'll just have the flat edge coming down.[19]
-
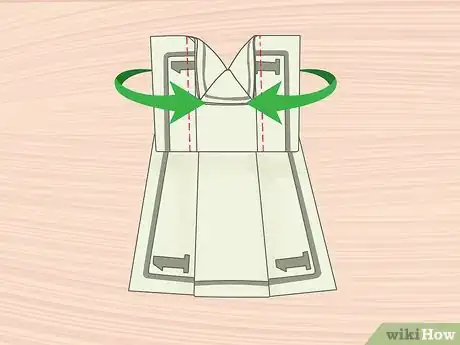
10Fold the edges of the bodice in. You should still be looking at the back of the dress. Pull in the long side of the bodice on the right side, folding it almost to the center. You'll need to crease the long edge, as well as a little diagonal edge near the waist. Do the same on the left side.[20]
- This step helps give shape to the dress.
-
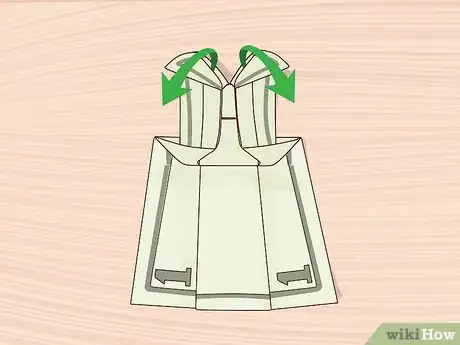
11Create the sleeves of the dress by folding out small triangles. On the right piece you just folded to the middle, fold the top corner out so it reaches beyond the edge of the dress, creating the sleeve on that side. Do the same for the left side.[21]
- Turn it back over, and you have a completed dress!
Community Q&A
-
QuestionHow do I straighten out a used bill?
 Community AnswerYou could try putting it under a stack of flat, heavy things, like books. Dictionaries usually work for this. If you don't have lots of books, then you could try putting heavy things on top one hardcover book (such as rocks).
 -
QuestionWhat holds the whole tree together?
 Community AnswerBy slotting the dollar bills together, they stay together in one piece.
 -
QuestionIs it illegal to fold money into origami shapes?
 Community AnswerMoney is officially property of the government, so damaging money could (in theory) be seen as destroying government property. But in reality, no one will mind, as long as you use your own money. Besides, you don't actually damage the money. It can still be unfolded and used.
References
- ↑ https://www.homemade-gifts-made-easy.com/money-origami-heart.html
- ↑ https://www.thestreet.com/video/14261327/happy-national-dollar-day-here-s-how-to-fold-a-dollar-bill-heart.html
- ↑ https://www.thestreet.com/video/14261327/happy-national-dollar-day-here-s-how-to-fold-a-dollar-bill-heart.html
- ↑ https://www.homemade-gifts-made-easy.com/money-origami-heart.html
- ↑ https://www.homemade-gifts-made-easy.com/money-origami-heart.html
- ↑ https://www.homemade-gifts-made-easy.com/money-origami-heart.html
- ↑ https://www.youtube.com/watch?v=6IW0w_xsMZY&feature=youtu.be&t=26
- ↑ https://www.youtube.com/watch?v=6IW0w_xsMZY&feature=youtu.be&t=66
- ↑ https://www.youtube.com/watch?v=6IW0w_xsMZY&feature=youtu.be&t=194
- ↑ https://www.youtube.com/watch?v=6IW0w_xsMZY&feature=youtu.be&t=216
- ↑ https://www.youtube.com/watch?v=Vow_s3DRTlo&feature=youtu.be&t=2
- ↑ https://www.youtube.com/watch?v=Vow_s3DRTlo&feature=youtu.be&t=14
- ↑ http://www.inklingsandyarns.com/2012/06/origami-dress-tutorial/
- ↑ https://www.youtube.com/watch?v=Vow_s3DRTlo&feature=youtu.be&t=55
- ↑ http://www.inklingsandyarns.com/2012/06/origami-dress-tutorial/
- ↑ https://www.youtube.com/watch?v=Vow_s3DRTlo&feature=youtu.be&t=129
- ↑ http://www.inklingsandyarns.com/2012/06/origami-dress-tutorial/
- ↑ https://www.youtube.com/watch?v=Vow_s3DRTlo&feature=youtu.be&t=154
- ↑ http://www.inklingsandyarns.com/2012/06/origami-dress-tutorial/
- ↑ https://www.youtube.com/watch?v=Vow_s3DRTlo&feature=youtu.be&t=149
- ↑ https://www.youtube.com/watch?v=Vow_s3DRTlo&feature=youtu.be&t=184
