wikiHow is a “wiki,” similar to Wikipedia, which means that many of our articles are co-written by multiple authors. To create this article, 24 people, some anonymous, worked to edit and improve it over time.
The wikiHow Video Team also followed the article's instructions and verified that they work.
This article has been viewed 299,299 times.
Learn more...
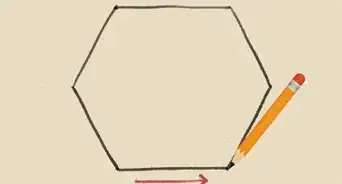
A hexaflexagon is a paper hexagon that is folded from a strip of paper. As the sides are flexed, or moved, they reveal more surfaces than a standard hexagon would. Like a hexagon, it still has 6 sides. Within the hexagon, there are 6 additional faces—as opposed to 2 faces on a standard hexagon shape.
Steps
Making the Initial Folds of a 6-sided Hexaflexagon
-
1Cut a strip of paper. Your strip should be at least 12 times as long as it is wide. Construction paper will hold the folds better than standard notebook paper.
-
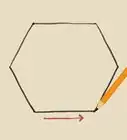
2Fold equilateral triangles into your paper. Equilateral means that all 3 sides are the exact same length. Make your first triangle by marking in about one knuckle. This will be the top point of your triangle. Make a diagonal fold, starting at this mark, with the long side of your strip. When you do so, you’ll see an equilateral triangle. There will be some excess paper on the top left of your triangle: cut this off. Open your fold to reveal an equilateral triangle.Advertisement
-
3Repeat this 19 times. You want to finish with a strip of paper that has 19 equilateral triangles. If you started with a rectangular strip, be sure to cut off the triangles from the edges—you’ll recognize them as being different because they won’t be equilateral.
- Try folding each triangle both ways to make flexing easier later on.
-
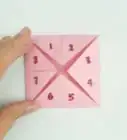
4Label your triangles 1-3. Flip your strip so that the first triangle is pointing upward. Label this “1.” Your next triangle is pointing downward: label this “2” and the next one “3.” Your next one is once again pointing downward, label it “1.” Continue labeling 1-3 all the way to the 18th triangle. You will have one extra triangle. This won’t get a number.
-
5Label your triangles 4-6. Flip over your strip. Skip the first triangle. The next triangle is pointing upward: label this “4.” The next triangle is also labeled “4.” The next two are both “5” and then the next two are both “6.” Repeat this pattern to the final triangle on your strip.
- You can color coordinate your triangles if it helps you identify which is which.
- The blank triangles are on opposite ends of the strip, on opposite sides.

Constructing the Hexaflexagon
-
1Fold your back numbers to face their partners. Take the first two “4” triangles and fold them into one another. Next, fold the two “5” triangles like this, then “6,” and so on down your entire strip. In effect, you’ve folded a flattened spiral.
- When you flip it over, your paper should read 1-2-2-3-3-1-1-2-2-3.
-
2Fold between the second set of 1’s and 2’s. With your strip flipped so that the lower numbers are toward you, find the second set of triangles that read 1-1 and 2-2. Make a fold between the two: you should fold the longer side under so that you’re looking at triangles “2,” “2,” and “3.
-
3Fold between your 1’s and 2’s again. When you made the last fold, you’ll notice that you made a cane shape. The corner of your cane is made up of four adjoining “2” triangles. Under your fourth one, make another fold: once again, folding the “1” toward the back. When you do this, slide the end above the end of the cane to cover the lone “3” triangle.
- Your product should now have 6 “2” triangles forming a hexagon and a “1” triangle as an extra flap on the top right of your hexagon.
-
4Glue your blank triangles together. Flip your hexagon over. The extra “1” triangle that is attached to the top should have a blank face on the back of it. You’ll see the other blank-faced triangle to the left of it. Fold it down and glue the pieces together.
- This is your end product. It should have the same outer shape as a hexagon, but have layers within.
Flexing Your Hexaflexagon
-
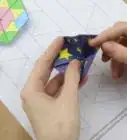
1Push the outer corners in. Start by pinching two triangles together along one of the edges. Do the same on the opposite side and push the corners toward each other.
-
2Open opposite triangles. Take the center of these triangles and open them to reveal the face of your hexaflexagon. If they refuse to open, try pinching an adjacent pair of triangles to loosen the folds.
-
3Try folding different sides. Now that you’ve seen how to open the hexaflexagon, try pinching different sides together to reveal all sides within. Faces 1, 2, and 3 will appear more often than 4, 5, and 6. Color or paste pictures on the six different faces and flex away.
Community Q&A
-
QuestionHow long should the paper be?
 Community AnswerThere is not an exact length it needs to be, but the strips should be approximately 1/12 as wide as they are long. You will need to cut off the extra triangles, however.
 -
QuestionDo I need to leave a side blank?
 Community AnswerNo. You add a symbol, letter, or just write the word glue. The side you glue can really have anything on it, but if you add a number, it might be confusing.
 -
QuestionWhere can I find the paper to make a hexaflexagon?
 Diamy WangCommunity AnswerYou can find it at most stores where school supplies are sold. You can use any type of paper. However, as stated above, construction paper is the most sturdy and is preferred.

About This Article
A hexaflexagon is a paper hexagon with all of the sides flexed to show more surfaces than a standard hexagon can. Start by cutting a strip of paper that’s at least 12 times as long as it is wide. Next, fold 19 equilateral triangles into your paper. Flip your strip over so the first triangle points up. Label it “1.” The next triangle, which should be pointing down, will be “2.” Continue labeling your triangles 1 through 3 until you get to the 18th triangle. Then, flip your strip over, skip the first triangle, and label the next triangle, which should be pointed up, “4.” Label the next triangle “4” too. The next two triangles should be labeled “5,” then the next two should be “6.” Repeat this pattern until you finish the strip. Now fold your back numbers to face their partners, so take the first two “4” triangles and fold them into each other. Fold between the second set of “1”s and “2”s twice to finish your hexaflexagon. To learn how to flex your hexaflexagon, keep reading!