X
wikiHow is a “wiki,” similar to Wikipedia, which means that many of our articles are co-written by multiple authors. To create this article, 17 people, some anonymous, worked to edit and improve it over time.
This article has been viewed 269,706 times.
Learn more...
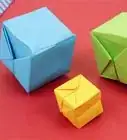
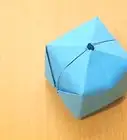
Origami is the Japanese art of paper folding. Few origami constructions require more than a piece of paper, making origami a wonderful hobby that is accessible to almost everyone. These instructions cover one of the most exhilarating pieces of art. The cube is a simple construction and should take no more than ten minutes to complete. The instructions include basic folds and abase that is common to many constructions.
Steps
-
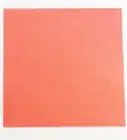
1Orient the paper into portrait alignment.
- You can also find a range of square origami paper on Amazon.
-
2Fold the bottom right corner upward so that the bottom edge is aligned with the left edge, and unfold. Then, repeat for the left corner.Advertisement
-
3Fold the top section of the paper down along the horizontal line formed by the tops of the Step 2-3 creases, and unfold.
-
4Cut along the Step 4 crease. Alternatively, lightly lick along the Step 4 crease and then carefully tear. You will not need the long rectangular strip.
Advertisement
Part 1
Part 1 of 3:
The Water Bomb Base
-
1Flip the paper over so that the Step 2-3 creases from the previous section are facing down and the paper is somewhat convex.
-
2Fold the bottom edge to the top edge, and unfold.
-
3Push the left and right edges toward the center until they meet, forming a tent-like shape. Flatten the tent-like shape along the existing creases.
Advertisement
Part 2
Part 2 of 3:
The Compressed Cube
-
1Fold the right vertex to the top vertex.
-
2Fold the right vertex of the resulting triangle to the center line.
-
3Insert the flap near the top vertex into the pocket along the top edge of the triangle formed in Step 3, and fold to secure.
-
4Repeat Steps 2-4 for the left side.
-
5Flip the paper over.
-
6Repeat Steps 2-5 for the now-front face.
-
7Fold the top triangular section down, and unfold.
-
8Fold the bottom triangular section up, and unfold.
Advertisement
Part 3
Part 3 of 3:
The Magic Final Steps
Community Q&A
-
QuestionAfter blowing, the cube is not taking shape. What did I do wrong?
 T. ChinsenTop AnswererThe paper used may either be too stiff or not stiff enough. Also, the folding needs to be precise, as it can affect how well it will shape out. With the help of a paper clip inserted into the hole, it is possible to nudge out the side walls and push it into shape.
 -
QuestionCan I attach string and a small origami box in such a way to make a hot air balloon or parachute? And would it be functional?
 Community AnswerThat would be a good way to make an origami hot air balloon. However, it would likely not be able to function because hot air balloons rely on fire, and paper is combustible.
 -
QuestionCan I make origami with construction paper?Community AnswerYou can, but it’s harder with the thick paper. Don’t use construction paper for harder origami because it is very hard to fold.
Advertisement
Things You'll Need
- 1 Piece of 8.5" x 11" printer paper (Feel free to use square origami paper. Then you can skip the first section, though you will need the folds from Steps 3-4.
- Scissors (optional)
About This Article
Advertisement