X
wikiHow is a “wiki,” similar to Wikipedia, which means that many of our articles are co-written by multiple authors. To create this article, volunteer authors worked to edit and improve it over time.
This article has been viewed 39,061 times.
Learn more...
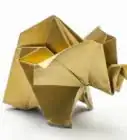
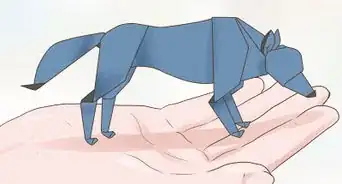
In the following wikiHow you will learn how to fold your own origami squirrel! It takes perseverance and patience but the end result is very satisfying.
Steps
Part 1
Part 1 of 7:
Making the Squirrel's Head
-
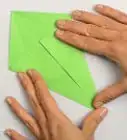
1Find a square piece of paper. A larger piece of paper usually makes this project easier. A recommended size is 8 inches by 8 inches. When making folds for origami, it helps to slide your thumb nail along the fold to make a really crisp fold. It also helps to have paper that is different colors on both sides to allow better differentiation between sides. The color of the paper is up to you as long as the shade of the color is different on each side.
-
2Cut the square piece of paper exactly in half. You will only need one of the halves for this squirrel. An easy way to achieve this is to fold the paper in half and cut along the fold. You can set one of the pieces to the side.Advertisement
-
3Fold the half of paper in half the long way.
-
4Unfold the paper and fold each edge of the paper in until the edges meet along the crease created in the center of the paper. Essentially, you are folding the paper into fourths.
-
5Fold the bottom corner of one side inward until the top edge lies against the middle crease. Repeat the fold on the adjacent corner. You should now have two small right triangles on one side that meet in the center of the paper, creating one point.
-
6Fold the point you just created towards the opposite end of the paper. The point created by the triangles should now be centered along the middle crease.
-
7Unfold all of the work done in the last two steps.
-
8Fold along the creases created in previous steps to create a small square at the end of the paper. This square will become the head of the squirrel.
-
9Pivot the small square you made in the previous step to the other side of the paper.
-
10Fold the bottom corner of the other end of the paper (opposite the square you just made) inward until the top edge lies against the middle crease. Repeat the fold on the adjacent corner, making two right triangles.
-
11Pivot the small square back to the original side it was on. Then, fold the entire paper in half along the center line.
-
12Push the front of the small square down, folding it on both sides until the center of the square points back along the folded center line of the paper. You just made the head of the squirrel.


Advertisement
Part 2
Part 2 of 7:
Making the Squirrel's Body
-
1Hold the paper by the end you just made the triangle on. Fold the longer straight part of the paper over in a right angle until the center line meets the edge of the fold created in the previous step.
-
2Fold the longer straight part of the paper under and up behind the shorter part of the paper.
-
3Unfold the work done in the previous two steps.
-
4Fold the longer straight part of the paper down to meet the vertical crease created earlier.
-
5Fold the longer straight part of the paper around and behind the fold created in the previous step.
-
6Unfold the work done in the previous two steps.


Advertisement
Part 3
Part 3 of 7:
Making the Squirrel's Tail
-
1Pinch the paper at the middle vertical crease and open the right side of the paper, folding it inward and downward until it is at a right angle to the other part of the paper.
-
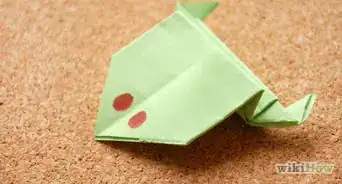
2Unfold the long end of the paper and rotate the end until it’s perpendicular to the body. This is the squirrel's tail. Fold the tail up to the crease created earlier. Next fold the triangle in on the tail as shown in the photos.
-
3Unfold the tail from the bottom so it folds towards the body, creating a kite shape with the tail.
-
4Flip the squirrel over and repeat the previous step on that side, folding the tail of the squirrel toward the body.


Advertisement
Part 4
Part 4 of 7:
Making the Squirrel's Feet


Part 5
Part 5 of 7:
Making the Squirrel's Ears, Nose, and Neck
-
1Take one side of the top of the head of the squirrel (the triangle on the left) and fold it down. Then fold up the corner of that piece. This will be the ear of the squirrel.
-
2Repeat the previous step with the other side of the squirrel's head to create the right ear.
-
3Fold over the tip of the squirrel's nose.
-
4Unfold the end of the squirrel’s nose and push the tip back, folding it in between the two sides of the squirrel’s head.
-
5Fold the back edge of the squirrel’s neck inward, folding the point at the base of the head underneath.
-
6Repeat the previous step with the other side of the squirrel.


Advertisement
Part 6
Part 6 of 7:
Making the Squirrel's Arms
-
1Fold the head of the squirrel down along its neck. The squirrel’s ears should point back toward the base of its tail. These creases are the beginning of the squirrel’s arms.
-
2Unfold what you just did.
-
3Fold the squirrel’s head back so that its ears point toward the tip of its tail.
-
4Unfold what you just did.
-
5Open up the front of the squirrel, pinch the top of its head and pinch below the two creases you just made. Push the head of the squirrel down gently. You should end up with one fold on each side of the squirrel. These form the arms of the squirrel.
-
6Create a crease right at the point where the squirrel’s back has a point. This is one of the more difficult steps. It will take some time to fold the edges crisply. It helps to open up the front of the squirrel with your finger, which will leave a small gap as shown in the fourth picture, while pushing in on the point of the back.
-
7Fold the left front edge of the squirrel’s midsection inward.
-
8Fold the right front edge of the squirrel’s midsection inward. Now your squirrel has well-defined arms!


Advertisement
Part 7
Part 7 of 7:
Finishing Up


Community Q&A
-
QuestionHow many times will it take to get it perfect?
 Community AnswerIt can vary from lots of times to only one time, depending on your experience and the environment that you are working in. If you are an experienced origami artist, then it might only take once or twice, however if it is a new skill, then it might take longer. If you don't get it perfect the first time, keep trying!
 -
QuestionWould I be able to make it into different animal body parts?
 Nick RollingCommunity AnswerUnfortunately no. Because these instructions are for an origami squirrel, they can only be used to make origami squirrel body parts. However, there are plenty of other origami animal creations that can be made. Just type whatever animal you would like to make along with the word origami in the wikiHow search box.
 -
QuestionWould this work with 8m x 8m cardboard?Nick RollingCommunity AnswerIt would be very difficult or perhaps impossible! Cardboard is hard to fold in general, and this project requires a lot of folds. It would also be difficult because of the large size of the cardboard, 8m is very big.
Advertisement
Things You'll Need
- Square piece of paper (preferably with different colors on each side)
About This Article
Advertisement