This article was co-authored by Yaffet Meshesha and by wikiHow staff writer, Jack Lloyd. Yaffet Meshesha is a Computer Specialist and the Founder of Techy, a full-service computer pickup, repair, and delivery service. With over eight years of experience, Yaffet specializes in computer repairs and technical support. Techy has been featured on TechCrunch and Time.
The wikiHow Tech Team also followed the article's instructions and verified that they work.
This article has been viewed 751,740 times.
This wikiHow teaches you how to change an external (USB) hard drive's format on Windows and Mac computers. Formatting a hard drive can change the file system to make it compatible with your computer's operating system, as well as fix any non-physical errors on the drive itself. Be aware that formatting a hard drive erases the drive's contents in the process.
Steps
On Windows
-
1Plug your hard drive into your computer. Insert the drive's USB cable into one of the thin, rectangular slots in your computer's casing.
- If you're using a desktop computer, USB ports are typically in either the front or the back of the computer's CPU box.
-
2Open Start . Click the Windows logo in the bottom-left corner of the screen, or press ⊞ Win on your keyboard.Advertisement
-
3
-
4Click This PC. It's on the left side of the File Explorer window.
-
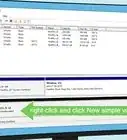
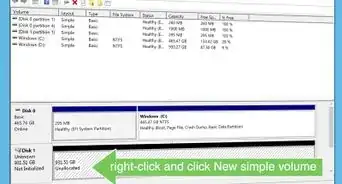
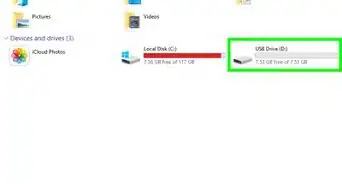
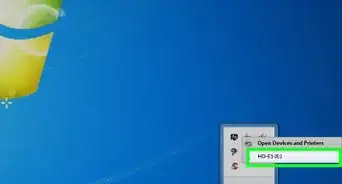
5Click your external hard drive's name. It's under the "Devices and drives" heading in the middle of the This PC window. Clicking the drive will select it.
-
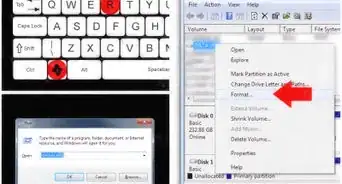
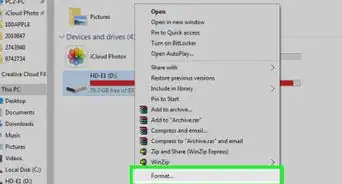
6Click the Manage tab. It's a menu item in the top-left side of the This PC window.
-
7Click Format. This flash drive-shaped icon is in the Manage toolbar near the top of the window. Clicking it opens the Format window for your external drive.
-
8Click the "File System" box. It's below the "File System" heading near the top of the page. Doing so prompts a drop-down menu with the following options:
- NTFS - Use this for Windows-only drives.
- FAT32 - Works on Windows and Mac, but has a storage limit of 32 gigabytes with an individual file size of 4 gigabytes.
- exFAT (Recommended) - Use this for hard drives you plan on using with multiple devices (Mac, Windows, console, etc.). Similar to FAT32, but has no storage limit.
-
9Select a format. Click the format you want to use to select it.
- If you've formatted your drive before, check the Quick Format box as well.
-
10Click Start, then click OK. Doing so prompts Windows to begin formatting your drive.
- Your external hard drive's files will be erased during this process.
-
11Click OK when prompted. Your external drive has now been reformatted to your selected file structure.


On Mac
-
1Plug your hard drive into your computer. Insert the drive's USB cable into one of the thin, rectangular slots in your computer's casing.
- If you're using an iMac, you may find the USB ports on the side of your keyboard or on the back of the iMac's screen.
- Not all Macs have USB ports. If you're using a newer Mac that doesn't come with USB ports, you'll need to purchase a USB-C to USB adapter.
-
2Open the Finder. It's the blue, face-shaped icon in the Dock.
- You can also just click the desktop.
-
3Click Go. This menu item is in the upper-left side of the screen.
-
4Click Utilities. It's near the bottom of the Go drop-down menu.
-
5Double-click Disk Utility. You'll find this in the middle of the Utilities page.
-
6Click your external hard drive's name. You'll see it in the window on the left side of the Utilities window.
-
7Click the Erase tab. It's at the top of the Disk Utility window.
-
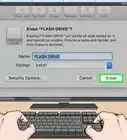
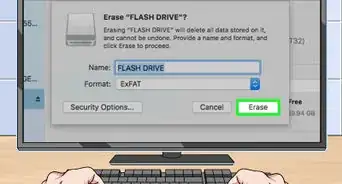
8Click the "Format" drop-down box. It's in the middle of the page. A drop-down menu will appear with the following format options:
- Mac OS Extended (Journaled) - The default Mac format. Only works on Mac.
- Mac OS Extended (Journaled, Encrypted) - Encrypted version of the default Mac format.
- Mac OS Extended (Case-sensitive, Journaled) - Version of the default Mac format that treats files with the same name differently if there are case differences (e.g., "file.txt" and "File.txt").
- Mac OS Extended (Case-sensitive, Journaled, Encrypted) - A combination of the three above formatting options for the Mac format.
- MS-DOS (FAT) - Works on both Windows and Mac computers, but has file size limit of 4 gigabytes.
- ExFAT (Recommended) - Works on both Windows and Mac computers. Has no storage limit.
-
9Select a format. Click a format you want to use.
-
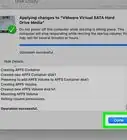
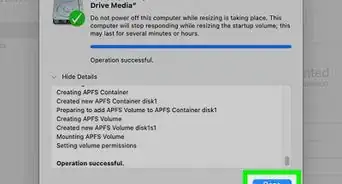
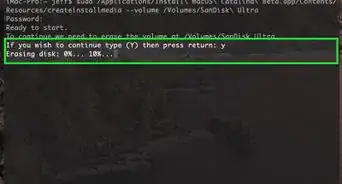
10Click Erase, then click Erase when prompted. Doing so will cause your Mac to begin erasing and reformatting your external hard drive. Once it finishes, your drive will be reformatted.


Expert Q&A
Did you know you can get expert answers for this article?
Unlock expert answers by supporting wikiHow
-
QuestionWhat does it mean to format a hard drive?
 Yaffet MesheshaYaffet Meshesha is a Computer Specialist and the Founder of Techy, a full-service computer pickup, repair, and delivery service. With over eight years of experience, Yaffet specializes in computer repairs and technical support. Techy has been featured on TechCrunch and Time.
Computer SpecialistFormatting means erasing all of the data off of a storage device so it can be used to store more data. Essentially, it's like a clean slate for your devices, in terms of its storage.
Support wikiHow by unlocking this expert answer.
-
QuestionCan I format an external hard drive to work for both Mac and windows? If so, how?
 Community AnswerYes, you can. You should format the external drive as either FAT 32 or exFAT. The former has an individual file transfer size limit of 4GB, and the latter doesn't have that limitation.
 -
QuestionHow do you format an external hard drive which says it can't be formatted?Community AnswerTry removing the external drive's partition in Disk Manager and setting up a new one.
Warnings
- Formatting does not destroy all data on hard drives. The format process prepares the drive to save new files. Typically, data must be overwritten on the disk or it can be recovered using recovery software.⧼thumbs_response⧽
- Formatting will erase all of your data. Back up any files you need to save before formatting a drive.[1]⧼thumbs_response⧽


References
- ↑ Yaffet Meshesha. Computer Specialist. Expert Interview. 22 September 2020.
About This Article

1. Connect the hard drive.
2. Open File Explorer.
3. Click This PC.
4. Click the drive once.
5. Click the Manage tab.
6. Click Format.
7. Select a file system.
8. Click Start.