This article was co-authored by wikiHow Staff. Our trained team of editors and researchers validate articles for accuracy and comprehensiveness. wikiHow's Content Management Team carefully monitors the work from our editorial staff to ensure that each article is backed by trusted research and meets our high quality standards.
The wikiHow Video Team also followed the article's instructions and verified that they work.
This article has been viewed 100,177 times.
Learn more...
There is nothing like the feeling of finishing a challenging puzzle! If you recently completed one, you may want to glue it together. You can use puzzle glue or adhesive sheets to glue your finished puzzle together. Once glued, you can display it in a nice frame or simply tack it to the wall!
Steps
Using Jigsaw Puzzle Glue
-
1Get liquid jigsaw puzzle glue. At your local arts and crafts store, you’ll see a choice between powder, spray on, and liquid glue. Unless you are comfortable mixing your own glue, it is best to choose the liquid variety.[1] Pick a size that is suitable for the size of your jigsaw puzzle.[2]
- You can also find jigsaw puzzle glue online.
- If you want to make your own glue, just mix one-part water with one-part white glue. Shake the mixture and you have puzzle glue![3]
- If you pick the 8 ounce (236 milliliter) bottle, you should be able to glue between 8 and 12 puzzles, depending on the size.
-
2Use parchment paper to avoid gluing the puzzle to the table. Cut a piece of parchment paper one inch (2.54 centimeters) larger than the size of your finished puzzle. By using parchment paper, you can avoid gluing your puzzle to the work table.[4]
- Although you may be tempted to use newspaper for this purpose, it is strongly discouraged. It will likely get stuck to your puzzle in the gluing process.
Advertisement -
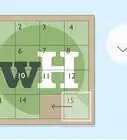
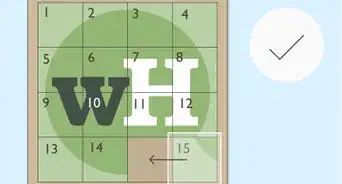
3Slide the parchment paper under the finished puzzle. Since you don’t want to disturb your finished puzzle, it is best to carefully slide the parchment paper underneath the puzzle. Align the shape of the parchment paper with the shape of the finished puzzle. Place one edge of the parchment paper underneath one edge of the puzzle and gently slide it underneath the puzzle.[5]
- You could ask a friend to hold the puzzle while you pull the parchment paper underneath.
-
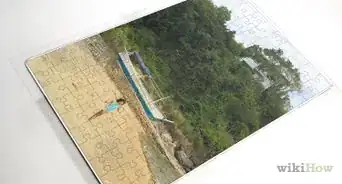
4Flatten the puzzle with a rolling pin. Since you’ll need the puzzle to be completely flat before applying any glue, you should make sure there are no edges sticking up or missing pieces. Use a rolling pin to press down any raised edges and to ensure the puzzle is completely flat.[6]
-
5Apply glue to the picture side of the puzzle. You can pour some glue directly onto the picture side of the puzzle. Alternately, you can use a brush to apply some glue to the puzzle. You should start with a small circle of glue, and then add more as needed.[7]
- Avoid adding too much glue at once, since it can lead to swelling.[8]
-
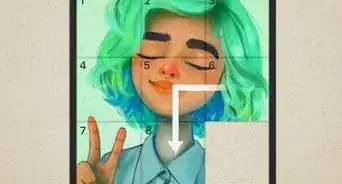
6Spread the glue evenly across the surface of the finished puzzle. Use your paint brush to spread the glue evenly across the picture side of the puzzle. If you don’t have a paintbrush, you can use a business card or a piece of cardboard to spread the glue. Make sure you cover all of the pieces of the puzzle![9]
- At this stage, you may see some air bubbles. This is fine, since they will go away when the glue dries.
-
7Let the glue bond and dry for 5 hours. Look on the bottle of glue to find out the drying time for your puzzle glue. Typically, it is around 5 hours. Let the puzzle dry completely.[10]
-
8Apply a second coat of glue. Use your paintbrush to apply a second layer of glue. Let it dry completely.[11]
-
9Apply glue to the back of the puzzle and let it dry. Slide the puzzle onto a piece of cardboard. Use the cardboard to flip the puzzle over onto the work table with the back of the puzzle facing up. Spread a thin layer of glue over the back of the puzzle. Let it dry completely. At this point, your puzzle should be sturdy and ready for display![12]


Using Adhesive Sheets
-
1Purchase puzzle adhesive sheets from a crafts store. You can find puzzle adhesive sheets at your local arts and crafts store or online. Choose the size that is recommended for the size of puzzle you have finished. If you can’t find the correct size, you can always choose a larger size and then cut the sheets to size.[13]
-
2Lay your finished puzzle upside down on a clean work table. Sandwich the puzzle between two pieces of cardboard. Holding the puzzle between the two sheets of cardboard, flip it upside down. Remove the top piece of cardboard. Then, use a rolling pin to flatten the surface of the puzzle. Make sure there are no pieces sticking up![14]
-
3Lay the adhesive sheets on the back of the puzzle. Starting on the left side of the puzzle, lay one sheet down at a time, working your way from left to right. Overlap the sheets by half an inch (1.27 centimeters), although more of an overlap is not a problem. Keep the edges of the adhesive sheets 1/8 inch (3.175 millimeters) away from the side of the puzzle.[15]
-
4Use a rolling pin to secure the adhesive sheets to the puzzle. Once the adhesive sheets are attached to the back of the puzzle, you can flatten everything out with a rolling pin. Then, you can remove the instructions that are attached to the back of the adhesive sheets.[16]
-
5Let the adhesive sheets bond to the puzzle. You’ll need to leave the puzzle for three hours, so that the adhesive sheets bond to the puzzle. After drying, you’ll be ready to display your puzzle![17]


Displaying Your Glued Puzzle
-
1Tack the puzzle to the wall with thumb tacks. Place the puzzle at an appropriate height and mark the corners with a pencil. Put the puzzle on the wall. Put a thumb tack in each of the four corners. Finally, erase the pencil marks.[18]
-
2Use foam core to mount your puzzle and prevent warping. Place your quarter inch (6.35 millimeter) foam core board on your work table. Put the finished, glued puzzle on top. Draw an outline around the edge of the puzzle, but try to mark a thin line that can be easily erased. Use a razor blade and a ruler to cut the piece of foam core to the correct dimensions. Spray the foam core with adhesive glue, and then place the puzzle on top.[19]
- You may want a second set of hands to properly center the puzzle on the foam core.
- Spray the adhesive glue in a well ventilated area.
- The puzzle needs to be glued together prior to mounting.
-
3Ask a crafts store to mount your puzzle to backer board. Mounting to backer board prevents warping. Your local craft store may offer this service, which involves attaching the puzzle directly to a piece of backer board with special adhesive.[20]
-
4Get the puzzle framed. If you plan to keep the puzzle on your wall for a long time to illustrate your accomplishment, you may prefer to get the puzzle framed. You could take the puzzle to a local framer. You could also pick up an inexpensive poster frame from a poster or photography store.[21]


Community Q&A
-
QuestionHow do I store a puzzle without a frame after it has been Mod-Podged?
 Beth H.Community AnswerDepending on the size of the puzzle, an empty pizza box is great for storing the puzzle. You also might use frame boxes; just ask a frame store for some of its leftover boxes.
 -
QuestionHow can I frame my puzzle and still be able to take it apart?
 Community AnswerComplete your puzzle on the frame: remove the glass, work on the back of the frame if it is wood or cardboard. If it is a large frame, use sticky foam. Cut the foam to final size of puzzle (it will be the backing later), and complete the puzzle there. When finished, return the glass and frame it tightly. You will be able to remove the pieces if desired.
 -
QuestionCan I use a regular school glue to glue a finished puzzle?
 Community AnswerUse 50% school glue and 50% water. Make sure it is mixed well. Put the mixture in a jar or bottle and shake well.
Warnings
- Avoid using glue on metallic puzzles or puzzles with glossy or lenticular finishes. Instead, try Puzzle Presto, an adhesive paper that you apply to the back of the puzzle to hold it together in preparation for mounting.⧼thumbs_response⧽
- Avoid using too much glue as this can cause your puzzle to swell or peel.⧼thumbs_response⧽


References
- ↑ http://www.puzzlewarehouse.com/how-to-glue-and-mount-a-puzzle/
- ↑ http://modpodgerocksblog.com/2017/03/how-to-use-puzzle-glue.html
- ↑ http://www.doityourselfdivas.com/2011/09/diy-mod-podge.html
- ↑ http://www.puzzlewarehouse.com/how-to-glue-and-mount-a-puzzle/
- ↑ http://www.puzzlewarehouse.com/how-to-glue-and-mount-a-puzzle/
- ↑ http://www.puzzlewarehouse.com/how-to-glue-and-mount-a-puzzle/
- ↑ http://ourpastimes.com/puzzle-together-using-mod-podge-4601343.html
- ↑ https://www.jigsawjungle.com/glue-your-puzzle
- ↑ http://ourpastimes.com/puzzle-together-using-mod-podge-4601343.html
- ↑ https://www.jigsawjungle.com/glue-your-puzzle
- ↑ http://ourpastimes.com/puzzle-together-using-mod-podge-4601343.html
- ↑ http://ourpastimes.com/puzzle-together-using-mod-podge-4601343.html
- ↑ http://betweennapsontheporch.net/how-to-save-or-frame-a-jigsaw-puzzle-without-using-messy-glues/
- ↑ http://betweennapsontheporch.net/how-to-save-or-frame-a-jigsaw-puzzle-without-using-messy-glues/
- ↑ http://betweennapsontheporch.net/how-to-save-or-frame-a-jigsaw-puzzle-without-using-messy-glues/
- ↑ http://betweennapsontheporch.net/how-to-save-or-frame-a-jigsaw-puzzle-without-using-messy-glues/
- ↑ http://betweennapsontheporch.net/how-to-save-or-frame-a-jigsaw-puzzle-without-using-messy-glues/
- ↑ http://ourpastimes.com/puzzle-together-using-mod-podge-4601343.html
- ↑ http://www.puzzlewarehouse.com/how-to-glue-and-mount-a-puzzle/
- ↑ http://www.puzzlewarehouse.com/how-to-glue-and-mount-a-puzzle/
- ↑ http://betweennapsontheporch.net/how-to-save-or-frame-a-jigsaw-puzzle-without-using-messy-glues/
- ↑ http://www.puzzlewarehouse.com/how-to-glue-a-puzzle/
About This Article