This article was co-authored by Katie Gohmann. Katherine Gohmann is a Professional Gardener in Texas. She has been a home gardener and professional gardener since 2008.
There are 8 references cited in this article, which can be found at the bottom of the page.
This article has been viewed 63,949 times.
A greenhouse can be an ideal environment for growing orchids. Greenhouses allow you to control the climate in such a way that you can imitate an orchid’s natural environment. This involves appropriately caring for both your greenhouse and your orchids. By carefully monitoring the temperature, humidity, and lighting of your greenhouse, you can create a perfect home for your orchids. By watering and feeding your orchids consistently, they will surely thrive.
Steps
Preparing Your Greenhouse
-
1Choose the right size. If you are installing a new greenhouse, it is preferable to build one that is at least 14 ft (4.3 m) wide by 16-20 ft (4.9-6.1 m) long. This will allow enough space for your orchid collection to grow and will allow space to display your collection with benches and other materials. This will save you money in the long run so that you don’t have to add extensions.[1]
-
2Pay attention to light. You will want your greenhouse to get consistent light with at least 6 hours of sun per day. Don’t install it near trees or buildings that provide a lot of shade. You can easily reduce light with window coverings but it is harder and more expensive to add light. It is great to have one facing north to south so that the sun travels across the whole length of the greenhouse. A greenhouse professional will be able to help you with this.[2]
- You can install artificial lighting, if needed.. Fluorescent lights are the most economical. You can get ones that are 2 ft (0.61 m) wide by 4 ft (1.2 m) long to provide adequate lighting.
- Try using a 50/50 mix of cool white and warm white tubes as bulbs because they are bright and inexpensive. You can get them for around $10.
- Gro-Lux tubes more closely resemble the spectrum of light in natural sunlight, but are much more expensive. They can cost around $60.[3]
- Consider whitewashing the windows of your greenhouse to prevent your orchids from getting sunburnt. Whitewash is a mineral substance that can be painted onto windows. It is often made of a hydrated lime (calcium hydroxide) solution.
- Whitewashing adds partial opacity and can also be removed if you no longer want it. It will allow light to enter without being too direct or scorching.
Advertisement -
3Set up benches to display orchids. Consider using benches that are 30 in (76.2 cm) tall by 33 in (83.8 cm) wide. If placing a bench in the center of the room, you can double this width. Make sure the benches’ material is moisture resistant, such as treated lumber, aluminum, or steel. [4]
- Make sure air is able to circulate through the top of the benches. This can be accomplished by adding aluminum mesh or redwood/cypress strips. Besides allowing for air circulation, this will also allow adequate drainage.
- If you need additional space for your orchids, wall mounts or hanging displays are a good option. They add visual interest by creating varied levels of height. This way you can truly be surrounded by your orchids.[5]
-
4Monitor the temperature. Most orchids need temperatures of 60-80 degrees Fahrenheit (15.5-26.6 degrees C) during the day, and 45-65 degrees Fahrenheit (7.2-18.3 degrees C) at night. In order to be a successful greenhouse grower of orchids, these temperatures should be closely maintained. Install a thermometer in your greenhouse to keep track of the temperature.
- Although it may be possible to get away with slightly higher night temperatures, never exceed the higher day temperatures or the orchids will not cope well.
- If you do wish to grow orchids from different climatic zones, try dividing your greenhouse to maintain different temperature levels.
- Make sure that you have a heating system if you live in an area that gets colder than 45 degrees Fahrenheit (7.2 degrees C). You can use any kind of heating system, including steam, solar, circulating hot water, or natural gas.[6]
- On the other hand, if you live in a very warm climate, you will need a cooling system. This usually is not necessary because ventilation is able to regulate temperature on extra warm days.[7]
-
5Adjust ventilation. In nature, orchids generally come from areas that have consistent, gentle winds. Ventilation is key to allowing your orchids to thrive. To provide appropriate airflow, use ceiling fans and oscillating fans. Keep the fans clean to avoid spreading disease. Ceiling fans move a high volume of air and allow you to change their speed.[8]
- Oscillating fans change airflow pattern to cover large areas without drying out your orchids.
- Use side and roof vents for increased ventilation. These are manually operated and a simple way to improve airflow.[9]
-
6Modify humidity. Humidity is absolutely necessary for orchids to grow well. Humidity should be at about 50 to 80 percent. Keeping a larger number of orchids will help increase humidity. If your greenhouse is not humid enough, use a humidifier.[10]
- If you aren’t sure about the humidity levels of your greenhouse, buy a hygrometer from a home improvement store to test your levels and adjust your humidity accordingly.


Preparing Your Orchids
-
1Choose a pot. Consider using a clear pot to monitor root progress. Three gallon pots work best to allow adequate space for the roots to grow. Make sure the pot has drainage holes so that excess water and mineral buildup can escape.[11]
- Choose an orchid pot, which can be found with the terracotta pots at garden shops.
-
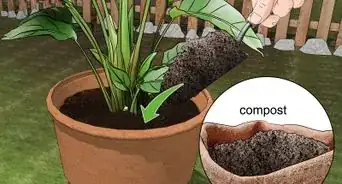
2Fill each orchid’s pot halfway with a potting medium. Use a material such as moss, bark, coconut fiber, sifted perlite, granular charcoal, cork, or rockwool. The purpose of the potting medium is to hold up the plant. Soil should not be used because it can damage orchids. Buy an orchid potting medium instead at your local gardening store.[12]
-
3Plant the orchid. Place the orchid on top of the potting medium and fill the rest of the pot with potting medium. Pack firmly around the orchid to keep it in place. The same method works for planting seeds or replanting already-grown orchids.[13]
-
4Start with easier orchids. Certain types of orchids are easier to grow. Consider starting out growing Cattleyas, Phalaenopsis, Paphiopedilums, and Cymbidiums. They are beautiful and among the least finicky.
- Cattleyas are the standard orchid that most people are familiar with. They like average temperatures around 65-78 degrees Fahrenheit (18.3-25.5 degrees C) during the day and 55-62 degrees Fahrenheit (12.8-16.6 degrees C) at night. They like a lot of light, so west and south facing windows will give them the best light levels.


Caring for Your Orchids
-
1Pay close attention to your orchids’ progress. Leaves are a key indicator of the health of your orchids. If they are not getting adequate light, leaves will likely be dark green and will not flower. Additionally, the distance between the leaves will usually increase. If caught early, leaf damage will not necessarily destroy the plant, but serve as an indicator to change conditions.[14]
- If your orchids are getting too much light, their leaves will turn a yellow-green or even look reddish. The leaves can even get round sunburn spots if they are overheating.
-
2Water when dry. When the potting medium is dry, it is time to water your orchids. They should be checked daily. If leaves appear shriveled, this is another sign that they need more water. Be careful not to overwater orchids. They tolerate being dry better than being drenched.[15]
- To prevent overwatering, make sure your pot has adequate drainage holes.
- Make sure there aren’t too many dissolved salts in your water and that its pH level is neutral or slightly lower. Sodium should not be greater than 25 ppm.
- Quality water is important in caring for your orchids. For best results, mist your orchid daily with bottled, filtered, or distilled water.
-
3Apply fertilizer. Consider using a water-soluble fertilizer for best results. The type of fertilizer depends on your type of potting medium. Add fertilizer to the water every three of four waterings. The fourth watering should be fertilizer-free to flush the pot and remove excess mineral buildup from roots.
- For bark, use a high nitrogen fertilizer with a 3-1-1 ratio of nitrogen-phosphorus-potassium. Make sure the nitrogen is urea-free because the orchid is not able to use urea-based nitrogen.
- For charcoal-perlite or rock, use a 1-1-1 ratio.
-
4Clean up the flowering stems. When the orchid is done blooming, cut the ends of the stems. This will help them to grow in the future. If you aren’t sure whether it is done blooming, it is best to wait because certain kinds of orchids produce a second crop of flowers.[16]
-
5Be aware of the temperature requirements of your orchid choices. You will need to know what climate region your type of orchid comes from in order to replicate the right temperature for them. This makes mixing types of orchids a little tricky, so try to stick with one temperature region. Orchids can be roughly divided into three main climate types: cool, intermediate, and warm.
- Cool: cool climate orchids are used to minimum winter night temperatures of 45º F (7º C) and a maximum summer's night temperature of 57º F (14º C).
- Intermediate: these orchids like a minimum winter night temperature of 50º F (10º C) and a maximum summer's night temperature of 64º F (18º C).
- Warm: warm climate orchids like a minimum winter night temperature of 57º F (14º C) and a maximum summer's night temperature of 72º F (22º C).[17]
-
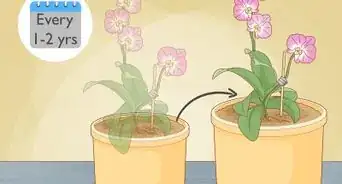
6Repot orchids every two years. The potting medium will break down during this time which will cause the roots to be restricted. Remove the orchid from the pot and remove all potting material from the orchid and root system, as well as any dead roots. Fill your pot halfway with a potting medium, add the plant, and cover with more potting medium. Press the potting medium down firmly so that the plant is securely supported.[18]
- f the plant still fits comfortably in the same pot, you can reuse it.
- If your orchid has outgrown its pot, it is time to transfer to a larger pot. Try the next size up, but don't go too large or the potting medium will dry too slowly.[19]
-
7Prepare greenhouse orchids for new seasonal growth. At the end of the flowering season, orchids go into a resting period during winter/cooler weather months. Keep a resting orchid in full light, dry and un-misted until the first growth shows in spring. Follow any instructions as given for individual orchids as well, which may differ depending on where they have been sourced from.


Expert Q&A
-
QuestionI just finished building my greenhouse for my cymbidiums, can I use screen for the roof?
 Katie GohmannKatherine Gohmann is a Professional Gardener in Texas. She has been a home gardener and professional gardener since 2008.
Professional GardenerHeat will be able to escape through a screen, making your greenhouse a lot less useful. Typical wall materials for greenhouses include polycarbonate, fiberglass, Lexan, and plastic tarp, in addition to glass. For a rundown on each, check out this article: http://www.aos.org/AOS/media/Content-Images/PDFs/HobbyGreenhouses.pdf -
QuestionWhat grade of roofing material?
 Community AnswerGreenhouse roofs should be clear to allow light to enter. The most common materials are glass, polyethylene film, double-layered panels of polycarbonate or acrylic, and fiberglass panels or sheeting.
 -
QuestionWhat is the classification of orchids?
 Community AnswerOrchids belong to the Orchidaceae family and the Orchis genus.
Warnings
- Don’t overwater orchids. When in doubt, they would rather be too dry than too wet.⧼thumbs_response⧽
Things You'll Need
- Greenhouse
- Orchids
- Thermometer/thermostat for adjusting temperatures
- Misting system
- Fans

-Step-8.webp)


-Oven-Step-15.webp)

References
- ↑ http://www.aos.org/orchids/additional-resources/greenhouses.aspx
- ↑ http://what-when-how.com/orchids/providing-the-right-growing-environment-orchids/
- ↑ http://what-when-how.com/orchids/providing-the-right-growing-environment-orchids/
- ↑ http://www.orchidsmadeeasy.com/orchid-greenhouse/
- ↑ http://www.orchidsmadeeasy.com/orchid-greenhouse/
- ↑ http://www.orchidsmadeeasy.com/orchid-greenhouse/
- ↑ http://www.orchidsmadeeasy.com/orchid-greenhouse/
- ↑ http://what-when-how.com/orchids/providing-the-right-growing-environment-orchids/
- ↑ http://www.aos.org/blog/general/growing-orchids-in-a-greenhouse.aspx
- ↑ http://www.gardenguides.com/123019-grow-orchids-greenhouse.html
- ↑ http://www.telegraph.co.uk/gardening/gardeningadvice/11255250/How-to-grow-orchids.html
- ↑ http://www.gardenguides.com/123019-grow-orchids-greenhouse.html
- ↑ http://www.gardenguides.com/123019-grow-orchids-greenhouse.html
- ↑ http://what-when-how.com/orchids/providing-the-right-growing-environment-orchids/
- ↑ http://www.gardenguides.com/123019-grow-orchids-greenhouse.html
- ↑ http://www.gardenersworld.com/how-to/grow-plants/how-to-grow-orchids/
- ↑ David Squire, The Little Book of Orchids, p38, ISBN 1-85833-100-5
- ↑ http://www.telegraph.co.uk/gardening/gardeningadvice/11255250/How-to-grow-orchids.html
- ↑ http://www.telegraph.co.uk/gardening/gardeningadvice/11255250/How-to-grow-orchids.html
About This Article


-Step-8.webp)