This article was co-authored by Ryaan Tuttle. Ryaan Tuttle is a Home Improvement Specialist and the CEO of Best Handyman, Inc. in Boston, Massachusetts. With over 17 years of experience, he specializes in building home service businesses, focusing on creating scalable and efficient brands. With the help of his global team, the companies have achieved over 10+ million in sales and received recognition through magazine features, and enjoy partnerships with wikiHow and Jobber field service software. Boston Magazine and LocalBest.com have named Best Handyman Boston the Best Handyman in Boston. Ryaan holds Construction Supervisor and Home Improvement Contractor Licenses.
This article has been viewed 55,945 times.
Skylights offer a way to bring more natural light into a room and help it feel more spacious. They can also help keep a house cooler by allowing hot air to escape. Most skylights are installed in an attic or ceiling, and by following a few steps you will be on your way to having a house with a skylight.
Steps
Preparing the Roof
-
1Measure the slope, or pitch, of your roof. Most skylights are manufactured with specific roof pitches in mind. It is important to measure the pitch of your roof before purchasing your skylight. Use a level with a ruler on the side to measure the roof run and height to calculate the pitch of your roof.
- From the side of the house measure from the corner along the wall 12 inches (30.5 cm) and mark the spot with a pencil. Make sure that this line is level using the bubble on your level. Then use a tape measure to measure the distance between the mark and the underside of the roof. Your roof ratio will be this vertical length divided by 12 (for 12 inches).
- Some skylights are also designed specifically for use on corrugated metal roofs.
-
2Mark the location for the skylight from the inside. While inside your house mark the location of choice in the wall.[1] Use a hammer to make a small hole in the ceiling in the chosen location. This way you can check if there is any special plumbing or electrical wires at this location.
- If there is anything in the way, it is usually easier to simply choose a new place for the skylight. Otherwise, it is possible to re-route plumbing and wires around the location.
- The opening should fit in between 2 rafters to prevent structural damage.
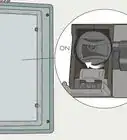
- If you are installing a skylight on a corrugated metal roof then it should be positioned just below the lap of the roofing and aligned with the grooves on the skylight fins.
Advertisement -
3Cut through the ceiling from inside. If you have significant space between the ceiling and roof or have an attic to push through then you will have to cut the ceiling from the inside. Otherwise you should be able to make one cut from the top of the roof through all the layers.
- Remove any drywall and insulation you cut through.
-
4Drive four screws from the inside through the roof. After you make sure there is no plumbing or wires in the way and cut a hole in the ceiling you should drive four deck screws through the roof at each corner.[2]
-
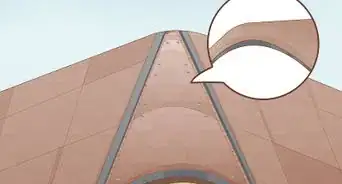
5Go up to the roof and remove shingles from the area. Strip the shingles from the rectangle plus at least 7 inches (18 cm) on each side. This way you won’t cut through and damage the shingles and therefore can use them again later after installing the skylight.[3]
-
6Mark the sides of your skylight and make the cuts. Use chalk line between each of the four screws to mark a rectangle where you will cut through the roof. Use a circular saw to cut through three of the sides of your rectangle.
- Be careful not to put weight on the cutout.
- These roof cuts are not reversible so make sure they are accurate.
- If making cuts on a corrugated metal roof you will need a special blade to cut metal.
-
7Cut through the fourth edge of your cutout. Have someone hold the cutout up from the inside while you make the fourth cut. This prevents the cutout from falling and damaging your floor or furniture.


Inserting the Skylight
-
1Prepare the opening. There are two types of skylight: those that have a frame in place and those that are mounted on a curb. For those that have a frame in place, the sheathing is a layer that will fit beneath your skylight to help prevent water leaks. For curb-mounted skylights you will need to secure two by sixes (5 cm by 15 cm) along the edges of the opening.
- To attach the sheathing for frame in place skylights, nail it down around the perimeter of the opening on top of the roof.[4] Then attach a strip of self-adhesive membrane along the bottom edge of the opening. One inch (2.5 cm) of this adhesive should be folded over the edge into the opening of the roof.
- To create the curb for curb-mounted skylights you must measure the sides of the opening and cut four 2x6s (5 cm by 15 cm) to fit along the upper edges. Nail the four pieces together into the shape of a rectangle. Make sure this box is square and then toenail it into place around the roof opening. Toenailing involves driving the nails in at an angle to securely attach the curb to the roof.[5]
-
2Pass the skylight's frame through the rough opening to get it onto the roof. Ask someone to hold the frame from the inside of the opening and bring it through the opening onto the roof. This way the skylight is secure and reduces the chance of dropping it or causing damage to the window.
- Be careful when working with the skylight at this point so that you do not damage it.
-
3Lower the skylight into place. Rest the skylight against the bottom edge of the opening first and then lower the light onto the roof. If the skylight is curb-mounted then you will need to lift window over the curbs and rest it on top of the sills.
- Skylights for corrugated metal must be slid under the upper flap of the roof. To slide it under the top flap of roof you will need to make two cuts in the roofing so that the skylight can be slid into location. This protects the roof from water leakage.
-
4Secure the skylight to the roof. Put 2-inch (5 cm) screws through the metal brackets on the frame's sides. Drive the screws through the skylight's neighboring rafters for frame in place skylights. Curb-mounted skylights will be attached directly to the curb.
- Skylights in corrugated metal roofs will be secured with 1 ¼ inch (31 mm) self-tapping sheet metal screws at 3 inch (7.5 cm) intervals.


Preventing Water Leakages
-
1Staple roofing felt onto the roof all around the skylight's edges. Staple 18 inch (46 cm) wide roofing felt onto the roof up close to the edges of the skylight. Make sure it surrounds the entire perimeter of the skylight.
-
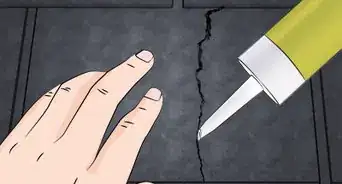
2Add the membrane around the edges of the skylight. Some skylights will recommend a membrane around the edges of the skylight frame or curb that extends 6 inches (15 cm) past the skylight’s sides. This membrane will act a little like tape and will provide another barrier against leaks.
- Start at the bottom edge when applying the membrane.
- Allow the ends of the membrane to extend past the corners. Then cut the membrane at a 45 degree angle from both corners to create two points. Secure the bottom point to the roof and the top point around the corner of the skylight frame.
- After applying the membrane on the bottom, put it on the sides and then last on the top edge of the skylight.
- Skylights in corrugated roofs should be sealed using roofing-grade silicone sealant. Apply a generous amount of sealant around the opening 1 inch (2.5 cm) from the edges.[6]
-
3Replace the shingles you removed earlier. Nail the roof shingles back into place on top of the membrane around the edges of the skylight.[7] Don’t worry about the nails going though the membrane because the membrane will seal around them.
-
4Attach the bottom sill of the flashing. The bottom sill will be a U-shaped metal piece that slips over the bottom of the skylight. Nail it to the side edges of the frame or curb of the skylight. The roofing felt and step flashing helps keep water from leaking around the skylight.
- The bottom sill flashing for skylights with a frame in place will be nailed directly to the roof at the top outside corners of the sill.
- The flashing of curb-mounted skylights will never be nailed to the roof. These flashings should only be nailed to the sides of the curb.
-
5Put shingles over the edges of the sill. Add shingles over the exposed edges of the bottom sill flashing.
-
6Add the rest of the step flashing along the sides. Overlap the top half of the shingles covering the bottom sill with one of the L-shaped step flashing pieces. Nail it in on the top outside counter and cover with a shingle. Continue with the rest of the step flashing.
- For the next piece, overlap the next step flashing piece on top of the shingle, again securing with a nail on the top outside corner. Place another shingle on top of that step flashing piece.
- Continue alternating step flashing pieces and shingles on both sides of the skylight.
-
7Cover with the counterflashing. The counter-flashing will either surround all four sides or just be on the sides of the skylight. This is essential for preventing water leaks through your skylight so be careful to install the counterflashing correctly.
- The counterflashing should simply snap into place.
- Counter-flashing is essential for protecting against wind-blown rain and snow.
-
8Add the saddle flashing. The saddle flashing is the top flashing piece that will cover your skylight. Lift up the top layer of shingles and slide the saddle flashing into place. Nail this piece into place underneath the shingles. Then add a layer of shingles on top of the flashing, making sure to leave 4 inches (10 cm) exposed.


Finishing the Light Shaft
-
1Create a frame for the roof and ceiling openings. Measure the sides of the openings and create frames from 2x4 (4 x 10 cm) lengths of wood. Attach them to the roof and ceiling to hold the rest of the light shaft frame in place.
-
2Cut four 2x4s to fit between the corners of the skylight and ceiling openings and nail them into place. These four 2x4 (5x10 cm) pieces of wood will form the basic frame for the light shaft. Cut the pieces so that they are the correct length to fit between the corresponding corners of the openings and nail them into each of the corners.
- You will likely need to cut the ends at an angle to fit securely against the ceiling and roof surfaces.
-
3Add additional beams so that the width between each beam is about 16 inches (40.5 cm). Add additional beams between the frames of the ceiling and roof. These will be the studs for your drywall installation.
- Again use 2x4s (5 x 10 cm) to create these beams and nail them into place.
-
4Nail in rigid foam insulation around the outside of the shaft. While in the attic, nail rigid foam insulation around the outside of the light shaft frame you have just created.
-
5


Expert Q&A
-
QuestionHow do you support a skylight?
 Ryaan TuttleRyaan Tuttle is a Home Improvement Specialist and the CEO of Best Handyman, Inc. in Boston, Massachusetts. With over 17 years of experience, he specializes in building home service businesses, focusing on creating scalable and efficient brands. With the help of his global team, the companies have achieved over 10+ million in sales and received recognition through magazine features, and enjoy partnerships with wikiHow and Jobber field service software. Boston Magazine and LocalBest.com have named Best Handyman Boston the Best Handyman in Boston. Ryaan holds Construction Supervisor and Home Improvement Contractor Licenses.
Home Improvement SpecialistTypically, you'll have double headers that are installed with joist hangers.
Warnings
- Know what material your home is constructed of. If your walls contain masonry and not just drywall, different equipment will be needed to cut a hole in your ceiling.⧼thumbs_response⧽
- Always use a harness to attach yourself to the roof while working up there.⧼thumbs_response⧽
Things You'll Need
- Skylight
- Tape measure
- Drywall saw
- Drywall knife
- Circular or reciprocating saw
- 2x6 boards
- Nails
- Hammer
- Shovel
- Screws
- Construction stapler and staples
- Roofing felt
- Step flashing
- Drill
- Interior frame
- Ladder
- Drywall
- Primer
- Paint


References
- ↑ Ryaan Tuttle. Home Improvement Specialist. Expert Interview. 24 September 2021.
- ↑ http://www.thisoldhouse.com/toh/how-to/intro/0,,20696957,00.html
- ↑ Ryaan Tuttle. Home Improvement Specialist. Expert Interview. 24 September 2021.
- ↑ Ryaan Tuttle. Home Improvement Specialist. Expert Interview. 24 September 2021.
- ↑ http://www.doityourself.com/stry/h2addskylight#b
- ↑ http://homeguides.sfgate.com/put-skylight-corrugated-metal-roof-34427.html
- ↑ Ryaan Tuttle. Home Improvement Specialist. Expert Interview. 24 September 2021.
- ↑ http://www.popularmechanics.com/home/improvement/interior/how-i-did-it-installing-a-skylight#slide-6
- ↑ Ryaan Tuttle. Home Improvement Specialist. Expert Interview. 24 September 2021.
About This Article

To install a skylight, start by cutting a hole through the roof and ceiling from the outside that's large enough to hold the skylight. Next, drive 4 deck screws through the roof from the inside to hold the skylight in place. Then, lay sheathing around the hole to prevent water leakages before inserting the skylight. Afterwards, screw in the metal brackets that are on the frame to secure it into the roof. Finish by stapling roofing felt around the skylight for extra protection against leaks. For tips on how to make a window frame for the inside of the skylight, keep reading!