This article was co-authored by Benjamin Hansen. Benjamin Hansen is a Landscape Contractor and the Owner of Artscape Gardens, a boutique landscaping company in Los Angeles, California. With over 12 years of experience, Benjamin specializes in transforming properties into aesthetic, functional, and drought-tolerant oases. Benjamin uses color scheme, dimension, and water conscious spaces to inspire the design and installation of soft scape, hardscape, patios, pathways, irrigation, drainage, fencing, concrete, lighting, and electrical work. Artscape Gardens covers all areas of the C-27 landscape contractor classification.
There are 8 references cited in this article, which can be found at the bottom of the page.
This article has been viewed 102,240 times.
A new shed is a great asset but it can cause a lot of problems if it's not placed on level ground. If you're worried about the ground where you want to place your shed being unsteady, it's relatively easy to make the area level in a matter of hours with the right tools. You can do this by plotting the area of your shed with wooden stakes and removing the topsoil from the area with a shovel. Make sure the subsoil is level and add the topsoil back in. Fill the rest of the hole with pea gravel and place your blocks and wooden posts on top of the pea gravel.
Steps
Doing the Groundwork
-
1Gather the basic materials. To level the ground for a shed, you'll need plenty of different materials, all of which you can buy at the local hardware store. The basic tools you need are a hammer, screws, a drill, a shovel, a rake, a spirit level, measuring tape, a ground tamper, a pencil, and string.[1]
- You will also need 2 4 in (10 cm) by 4 in (10 cm) posts that are the same length as your shed and 2 4 in (10 cm) by 4 in (10 cm) posts that are the same width as your shed.
- Get a long, flat plank of wood that you will use to make sure the ground is level.
- Get hardened steel, structural, No.9, 2.5 in (6.4 cm) long screws.
- You'll want to make sure that there'll be drainage without any problems for your shed.[2]
-
2Calculate how much pea gravel and how many mason blocks you need. The amount of these items you'll have to get depends on the size of your shed. The larger your shed, the more pea gravel you'll need to fill the foundation hole. The same goes for the mason blocks.
- To find the amount of pea gravel you need, multiply the length of your shed by the height of the hole (3 in (7.6 cm)) by the width of your shed.
- You will need enough mason blocks to lay around all 4 walls of the shed, so find the perimeter of the shed, and divide it by the length of each block to determine how many you need.
Advertisement -
3Pick a relatively level area for your shed. Putting a shed on a hill or another slanted area is a very difficult process that might require heavy machinery. You will find it much easier to level a relatively flat area.[3]
- Avoid areas with standing water because this will cause a lot of problems for your shed. The water will soften the soil over time and the weight of your shed will cause the soil to shift even more. This could cause big structural problems for your shed.
-
4Mark out the area of your shed base using wooden stakes. Find the measurements for the base of your shed on the side of the packaging. If you're making a shed from scratch, decide the measurements you want for your shed. Use a measuring tape to mark out this area on the ground. Plant wooden stakes at all 4 corners of the shed base.[4]
- For example, if your shed is 15 ft (4.6 m) by 7 ft (2.1 m), measure the front of the shed first. Place 2 stakes at either side of the 7 ft (2.1 m) measurement. Then measure 15 ft (4.6 m) from both of your stakes and mark both of those spots with 2 more stakes.
-
5Join the stakes together using string. The string makes it easier for you to find out if the measurements of the shed are square later in the process. Use string, fishing line, or twine. Tie the string around 1 stake before moving to the next stake. Tie the string to all 4 stakes, with all of them connected by the string.[5]
- Make sure the string is tightly wrapped to the stakes and that there's no slack in the line.
- Tie the string at the same height on each stake.
-
6Check to make sure that the layout is perfectly square. You can do this by using measuring tape on the stakes and string. Measure from the bottom left corner to the top right corner and note the measurement. Then measure from the top left corner to the bottom right corner.[6]
- If both of these measurements are the same, your layout is square.
-
7Use a shovel to dig a hole the size of the shed. Generally, around half the length of the head of your shovel should be the right depth to dig. If the ground is especially soft, dig the full length of your shovel's head in depth. Use the back of your shoe near the heel to force the shovel into the ground.[7]
- Try to dig neatly inside the stakes.
-
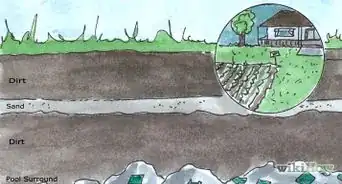
8Remove the topsoil and grass with your shovel from the area. Topsoil is much softer than other types of soil and it could cause problems for your shed if you don't remove it. Topsoil is browner in color than other types of soil. Keep digging the topsoil out of the hole and placing it in a pile on 1 side until you start to notice a lighter colored, more solid soil below it.[8]
- Stop removing the soil when you reach this lighter soil.
-
9Level out the subsoil using a plank and spirit level. Place a long plank into the area. At first, judge where the ground is uneven by looking at the plank. Move the subsoil until the plank looks close to level. Lay your spirit level on top of the plank and keep moving the soil until the spirit level shows that the ground is even.[9]
- Repeat this process across the entire surface of the hole.


Leveling the Soil and Pea Gravel
-
1Fill the hole to 3 in (7.6 cm) below the top with topsoil. Now that the subsoil is level, use your shovel to add the topsoil back into the hole. While the topsoil is softer than the subsoil and can cause problems, you won't need to worry once the subsoil is level.[10]
- You will fill the remaining 3 in (7.6 cm) with pea gravel later.
- If your topsoil contains grass, use your shovel to slice the layer of grass off the topsoil.
-
2Use a rake to break up lumps in the topsoil. The topsoil needs to be even before you add the pea gravel on top of it. Topsoil tends to have rocks and other items embedded in it that can make it hard to even out. Drag your rake across the topsoil, breaking up lumps as you go.[11]
- Throw any rocks out of the area as you rake them up.
-
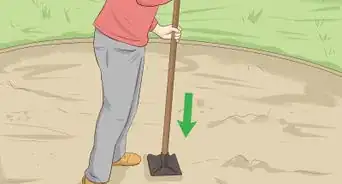
3Compress the soil using a ground tamper. A ground tamper is a heavy device with a flat head. Place it flat on the topsoil and push down on it to compress the soil. You can stand on it to create a downward force. Use the tamper to compress all of the soil in the hole.[12]
- You can also use a vibrating whacker plate or another heavy, flat object that's easy to move.
-
4Level out the topsoil with the plank and spirit level. To level out the topsoil, use the exact same method that you used to level out the subsoil. Place the plank on the topsoil and remove or add topsoil until it looks level. Place the spirit level on the plank and adjust the soil until the spirit level says the plank is level.[13]
- The bubble at the center of the spirit level will be inside the 2 lines when the spirit level is level.
- Lay the plank across the whole area of the hole to level it out.
-
5Fill the hole with your pea gravel and level it. Pea gravel will allow for water to pass into the soil under the shed. Use your shovel to fill the hole with pea gravel. Once the pea gravel is added and the hole is full, level it out using the ground tamper.[14]
- The ground tamper will make the pea gravel level as you compress it.
-
6Place the mason blocks around the 4 outside walls of your covered hole. You can place the sides of the blocks by side or have a small gap between them. Lay the blocks along the sides of the covered hole in a line. These blocks will form the foundation for your shed.
- Push them down to move the pea gravel beneath the blocks.[15]
-
7Lay 4 in (10 cm) by 4 in (10 cm) posts on the blocks and check if they're level. With the blocks laid down, place these wooden posts along the walls of the shed. Make sure that the posts are long enough to cover the length of the wall they're positioned at. Put your spirit level on top of the posts to check if they're level.[16]
- If the posts aren't level, adjust the blocks or pea gravel accordingly. Keep adjusting until all 4 posts are level.
-
8Assemble the shed floor and fasten it to the wooden posts. Once all of your posts are level, you can assemble the shed frame. Follow the instructions that came with the frame to assemble it. If you're making the shed from scratch, it's up to you how you build the frame and shed. If you don't have experience in shed building, get help from a builder or woodworker. When the frame is built, get a friend to help you lay the frame on top of your wooden posts.[17]
- Secure the frame in place by drilling screws through it and into the 4 in (10 cm) by 4 in (10 cm) posts.
- The base and frame of the shed should be perfectly level at this stage. You can build the rest of the shed on top of these foundation parts.


What's the Best Wood to Use to Build A Shed?
Things You'll Need
- 4 wooden stakes
- String, twine, or fishing line
- Hammer
- Drill
- Hardened steel, structural, No.9, 2.5 in (6.4 cm) long screws
- Measuring tape
- Spirit level
- Pencil or marker
- Pea gravel
- Shovel
- Rake
- Long, flat plank of wood
- Ground tamper or vibrating whacker plate
- Mason blocks
- 2 4 in (10 cm) by 4 in (10 cm) posts that are the length of your shed
- 2 4 in (10 cm) by 4 in (10 cm) posts that are the width of your shed


References
- ↑ https://youtu.be/wTtpQr8A89g?t=42s
- ↑ Benjamin Hansen. Licensed Landscape Contractor. Expert Interview. 6 October 2020.
- ↑ https://www.finehomebuilding.com/2003/04/01/a-firm-foundation-for-a-backyard-shed
- ↑ https://www.finehomebuilding.com/2003/04/01/a-firm-foundation-for-a-backyard-shed
- ↑ https://outdoorlivingtoday.com/level-shed-floor-properly/
- ↑ https://youtu.be/wTtpQr8A89g?t=1m44s
- ↑ https://outdoorlivingtoday.com/level-shed-floor-properly/
- ↑ https://www.finehomebuilding.com/2003/04/01/a-firm-foundation-for-a-backyard-shed
- ↑ https://outdoorlivingtoday.com/level-shed-floor-properly/
- ↑ https://outdoorlivingtoday.com/level-shed-floor-properly/
- ↑ https://outdoorlivingtoday.com/level-shed-floor-properly/
- ↑ https://www.finehomebuilding.com/2003/04/01/a-firm-foundation-for-a-backyard-shed
- ↑ https://www.finehomebuilding.com/2003/04/01/a-firm-foundation-for-a-backyard-shed
- ↑ https://youtu.be/wTtpQr8A89g?t=2m49s
- ↑ https://youtu.be/wTtpQr8A89g?t=2m49s
- ↑ https://youtu.be/wTtpQr8A89g?t=3m8s
- ↑ https://youtu.be/wTtpQr8A89g?t=3m46s
About This Article

It's important that the ground you're putting a shed on is level, or you could run into problems down the road. Fortunately, you can level an area within a few hours using the right tools. You'll need 4 by 4-inch posts, pea gravel, mason blocks, and topsoil. Once you have all your materials, you'll need to dig a hole the size of your shed, level it with a plank and spirit level, and fill it in with the topsoil and pea gravel. After that, just build a foundation on the level surface using the mason blocks and the 4 by 4-inch posts. The floor of your shed can go right on top of that foundation. To learn how to calculate what size posts and how many mason blocks you'll need, read on!