This article was co-authored by wikiHow Staff. Our trained team of editors and researchers validate articles for accuracy and comprehensiveness. wikiHow's Content Management Team carefully monitors the work from our editorial staff to ensure that each article is backed by trusted research and meets our high quality standards.
The wikiHow Video Team also followed the article's instructions and verified that they work.
This article has been viewed 258,081 times.
Learn more...
Looking for a way to make an unconventional floral arrangement? Are you simply accenting a handbag or creating an entire bouquet? Designing flowers from burlap material, or hessian fabric, can add interest and texture to any arrangement. Plus, you can use these flowers for clothing, accessories, or to decorate. The possibilities are endless!
Steps
Making a Stem Rose
-
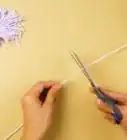
1Cut a long strip of burlap. The wider you cut the strip the larger your rose will be. The same reasoning goes for how long you cut the strip. Use burlap ribbon or cut material around two inches wide and 45 inches long, or about two and a half centimeters by 11 and a half decimeters. Don’t follow the grain of the fabric for a slightly frayed look.
-
2Wrap one end around a wire stem. Take one end of your burlap strip and wrap the entire two inches around a craft wire. You can find wire that is used to make flowers at your local craft store or order it online.[1]Advertisement
-
3Secure the end with hot glue. Place a line of hot glue on the burlap next to the wire that is not yet rolled between it. Fold the wire and rolled piece of burlap over once to lay it over the line of hot glue. Press down lightly and let the glue cool down.[2]
-
4Wrap and glue several more times. Repeat the previous step about three more times, until the roll is about a half-inch thick, or one and a quarter centimeters. This will be the middle of your rose.
-
5Fold the fabric the opposite way. Hold the burlap strip about two inches from the wire roll. Fold the two inches, or 2.54 centimeters, of fabric over and away from the roll. Make sure you pinch the fold at the bottom of the flower base. This is your first rose petal.
-
6Make another fold around the stem. As you pinch the first fold with one hand, slightly turn the stem as you make another fold about a half-inch, or one and a quarter centimeters, from the first with your opposite hand. Gather this second petal at the base, along with the other one.
-
7Glue the folds together. Place a drop or two of hot glue between the folds towards the flower base to secure them together. Be sure to hold the folds together as the glue dries and cools down.
-
8Continue to fold and glue petals. Repeat steps five, six and seven several more times. Remember to hold the fabric at the base of the flower, until you secure it with glue. Continue to turn the wire as you work around the entire stem.
-
9Stop folding when you have six to eight inches of loose burlap. This length is also about one and a half to two decimeters. You should have what looks like a rose at this point, but keep some fabric loose in order to finish it. Make sure you secure the last folds with hot glue.
-
10Wrap the rest of the burlap around the base. To really make your rose stem look finished, wrap the rest of it around the base of the rose so that it’s just cupping it. You can wrap all the way around the base and secure it with glue, or use the end to create one last petal.

Making a Flower Accent
-
1Match the burlap with what you’re using it on. You may want to reconsider placing a burlap flower on a silk blouse. Hold a piece of burlap up to the material you want to use it on and make sure they match.
-
2Size the flowers correctly. Sometimes bigger isn’t always better so make sure you are sizing your flowers appropriately for your project. Fabric that is one and a half inches wide by 30 inches long, or about four centimeters by seven and a half decimeters, is a good size to start with. The longer strips of burlap you use the more petals you’ll have.[3]
-
3Fold a burlap strip in half lengthwise. Lay your strip of burlap flat on a table and fold it in half lengthwise. If you are working with a strip that’s one and a half inches (almost four centimeters) wide, it should be three-quarters of an inch (a little less than two centimeters) wide after you fold it.
-
4Roll one end inward several times. Pick up one end of the folded strip and begin rolling it inward. Continue rolling several more times so you have approximately two or three center layers This will create the center of your burlap flower.
-
5Twist the burlap away from the center. As you hold the rolled center with one hand, start folding and twisting the burlap down and around the centerpiece. Do not keep the rest of the burlap folded in half anymore. Continue to roll and twist the burlap around the center and restart if you need to.
-
6Apply hot glue to the end of the burlap and twist underneath the flower. Hold in place for several minutes or until dried so your flower doesn’t unravel once you start working on the base.
-
7Glue a felt center on the flower base. Place hot glue on the bottom of the flower and along the sides to ensure it is fully contained. Cover the bottom with a felt center and hold both pieces together, until the hot glue is dry and set.


Making Frayed Flowers
-
1Cut a strip of burlap. Make sure you cut along the same direction as the fibers. The width and length of the strip you cut will determine how big your end result will be. One and a half to three inches, or 3.81 to 7.62 centimeters, is good for the width. Choose between 15 to 30 inches, or 3.81 to 7.62 decimeters, for the length.
-
2Place a strip of hot glue on one end. Secure one end of your flower by placing a strip of glue down the length of one end along the edge. Fold the edge over one time and lightly press down to set it in place.
-
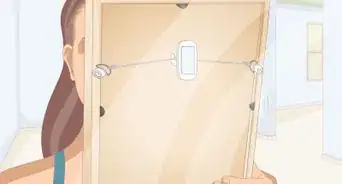
3Pull a string from the other end. Find one string on the opposite end of the strip between the middle and bottom part of the width. Pull the string away from the rest of the strip. You should end up with a strip of bunched, gathered burlap.[4]
-
4Glue both ends together. Take each end of the bunched strip of burlap and circle them around to connect them. Glue the ends together with a dollop of hot glue.
-
5Trim loose strings. You will likely have lots of frayed ends after you bunch and glue your burlap together. Even though you’re going for the frayed look on this one, trim any ends that look especially out of place.
-
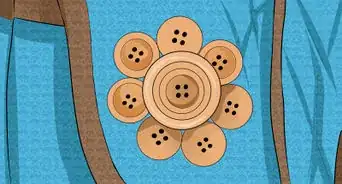
6Add a button or stone to the middle. To add a decorative touch and make your flower look finished, add a rhinestone or button to the middle. You can also use another piece of fabric or anything you can think of to make your flower daisy-like.
Community Q&A
-
QuestionWhat are step by step instructions for gluing and twisting the burlap to make a rose and eventually a bouquet?
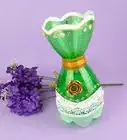
 Chantelle HegneyCommunity AnswerFirst, get some large foam balls. Glue and cover them with burlap, and leave a little foam space for the stems. Get some extra burlap and cut it into spirals. Take the spirals and wrap them around the balls, gluing the spirals. Let them dry. Take some green painted skewers and push the burlap roses into the skewers. Put the roses into a vase and that is it!
Things You'll Need
- Scissors
- Hot glue gun
- Hot glue sticks
- Burlap
- Felt rounds
- Floral wire

References
- ↑ http://www.hobbycraft.co.uk/decor-and-hobbies/home-decor/flower-arranging-tools-and-accessories
- ↑ http://www.rusticsunshine.com/how-to-make-a-burlap-flower-bouquet/
- ↑ http://www.craftaholicsanonymous.net/burlap-roses-tutorial
- ↑ http://thefrugalhomemaker.com/2013/04/10/no-sew-burlap-rosette-tutorial-diy-fabric-flower-tutorial/
About This Article

To make a burlap flower accent, start by folding a burlap strip in half lengthwise. Next, roll 1 end inward several times to create the center of your flower. Then, holding the rolled center with 1 hand, start folding and twisting the burlap down and around the centerpiece. Once the flower accent is complete, put some hot glue on the end of the burlap and twist it under the flower to secure it. Finally, glue a felt center on the base to finish your flower accent. To learn how to make frayed burlap flowers, keep reading!