This article was co-authored by wikiHow Staff. Our trained team of editors and researchers validate articles for accuracy and comprehensiveness. wikiHow's Content Management Team carefully monitors the work from our editorial staff to ensure that each article is backed by trusted research and meets our high quality standards.
The wikiHow Video Team also followed the article's instructions and verified that they work.
This article has been viewed 103,346 times.
Learn more...
Homemade goat milk soap can be one of the most luxurious soap you'll ever use. While you can always use a melt-and-pour soap base and call it a day, making it from scratch will give you full control over what goes into it. You have to pay attention to the temperature while making the soap, however; if you don't, then the soap may turn out brown, which isn't aesthetically appealing.
Ingredients
- 3.5 ounces (100 g) of goat milk
- 3.5 ounces (100 g) of water
- 3.8 ounces (109 g) of sodium hydroxide
- 7 ounces (200 g) of refined coconut oil
- 5 ounces (150 g) of shea butter
- 14 ounces (400 g) of olive oil
- 1.76 ounces (50 g) of castor oil
- 8 drops grapefruit seed extract
Steps
Preparing the Lye Base
-
1Freeze the goat milk in an ice cube tray. Measure out 3.5 ounces (100 g) of goat milk, and pour it into an ice cube tray. Set the tray into the freezer, and leave it there until the milk freezes. This could take several hours to overnight.[1]
- The larger the ice cubes are, the longer they will take to freeze.
- Once frozen, the fat may float to the top of the milk and appear as a dry, crusty layer. This is normal.
-
2Put on safety gear and find a well-ventilated area to work in. This is very important. Lye is caustic and can cause serious burns if it gets on your skin. Put on a shirt with long sleeves as well as a pair of safety goggles. Pull on a pair of rubber work gloves. Find a well-ventilated place to work in, preferably outside.[2]
- You can also work in a kitchen sink as long as you keep a window open.
Advertisement -
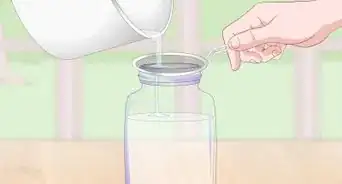
3Pour the water into a heatproof jug, then add the sodium hydroxide. Use a digital kitchen scale to weigh 3.5 ounces (100 g) of water. Pour the water into a heatproof jug. Use the scale to weigh 3.8 ounces (109 g) of sodium hydroxide, then slowly stir it into the water with a stainless-steel spoon.[3]
- Never add water to sodium hydroxide. Always add sodium hydroxide to water.
- Make sure that you get sodium hydroxide and not potassium hydroxide. They are 2 different types of lye and will give you very different results.[4]
- The jug must be heatproof. The water will get very hot once you add the sodium hydroxide into it.
-
4Set the lye solution aside so that it can cool to 100 °F (38 °C). Don't let it cool too much, however; it still needs to be warm enough for it to melt the goat milk ice cubes. How long it takes for the water to cool will depend on the temperature outside.[5]
- Use a digital thermometer to gauge the temperature. You may be able to find it online in a store that specializes in soap-making supplies.
- Lye heats up by itself when you add it to liquid. Over time, however, it will cool back down. This can take a few minutes.
-
5Add the ice cubes to the lye-water and let it cool to room temperature. Pop the goat milk ice cubes out of the tray, then gently slip them into the water. Wait for the ice cubes to melt and the solution to cool down to room temperature, or somewhere between 68 and 72 °F (20 and 22 °C).[6]
- Get started on heating the solid oils while you wait for the ice cubes to melt and the lye-water to cool.
- The solution may turn brassy and smell like ammonia, which is normal. Avoid breathing the fumes in, however.[7]
- Don’t plop the ice cubes in, or they might splash. The lye is still caustic and dangerous at this point.


Adding the Oils
-
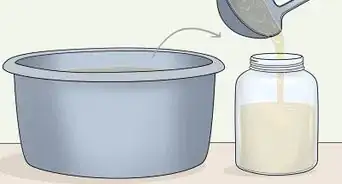
1Melt the solid oils in a stainless steel saucepan over low heat. Use your digital scale once more to measure out 7 ounces (200 g) of refined coconut oil and 5 ounces (150 g) of shea butter. Place both into a stainless steel saucepan. Turn the heat up to “low,” and wait for the oils to melt, stirring them often.[8]
- Don't turn the heat up to make them melt faster; they will melt quickly enough over low heat. If you turn the heat up too high, the oil will get too hot.
- You can use just coconut oil instead of the coconut oil-shea butter combo. Use a soap-making calculator to find out exactly how much coconut oil you should use.[9]
- You can take your safety gear off for this step, but you will need to put it back on later once you start working with the lye again.
-
2Add the liquid oils into the melted solid oils. Measure out 14 ounces (400 g) of olive oil and 1.76 ounces (50 g) of castor oil using your kitchen scale. Add them to the melted oils in the saucepan, then give the mixture a stir.[10]
- You can use just olive oil. Again, use a soap-making calculator to find out how much you should use.[11]
- If you can find it, use olive oil pomace. It’ll give you a lighter-colored soap in the end, which is generally more aesthetically pleasing. Otherwise, stick with virgin olive oil.
-
3Take the pot off the stove and stir the oil until it's 90 °F (32 °C). This should not take very long since the liquid oils are much cooler than the heated, solid oils. The mixture may thicken a little, but it shouldn’t turn solid again.[12]
- Use your thermometer to keep track of the temperature.
-
4Pour the lye solution into the oil, then stir it in. Put your safety gear back on if you took it off earlier. Slowly pour the lye solution into the oil mixture, then give it a stir with a spoon or a stick blender. If you’re using a stick blender, do not turn it on just yet.[13]
-
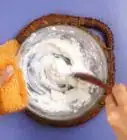
5Use a stick blender to stir and blend the soap. Set the blender into the pot so that it touches the bottom and stir the solution without turning it on. Next, raise the blender towards the middle of the pot, and pulse it a few times.
- Be sure to use a stick blender. Don't use a hand mixer. It will agitate the mixture too much and result in splashes.
-
6Repeat stirring and blending process for about 10 minutes. The mixture is ready when it reaches the “trace” stage. This is where you can drizzle some soap on top of itself and it leaves behind an impression.[14] It will look a little like warm custard.
- Your soap may trace sooner than 10 minutes, especially if you used the olive oil and castor oil combo.
-
7Add 8 drops of grapefruit seed extract, then give the mixture a stir. This acts as an anti-oxidant, which is beneficial for your skin. It also helps keep the milk and oils from going rancid. Note that this won't preserve the soap.[15]
- You can also add any essential oils at this point. Refer to a soap-making calculator to find out how much you should use.
- You can leave this out if you want to, especially if you used just olive oil (as opposed to the olive oil-castor oil combo. Olive oil preserves really well.[16]


Pouring, Cutting, and Curing the Soap
-
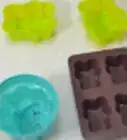
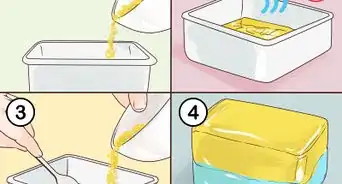
1Pour the soap into your desired mold. You can use just about anything as a soap mold, from baking pans to actual soap molds.[17] To make demolding easier, line your mold with plastic, parchment paper, or freezer paper.[18]
- If you don’t have plastic, parchment paper, or freezer paper, try a spray-on mold release instead. Avoid using wax paper, however, as it tears too easily.
- If your mold is made from silicone, you don’t need to line it with anything. Silicone is easy to demold because of how smooth it is.
-
2Cover the soap with plastic wrap and refrigerate it for 24 hours. Make sure that you press the plastic wrap directly against the top of the soap. The lye will still be caustic at this point, so be sure to wear gloves for this step.[19]
- Refrigerating the soap will help it turn a light color. If you prefer a darker colored soap, leave it out on the counter for 24 hours.[20]
-
3Take the soap out of the fridge and leave it alone for 3 to 4 days. You should do this even if you let the soap sit on the counter for 24 hours. In either case, leave the soap in its mold; do not take it out. This will allow the soap to harden up further.[21]
- If the soap starts to develop cracks, it's getting too warm. Move it to a cooler location.[22]
- If you demold the soap too soon, it may break or crack because of how soft it is.
-
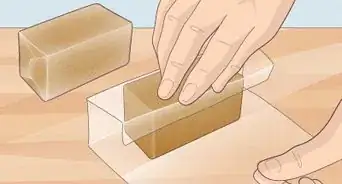
4Take the soap out of the mold. How you do this depends on what type of mold you are using. In most cases, you should be able to just turn the mold upside-down and slide the soap out, like you would a cake. In some cases, however, you may have to take the entire mold apart.
- Be sure to remove the plastic wrap first!
- You can touch the soap with bare hands at this stage, but it's not ready to use.
-
5Cut the soap into 1 in (2.5 cm) thick bars. Use a special soap cutting blade for this or a non-serrated knife. If you poured the soap into individual molds, then you don't need to cut them further; they're already the perfect size.
-
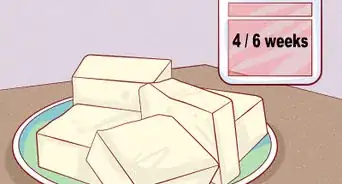
6Leave the bars in a well-ventilated area out of sunlight for 3 to 4 weeks. Arrange the bars on a wire cooling rack some place cool and dry with good airflow. After about 1 or 2 weeks, flip the bars over, and let them finish curing for another week or 2.[23]
- If you used just olive oil, instead of the olive oil-castor oil combo, let the soap cure for 4 to 6 weeks to instead.[24]
- Once the bars of soap have finished curing, they are ready to use! Wrap them in plastic and sell them or give them away to family and friends.


Community Q&A
-
QuestionHow much goat milk, oils, essential oils, and lye do I need?
 Community AnswerYou need 1/2 cup of goat milk, 1 teaspoon of olive oil and a cup of lye.
 -
QuestionHow do I keep the soap from sticking to the mold?
 Community AnswerPortion it inside a dish or plastic container, and for best results, let it rise before you refrigerate.
 -
QuestionMy soap is crumbling when I cut it. Can I remelt it and save the batch?
 Community AnswerYes, you can.
Warnings
- Be careful when handling the lye. It is caustic and can cause severe burns. Keep young children and animals out of the room while you're working with it.⧼thumbs_response⧽
Things You'll Need
- Safety goggles
- Rubber work gloves
- Long-sleeved shirt
- Digital kitchen scale
- Digital thermometer
- Heatproof jug
- Stainless steel spoon
- Stainless steel saucepan
- Plastic wrap
- Stick blender or immersion blender
- Soap-making molds


References
- ↑ https://lovelygreens.com/how-to-make-natural-goat-milk-soap/
- ↑ https://thenerdyfarmwife.com/how-to-make-soap-with-milk/
- ↑ https://lovelygreens.com/how-to-make-natural-goat-milk-soap/
- ↑ https://thenerdyfarmwife.com/how-to-make-soap-with-milk/
- ↑ https://lovelygreens.com/how-to-make-natural-goat-milk-soap/
- ↑ https://lovelygreens.com/how-to-make-natural-goat-milk-soap/
- ↑ https://thenerdyfarmwife.com/how-to-make-goats-milk-soap-from-grocery-store-items/
- ↑ https://lovelygreens.com/how-to-make-natural-goat-milk-soap/
- ↑ https://thenerdyfarmwife.com/how-to-make-goats-milk-soap-from-grocery-store-items/
- ↑ https://lovelygreens.com/how-to-make-natural-goat-milk-soap/
- ↑ https://thenerdyfarmwife.com/how-to-make-goats-milk-soap-from-grocery-store-items/
- ↑ https://lovelygreens.com/how-to-make-natural-goat-milk-soap/
- ↑ https://lovelygreens.com/how-to-make-natural-goat-milk-soap/
- ↑ https://thenerdyfarmwife.com/how-to-make-goats-milk-soap-from-grocery-store-items/
- ↑ https://lovelygreens.com/how-to-make-natural-goat-milk-soap/
- ↑ https://thenerdyfarmwife.com/how-to-make-goats-milk-soap-from-grocery-store-items/
- ↑ https://lovelygreens.com/how-to-make-natural-goat-milk-soap/
- ↑ https://thenerdyfarmwife.com/how-to-make-goats-milk-soap-from-grocery-store-items/
- ↑ https://lovelygreens.com/how-to-make-natural-goat-milk-soap/
- ↑ https://thenerdyfarmwife.com/how-to-make-goats-milk-soap-from-grocery-store-items/
- ↑ https://lovelygreens.com/how-to-make-natural-goat-milk-soap/
- ↑ https://thenerdyfarmwife.com/how-to-make-goats-milk-soap-from-grocery-store-items/
- ↑ https://lovelygreens.com/how-to-make-natural-goat-milk-soap/
- ↑ https://thenerdyfarmwife.com/how-to-make-goats-milk-soap-from-grocery-store-items/
- ↑ https://thenerdyfarmwife.com/how-to-make-soap-with-milk/
- ↑ https://thenerdyfarmwife.com/how-to-make-goats-milk-soap-from-grocery-store-items/
- ↑ https://thenerdyfarmwife.com/how-to-make-goats-milk-soap-from-grocery-store-items/
About This Article

To make goat milk soap, start by pouring water into a heatproof container, followed by sodium hydroxide. Once the solution has cooled to 100° Fahrenheit, add 3.5 ounces of frozen goat milk and let the mixture cool to room temperature. Next, melt coconut oil and shea butter over low heat before adding olive oil and castor oil. Then, remove the pan from the heat, add the lye solution, and use a stick blender to blend the soap for 10 minutes. Finally, pour it into a mold and let it sit for 4 days before cutting it into bars. For tips on how to add essential oils to your soap, read on!