wikiHow is a “wiki,” similar to Wikipedia, which means that many of our articles are co-written by multiple authors. To create this article, 10 people, some anonymous, worked to edit and improve it over time.
This article has been viewed 41,301 times.
Learn more...
Modular origami is believed to have evolved from kusudama, an ancient Japanese art that used folded paper to create vessels for holding incense and potpourri. Unlike kusudama, which strung units together to create larger structures, modular origami uses only folds to join components together, using no glue, tape, or string. When joined together, the individual modules of modular origami make a larger, complex origami structure that can be quite beautiful.[1]
Steps
Making an Origami Menko Box
-
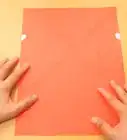
1Begin with a square piece of origami paper (you’ll need two in total). An origami menko is one of the quintessential modular origami pieces and is great for illustrating the principles of how modular origami works. Fold the first piece of paper into thirds like you would a letter going into an envelope:[2]
- Beginning with the backside of the paper facing up on a flat surface, fold the top third of the paper down to create a horizontal fold. Crease well.
- Fold the resulting shape in half, creating a horizontal fold. Crease well.
-
2Fold the corners. Fold the right bottom corner up so the bottom tip meets the top of the paper, making a diagonal crease. Crease well.
- Fold the left top corner down to meet the bottom of the paper, making a diagonal crease. Crease well.
- You’ll have what will look like a square in the middle of the paper, flanked on each side by triangles (which will be facing opposite ways--one facing the front, one facing the back).[3]
Advertisement -
3Repeat the previous steps with the second piece of paper. You should then have two identically folded pieces of paper.
- Now you can begin to join them together to form an origami menko.
-
4Place one piece over the other. Lay the first piece so it’s oriented horizontally with the triangle folds facing up towards you.
- Lay the second piece over the first, but oriented vertically with the triangle folds facing up towards you.
-
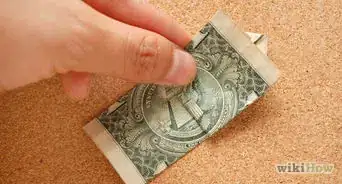
5Fold the right flap of the first piece over the second. Grasp the right flap of the first piece and fold it vertically along the right edge of the second piece. Crease well.
- The tip of the flap of the first piece will touch the top left corner of the square in the center of the second piece.
-
6Fold the top flap of the second piece down. Grasp the top flap of the second piece and fold it down horizontally along the top edge of the first piece. Crease well.
- The tip of the flap of the second piece will touch the bottom-left corner of the center square.
-
7Fold the left flap of the first piece inward. Grasp the right flap of the second piece and fold it inward on the vertical axis.
- The tip of the flap of the first piece should touch the bottom-right corner of the center square.
-
8Tuck and insert the tip of the final flap into the pocket formed by the fold of the first flap. Note that rather than fold the final flap as you did the previous ones, you’ll be tucking and inserting it.
- The result should look like a folded square composed of four triangles.
Making Modular 5-Point Star
-
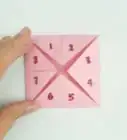
1Fold the first piece of paper along its vertical and horizontal axes. A modular 5-point star begins with a square piece of cardstock origami paper and results in a 5-pointed, partially raised star.[4]
- Begin with the paper face-down on a flat surface. Fold the paper in half vertically. Crease well and unfold.
- Still keeping the paper face-down, fold the paper in half horizontally. Crease well and unfold.
-
2Fold the top right corner. Fold down the top right corner so that the tip touches the center of the paper where the vertical and horizontal creases meet.
- Crease well and leave folded.
-
3Fold the bottom left corner. Fold the bottom left corner so that the tip touches the center of the paper where the vertical and horizontal creases meet.
- Crease well and leave folded.
-
4Fold the top left corner. Fold the top left corner so that the tip touches the center of the paper where the vertical and horizontal creases meet.
- Crease well and unfold.
-
5Refold the paper along the horizontal axis. Fold the paper over along the pre-existing horizontal crease.
- Re-crease and leave folded.
-
6Fold the right-most triangular panel backward. Grasp the right-most triangular panel (it should be the only panel with the backside facing toward you).
- Fold it backwards (mountain fold) to form a diagonal crease.
- Crease well and unfold.
-
7Fold along the vertical axis. Fold the paper in half along the vertical axis.
- Crease well and unfold.
-
8Repeat previous steps. You’ve completed your first modular unit; repeat the previous steps with four additional squares of paper.
- You should ultimately have five units.
- Each modular unit will have two partial pockets, one on the front and one on the back of the unit, each ending with a paper tip.
-
9Slide the paper tip of one unit into the pocket of a second. Pick up two units. Slide one of the paper tips from the first into one of the pockets of the second.
- The result will form an “L” shape.
-
10Slide the tip of the third unit into the pocket of the “L” shape. Pick up a third unit and slide its tip into the pocket at the tip of the “L” shape.
- The result should look like a square.
-
11Slide the tip of the fourth unit into the pocket of the square shape. Pick up the fourth unit. Slide the tip of the fourth unit into the pocket of the square shape.
- You can identify the pocket by its triangle of backside paper.
-
12Slide the tip of the fifth unit into the exposed pocket on the left. Simultaneously, slide the tip of the fourth unit into the pocket of the fifth unit.
- Then, slide the tip of the first unit into the pocket on the other end of the fifth unit. Simultaneously, slide the remaining tip of the fifth unit into the pocket of the first unit.
- The result will form a five-pointed star.
Making a Modular Magic Circle
-
1Begin with a square piece of origami paper. This magic circle is comprised of a series of modular pieces that, when linked together, can be inverted to form a new shape.[5]
- Fold the paper in half vertically and crease well. Unfold.
- Fold in half horizontally and crease well. Unfold.
-
2Turn the paper over. Fold the paper along both diagonals.
- Fold the upper right corner down so it reaches the lower left corner. Crease well and unfold.
- Fold the upper left corner down so it reaches the lower right corner. Crease well and unfold.
-
3Fold the paper inward to form a triangle. Using the pre-existing creases, push the right and left side horizontal creases inward towards one another.[6]
- Push the top of the paper downward. The paper will now resemble a triangle.
-
4Fold the right and left edges in along the center crease. With the tip of the triangle pointing away from you, fold the left edge down so it lays along the center crease. Crease well.
- Fold the right edge down so it lays along the center crease. Crease well.
-
5Turn the paper over and repeat on the other side. With the tip of the triangle pointing away from you, fold the left edge down so it lays along the center crease. Crease well.
- Fold the right edge down so it lays along the center crease. Crease well.
- You’ll have a four-pointed shape resembling a diamond; this is your first module piece.
-
6Repeat to create seven more modules. Repeat each of the steps above with seven more pieces of paper.
- When finished you should have eight modules total.
-
7Insert the tips of one module into the pocket of another. To join the modules, pick up one and hold it in your left hand.
- Pick up a second and hold it in your right hand.
- Orient the two pieces so that the single points of each are facing away from each other.
- Slide the two top tips of the right-hand piece into the two top pockets formed in the other.
- Fold the two joined pieces so that their top single points rest directly on top of each other like a mirror image.
-
8Repeat with each module. Repeat the previous step for each of the remaining modules.
- Insert the tips of each new piece into the pockets of an already joined piece and fold both pieces inward so they face each other like mirror images.
-
9Join the first and last modules. To complete the circle, insert the tips of the first module into the pockets of the last module in the chain.
- Fold the pieces inward so they face each other like mirror images.
-
10Play with your magic circle. You can now play with inverting your magic circle by grasping the inner edges and pulling them gently outward until the circle inverts to form a new shape.
- You can repeat the inversion to return to the previous shape.
Community Q&A
-
QuestionMy modules keep falling apart. What should I do?
 Community AnswerIf you don't want to use paper glue, make the folds as crisply and precisely as you can.
 -
QuestionCan I use more than 8 pieces?
 T. ChinsenTop AnswererModular origami gives you the opportunity to test out how many units will make an optimum shape. Most units will limit the shape and number of units due to the angles in the single unit. For this article, you can use more than the 8 units.
 -
QuestionWhy are there so many different kinds of origami in the world?
 Community AnswerOrigami is an art form, so it is constantly developing to include more intricate and special techniques.
Things You’ll Need
Origami Menko
- 2 pieces of square origami paper
Five-Pointed Star
- 5 pieces of square cardstock origami paper
Magic Circle
- 8 pieces of square origami paper

References
- ↑ http://www.origami-instructions.com/modular-origami-instructions.html
- ↑ http://artplatter.com/2012/06/origami-menko-folding-instructions/
- ↑ http://artplatter.com/2012/06/origami-menko-folding-instructions/
- ↑ http://www.origami-instructions.com/origami-modular-5-pointed-star.html
- ↑ https://www.youtube.com/watch?v=cb0ICsjkl14
- ↑ https://www.youtube.com/watch?v=cb0ICsjkl14
About This Article
To make a modular origami menko box, you'll need to use 2 pieces of origami paper to create a folded square composed of 4 triangles. Start by folding a square piece of paper into thirds before folding in the corners to make a trapezoid. Then, repeat the process with another piece of paper and lay one shape on top of the other. Next, fold the flaps toward the center, working counter-clockwise. When you get to the final flap, tuck it into the pocket you made when you folded the first flap so that the final shape is a square. To learn how to make a 5-point star using modular origami, read on!